|
|
Post by scanrail on Nov 3, 2019 16:51:25 GMT -5
Hi David,
Thanks! No need to hurry, because after a number of orders from Germany I ran out of empty circuit boards, so I have to order them again from my local manufacturer (I will do this in any case).
Regards,
Alex
|
|
|
|
Post by scanrail on Nov 2, 2019 22:18:55 GMT -5
Hello David, It's a pity that these threads from German forum are not visible to unregistered users, unfortunately I can do nothing with this. And I read German very little too and chat on mentioned forum using on-the-fly translation to English in Google Chrome. However, I post there a lot of info in English. First two links lead to my own threads about using these buffer PCB's in combination with DCC decoders. In a couple of words, the effect is excellent and very pronounced, and many decoders work totally differently when buffered this way. I don't think it makes a big sense to copy all these long-reads here, so I post just a few pictures: Using type B buffer in Rail Zeppelin (Marklin 88761) in combination with DCC decoder CT Elektronik DCX77z: 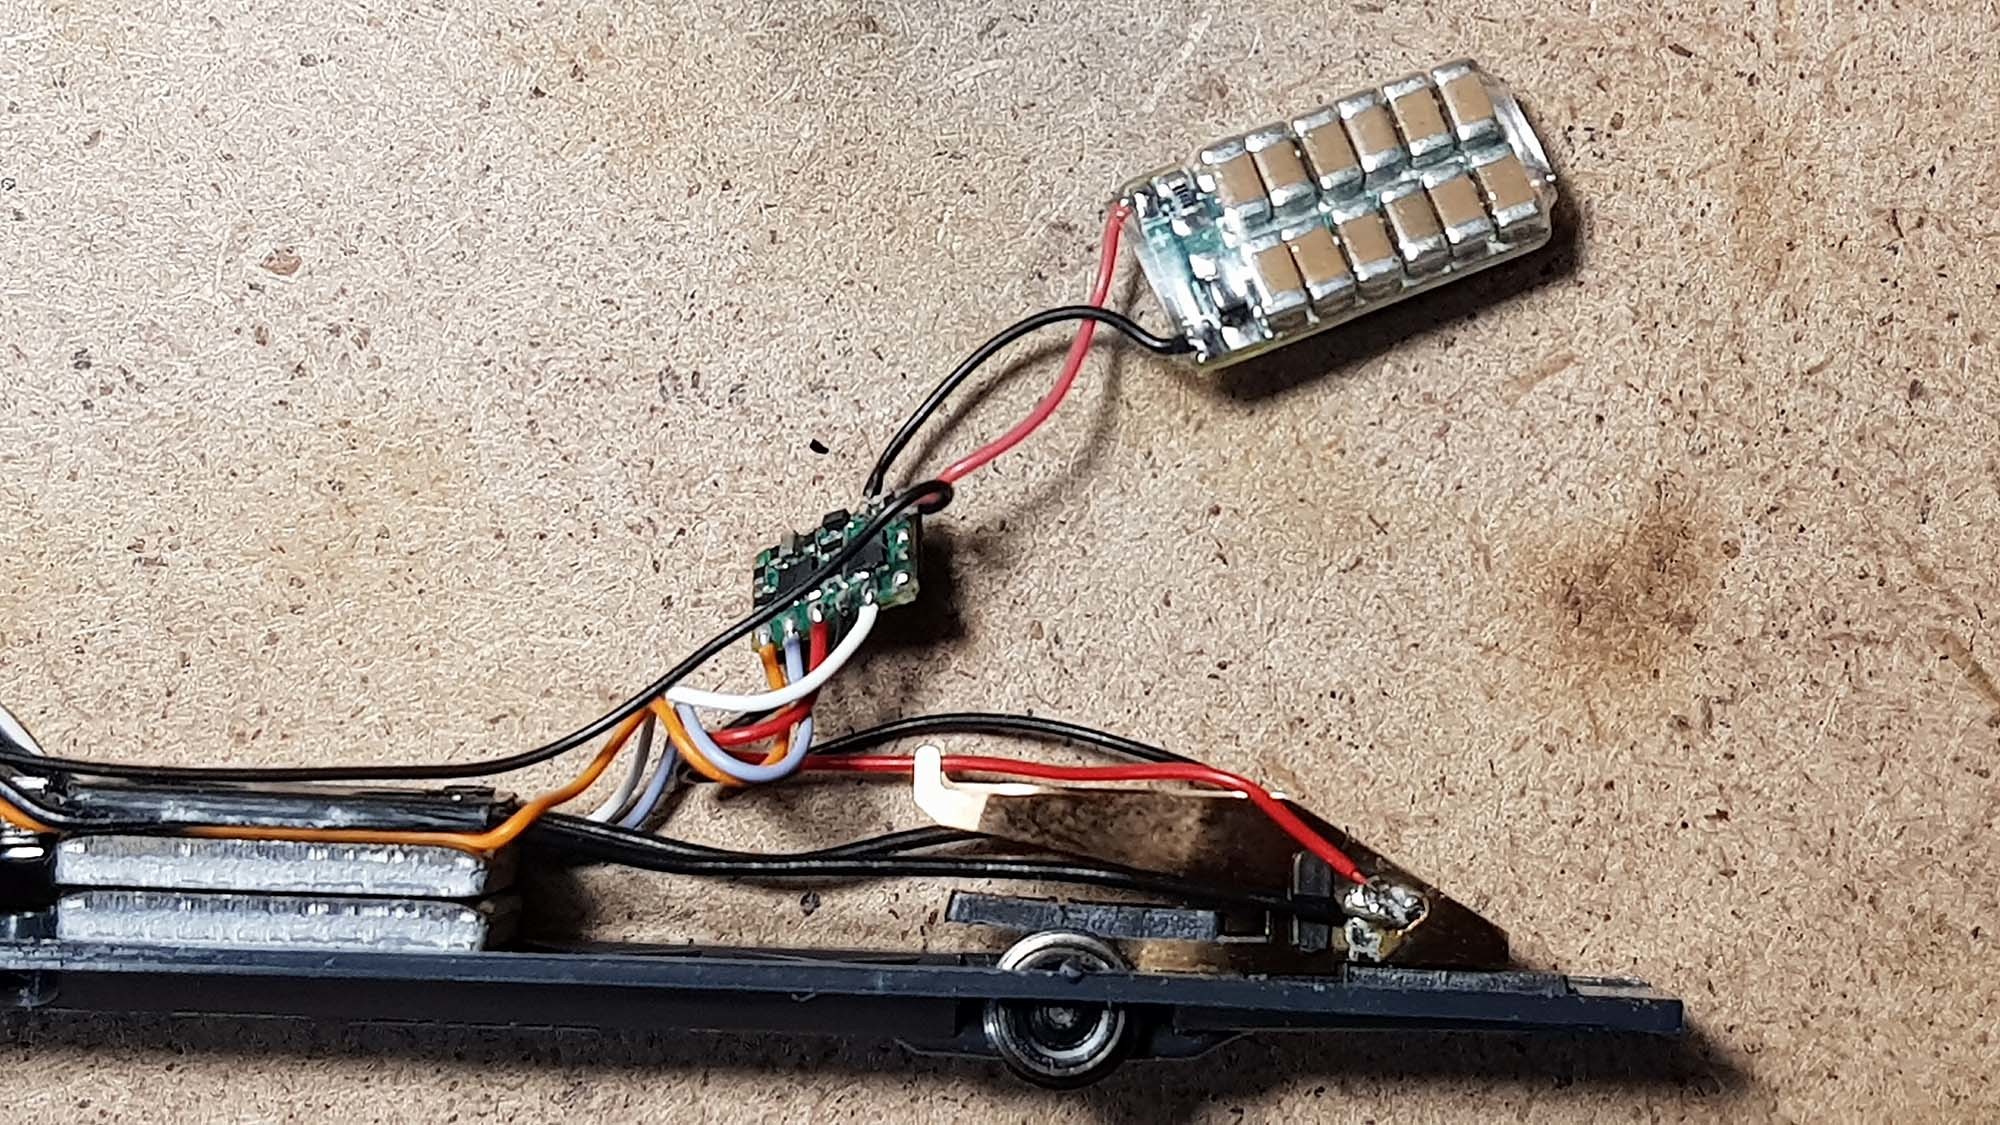 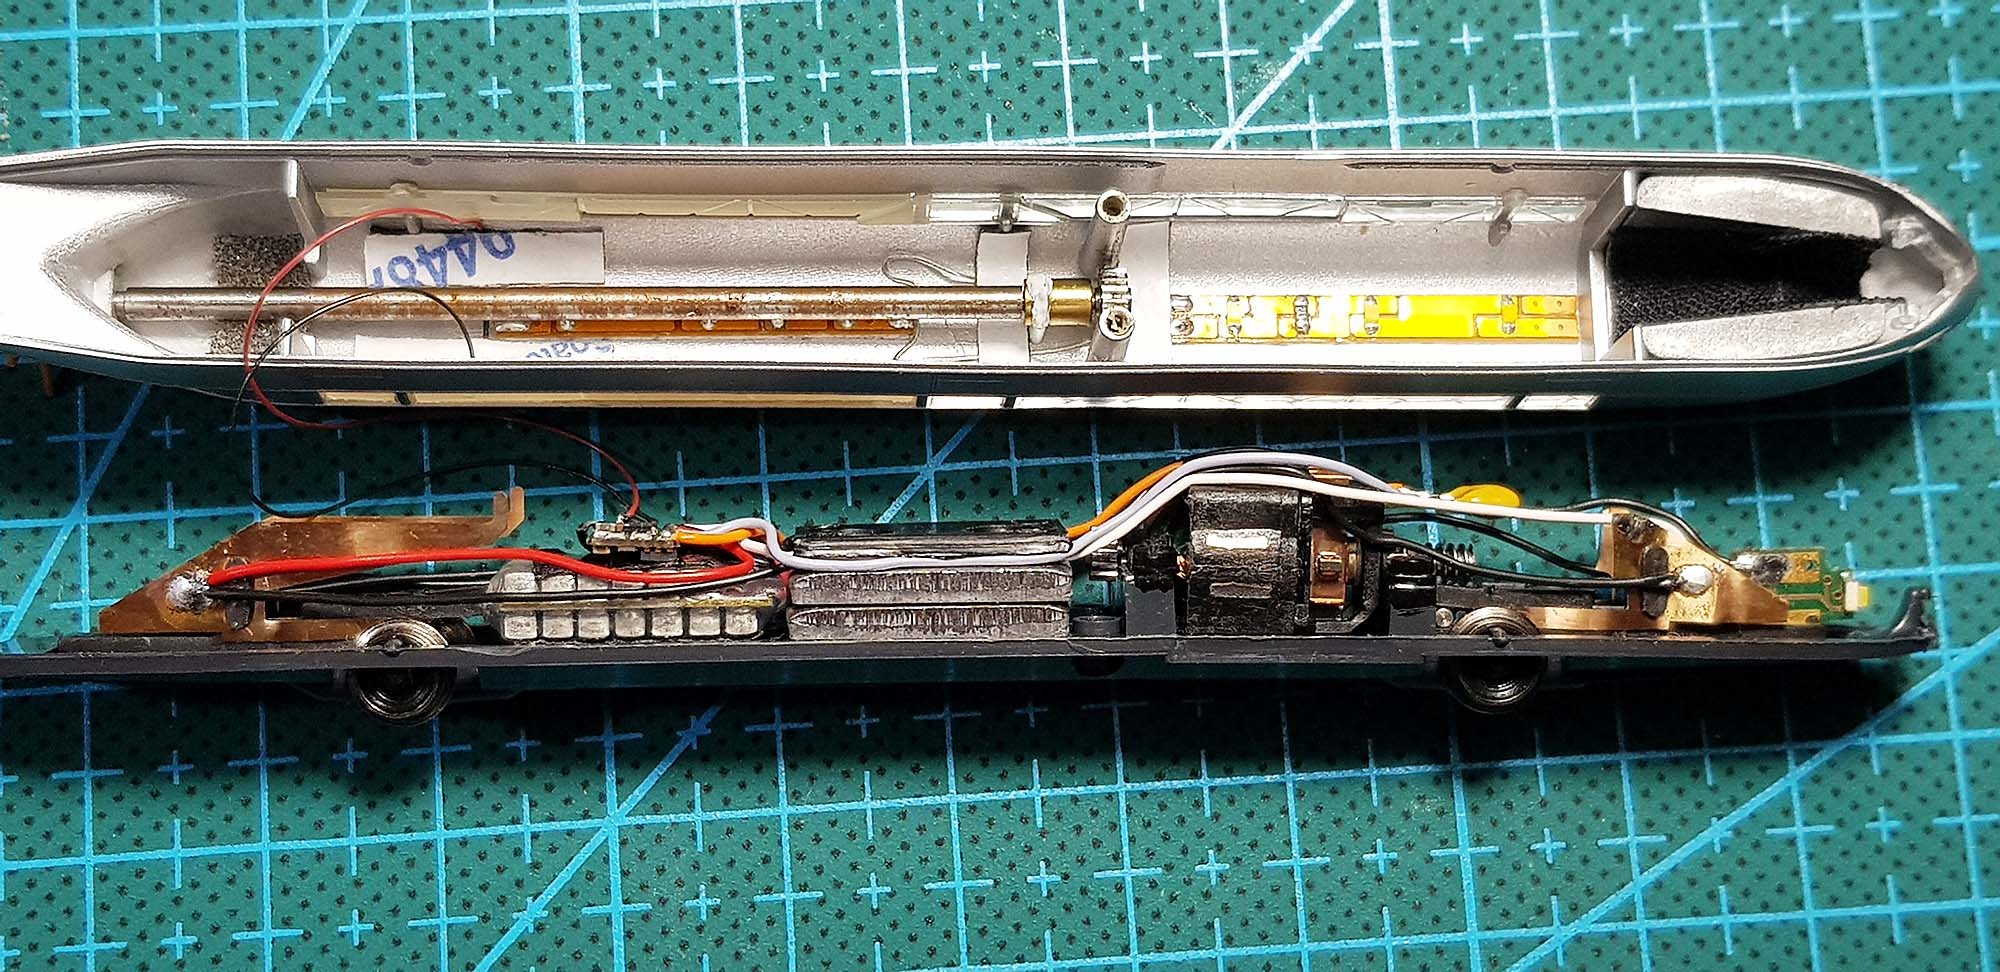 Using type C buffer in German Class 52 steam locomotive (Marklin 88830) in combination with multiprotocol sound decoder Doehler & Haass SD10A: 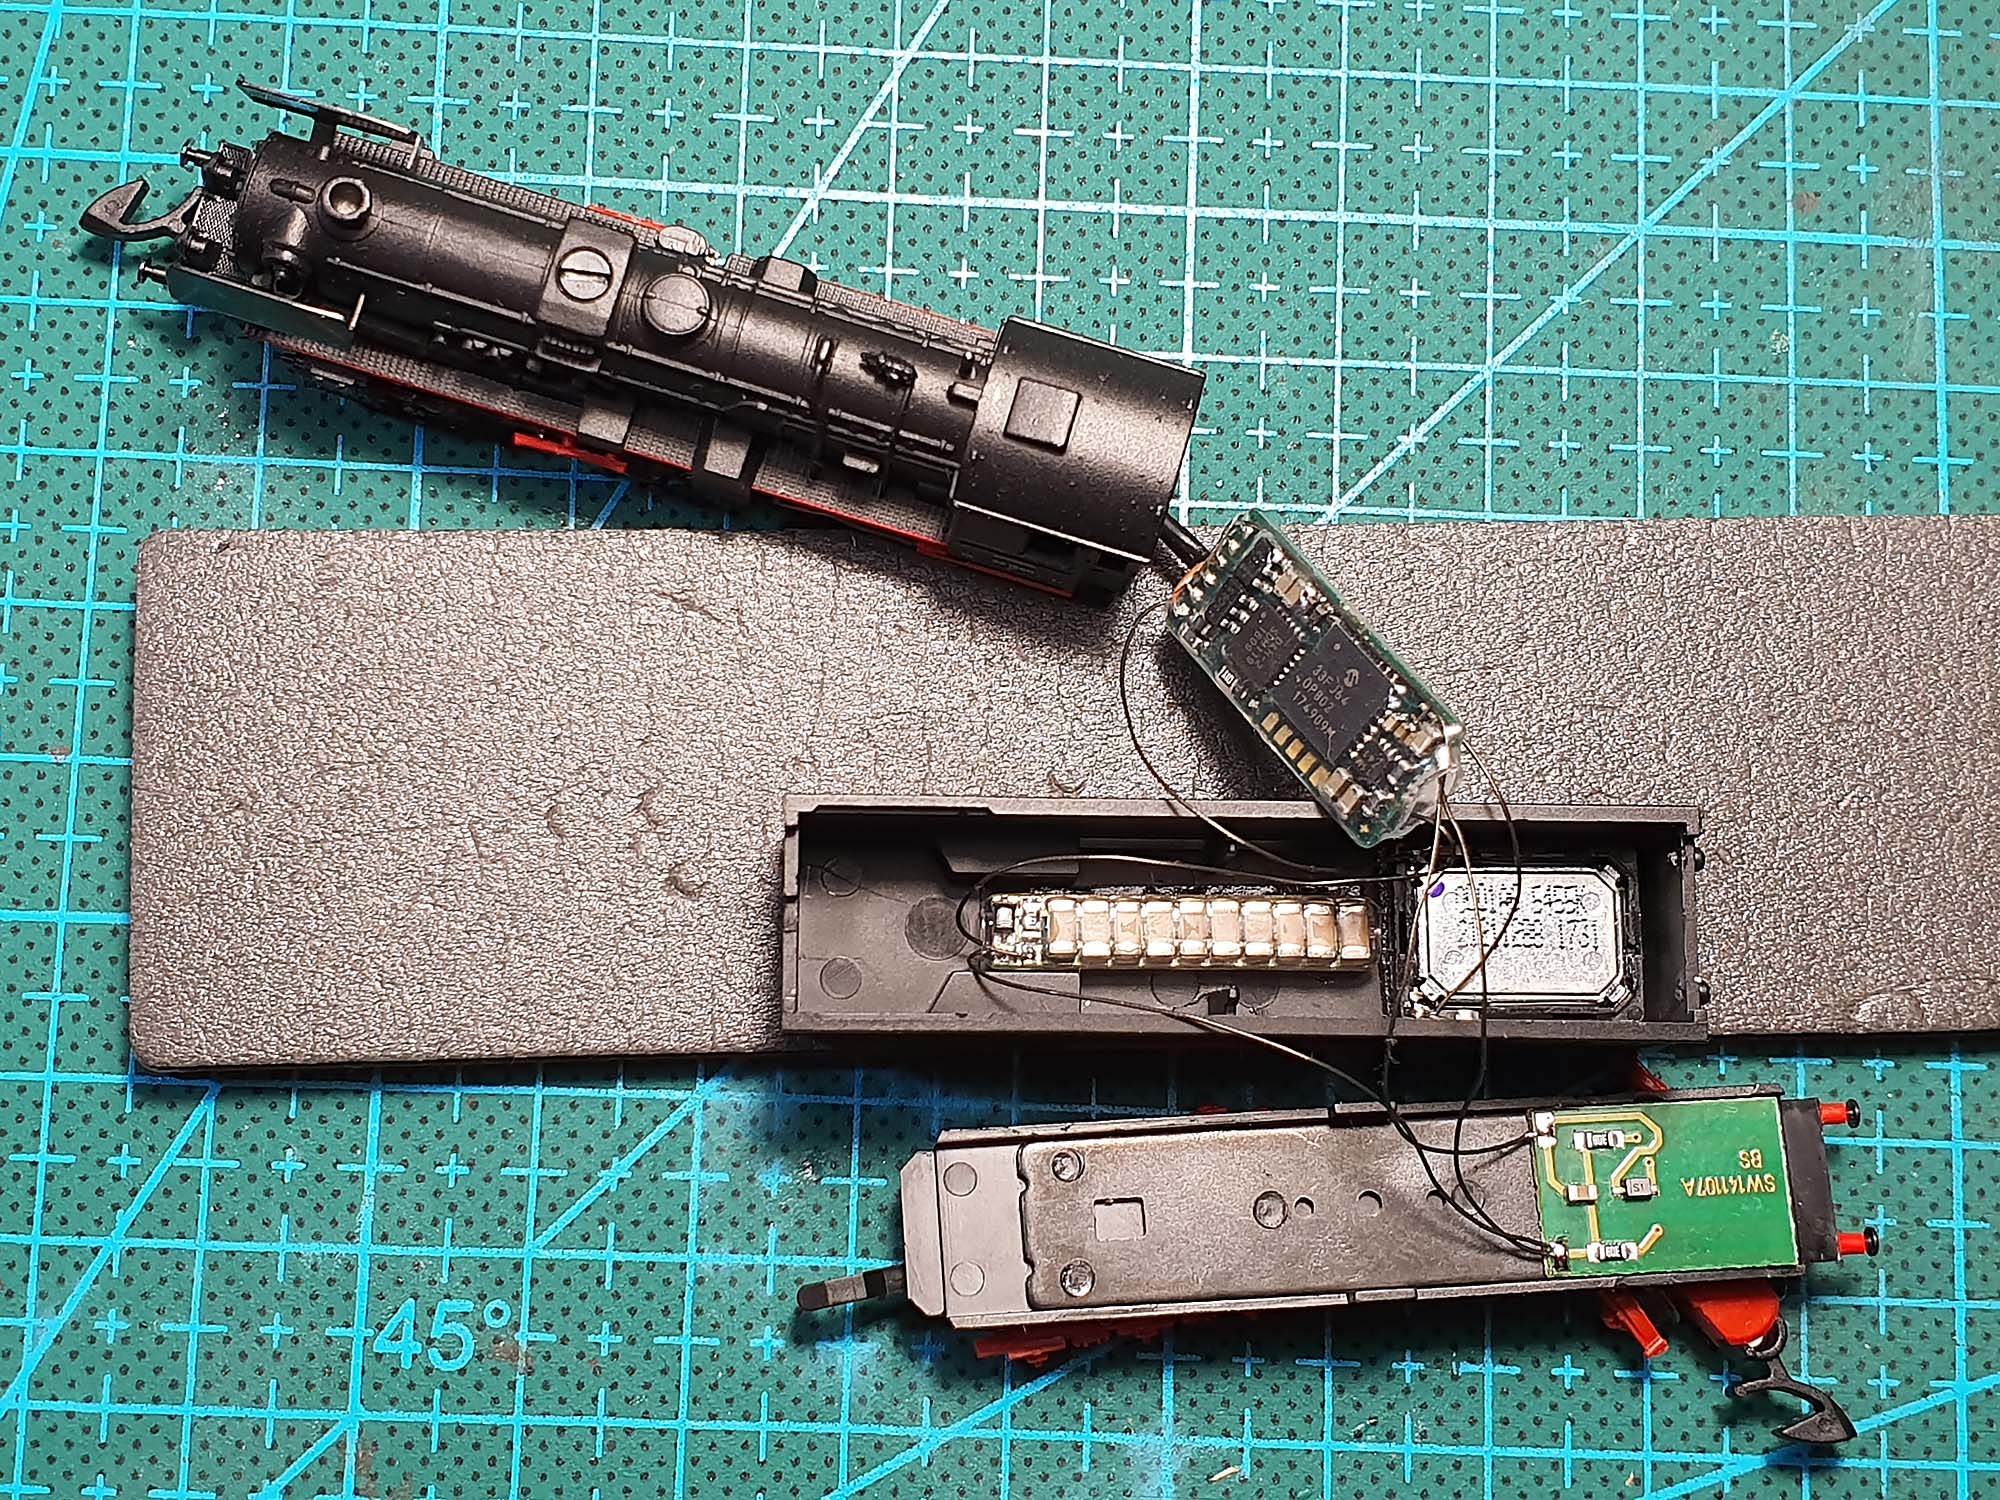 Using type C buffer in German 3-axle baggage car in combination with multiprotocol sound decoder Doehler & Haass SD18A: 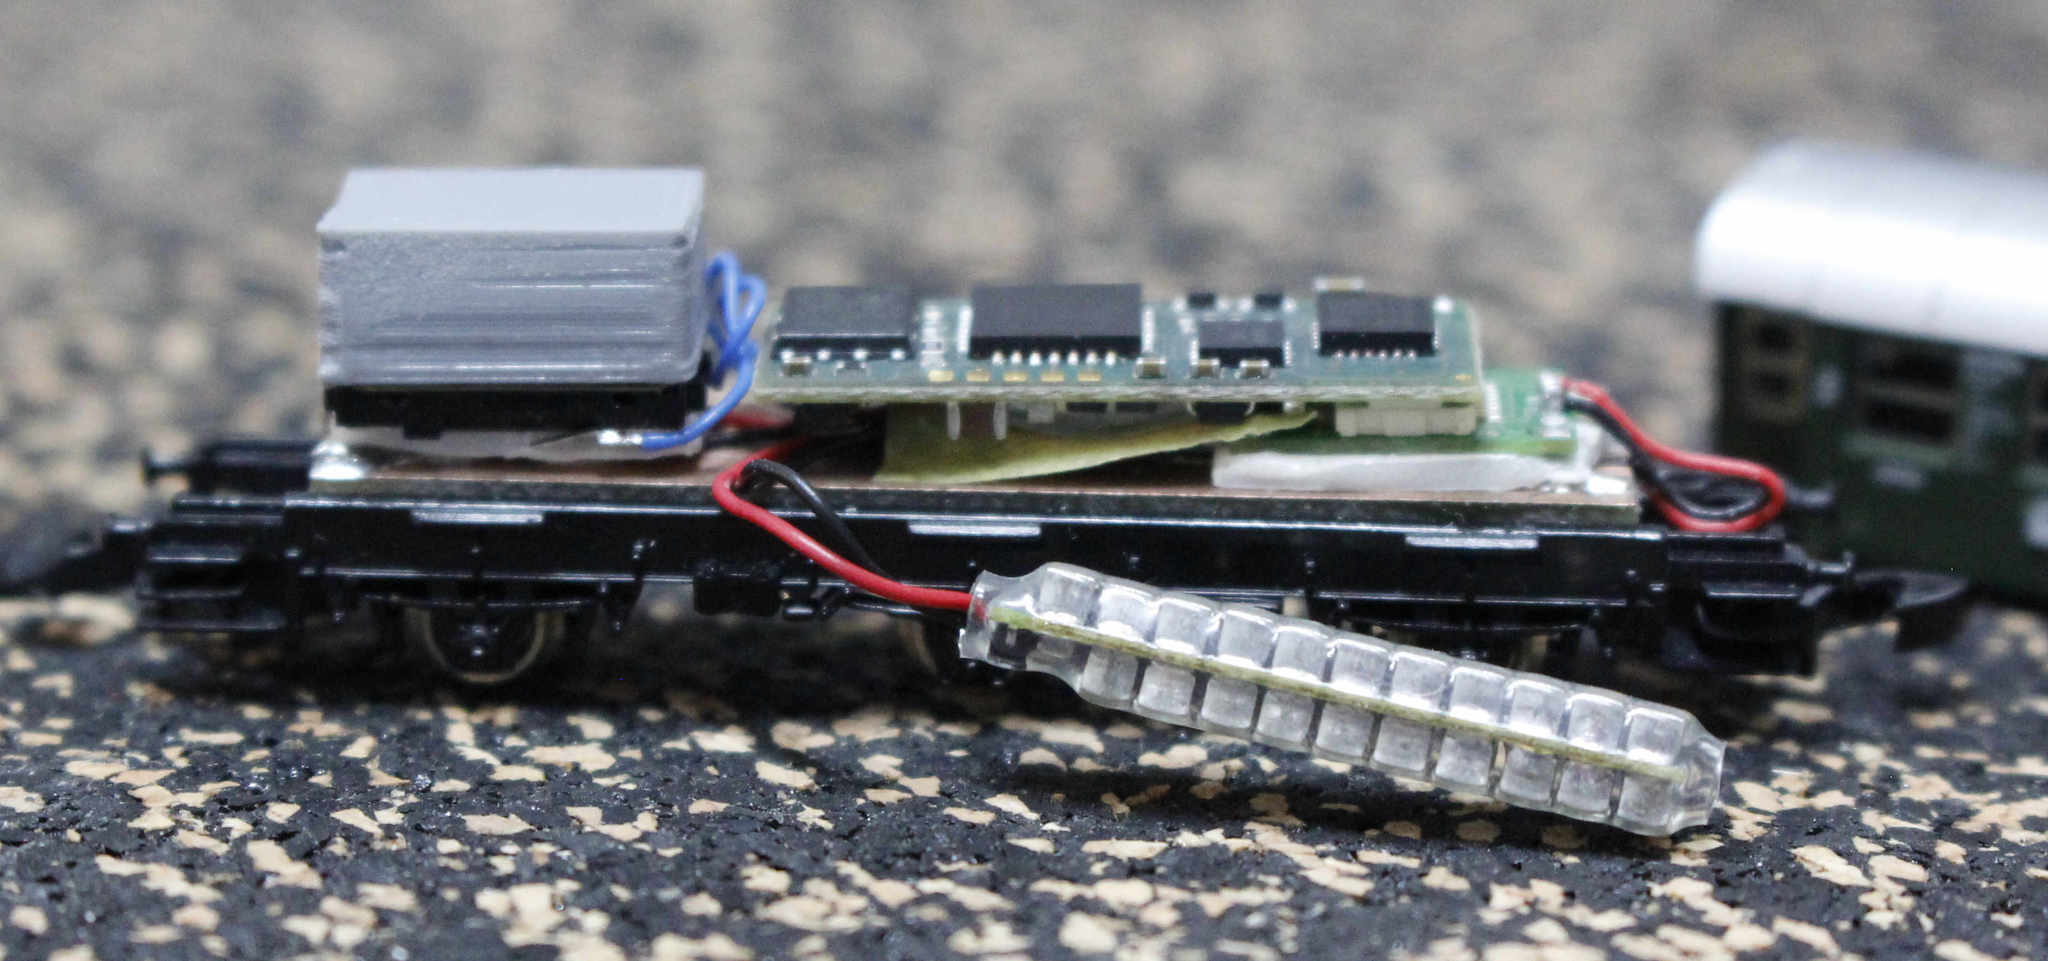 About pricing: I would like to offer these boards already assembled and carefully tested. Price is $15 per board (any type). About compatibility: I did not designed these boards keeping in mind a particular model of locomotive; the main goal was to make them as small as possible, and provide a highest possible capacity in a given volume. For this purpose I found very small 100 μF 16V SMD 1206 X7R ceramic capacitors. These capacitors have a number of important advantages: they are not polarity sensitive, that allows using them for buffering DC analog locos, and they have a much higher capacitance density that cannot be offered by any kind of classic can-type electrolytic capacitors. My US locomotive fleet consists of various AZL diesels, AZL Mikado, a number of MTL F7's and MTL SD40-2. There is also a number of Marklin version of E8/E9 diesels and Marklin F7's. All my AZL diesels (and Marklin E8/E9) equipped with Digitrax DZ123Z0 decoders (MTL SD40-2 with DZ123M0), I like very much how they work even on slightly dirty tracks, and I didn't make any tests with such buffers. Furthermore, in most cases there is no room for additional enhancements inside most AZL locos, so I can hardly imagine if someone will manage to add such buffer PCB there. Additionally, there is no info on how buffer capacitors can be attached to Digitrax drop-in decoders (maybe it is possible, however I didn't explored this question yet). Digitrax offers "Power-Xtenders": www.digitrax.com/products/power-xtenders/, but they intended to use with their other kinds of decoders. My Mikado is equipped with Doehler & Haass DH05C decoder. This decoder is buffer-capable. However again, there is no room inside Mikado's tender to add anything except decoder itself. Marklin F7's are digitized with drop-in decoders LDS26306-U from German manufacturer Velmo. These decoders are also based on Doehler & Haass DH05C chips. It is hard to attach a buffer PCB to them due to a fact that they are dedicated to a particular model of locomotive. About functioning principles and connecting buffer capacitors to decoders: I would like to give a link to a very detailed article on German site (I'm sorry, it's again in German  , please use Google Chrome translate): www.1001-digital.de/pages/basteln-bauen/elektronisches/anleitungen/pufferschaltung-fuer-16-v-smd-kondensatoren.phpMy boards are built exactly using the circuit diagram described there (with one exception: I excluded Zener diodes from variants B and C). In DC analog mode these buffer boards are simply attached in parallel with motor. That's all. However, in order to use with DC analog type B and C boards should be slightly modified - I have to remove a diode and reduce resistor value to about 1-10 Ohms (again, it is a reason why I would like to sell them already assembled). Type A board is not suitable for DC analog since it is based on polarity sensitive Tantalum capacitors. Regards, Alex |
|
|
|
Post by scanrail on Oct 30, 2019 18:02:22 GMT -5
Hi Alberich,
Bad contact between wheels and tracks, jerks and stalls - all this is very common to any railway model scales, and the smaller the scale, the more it is pronounced. There is usually very little space in any Z scale locomotive to accommodate almost any kind of buffering, so it is a situation where anything is better than nothing. Buffering effect will be more visible on locomotives equipped with coreless motors that consume very low current. Surely it would be hard to buffer old 'voracious' motors (like used in MTL F7's for example), but even here 2000 μF will be helpful. Such keep-alive capacitors are often called 'electronic flywheels'.
|
|
|
|
Post by scanrail on Oct 30, 2019 15:22:29 GMT -5
Hi friends, After a number of requests I decided to create a thread about my buffer circuit boards I have recently developed. There are 3 different PCB's available. Type A is based on 470 μF 16V or 220 μF 16V Tantalum capacitors. Types B and C are based on 100 μF 16V X7R ceramic SMD 1206 capacitors. Circuit boards are designed in a such way that they can be cut off to many different sizes. Various thickness is also available if capacitors populated on a single or both sides of PCB. Type A is not suitable for analog mode since it is based on polarity-sensitive capacitors. Only B and C types are suitable for analog (without a diode and with a resistor with lower value). Buffer circuits are based on the 'classic' scheme with 100 Ohm resistor and diode. Type A is equipped with a 15V Zener diode for additional safety with Tantalum capacitors. Types B and C don't feature a Zener diode because ceramic capacitors are much less sensitive to a possible overvoltage scenarios. Also I did not included it in order to save more space on a very small PCB. Buffer boards can be useful for both digital and analog locomotives. All boards were successfully tested and already used in a number of my own projects, as well as other projects. Links below lead to the German forum: Märklin 88761 Rail Zeppelin digital: f.z-freunde-international.de/viewtopic.php?f=16&t=13411Märklin 88830 BR52 steam locomotive digital with sound: f.z-freunde-international.de/viewtopic.php?f=16&t=13563Sound decoder for BR38: f.z-freunde-international.de/viewtopic.php?f=16&t=14033Please take a look at the picture for detailed specifications. Red vertical lines show how each PCB can be cut:  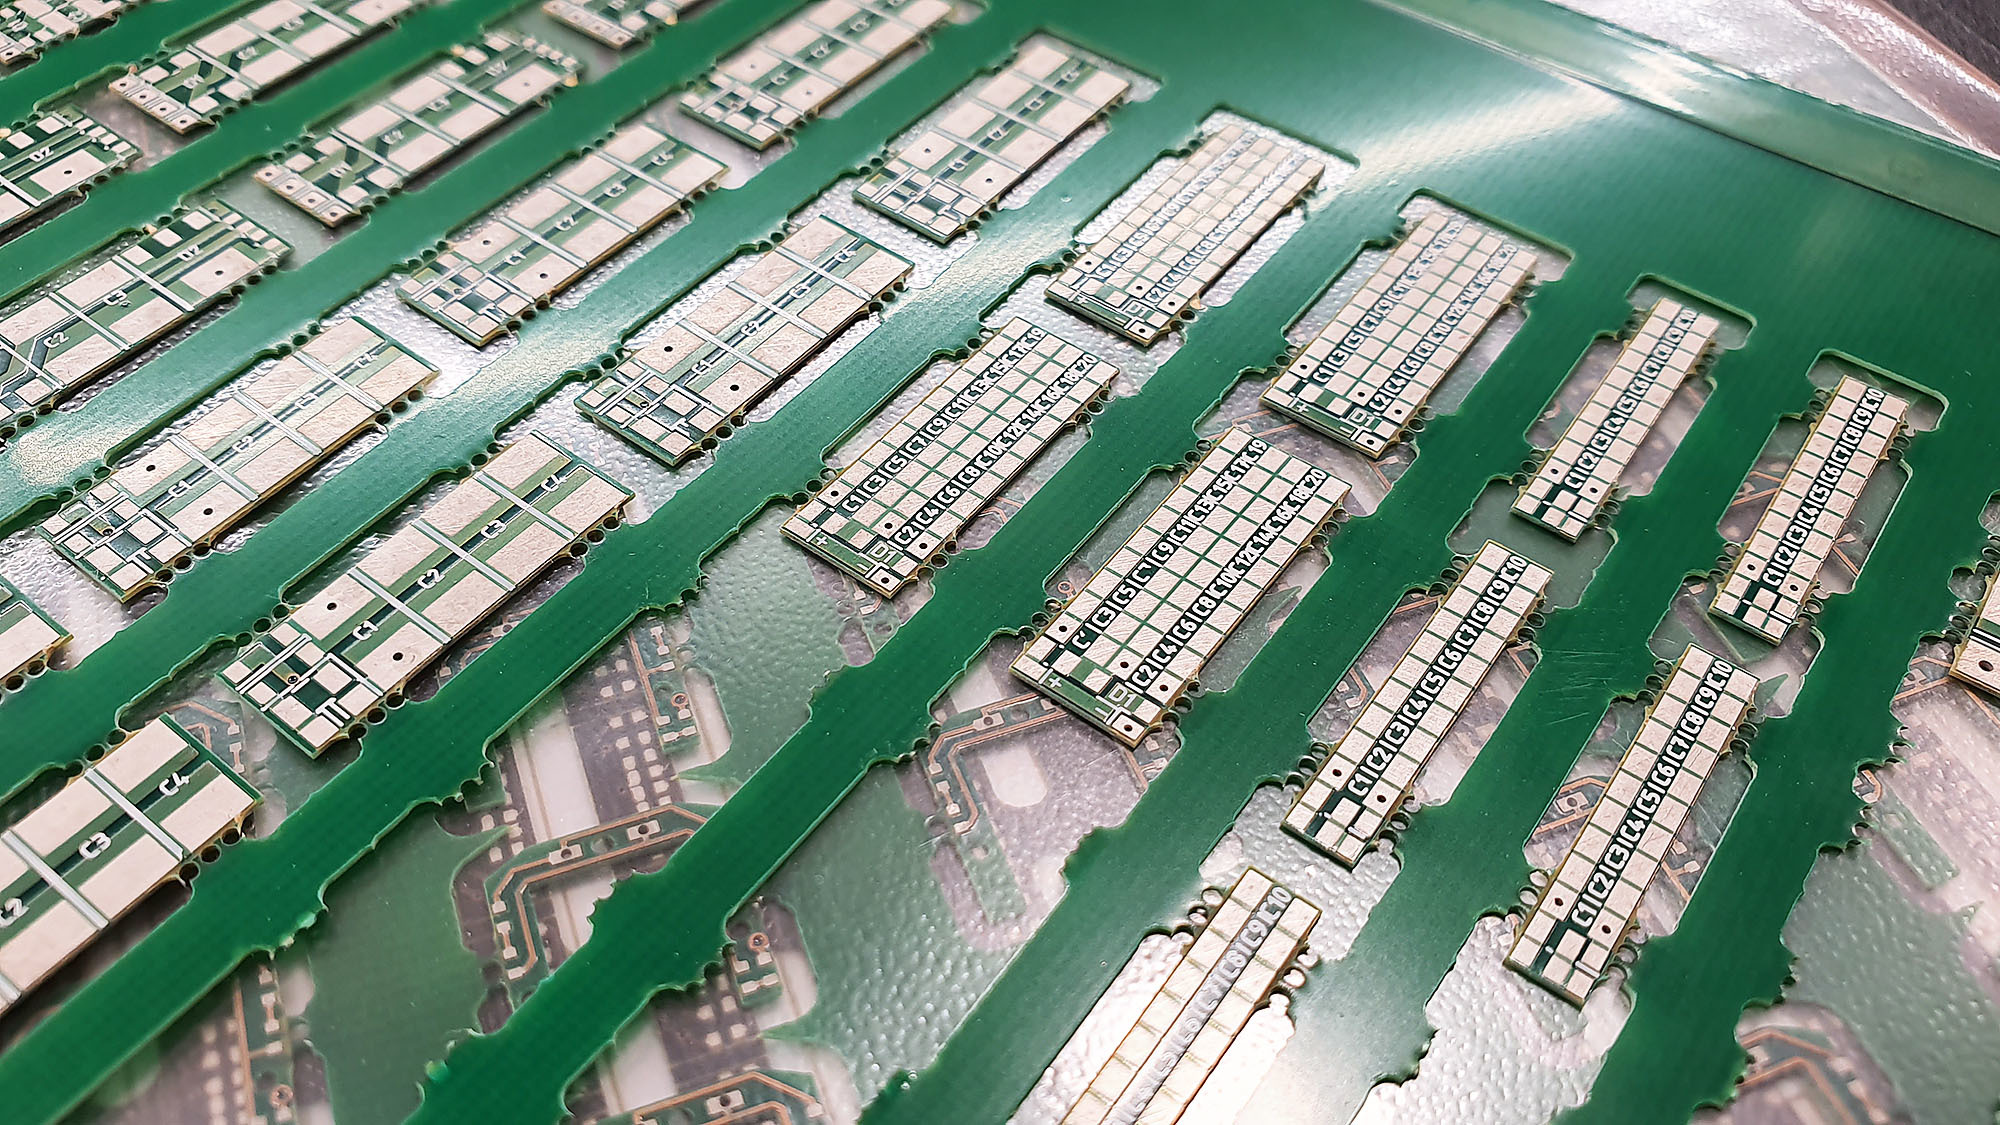 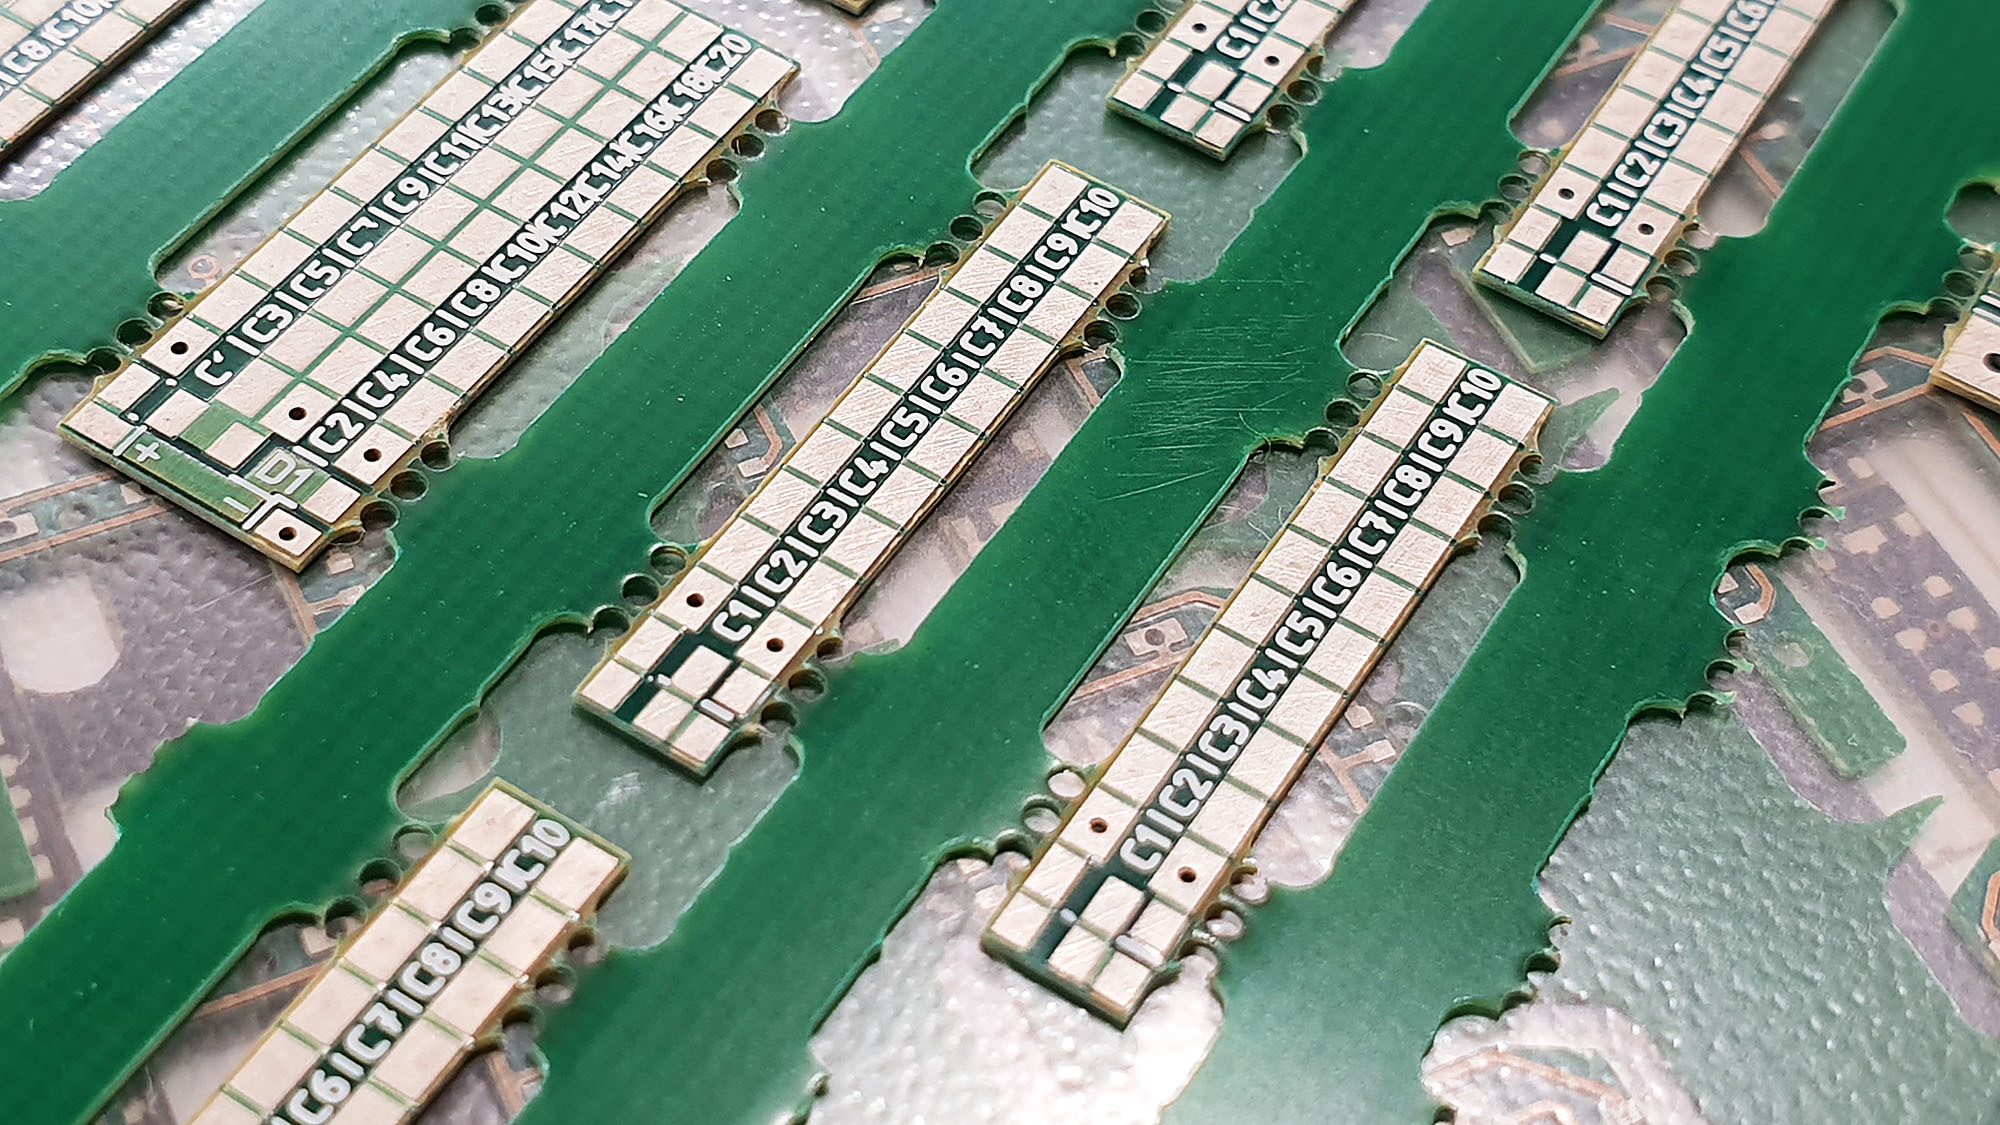 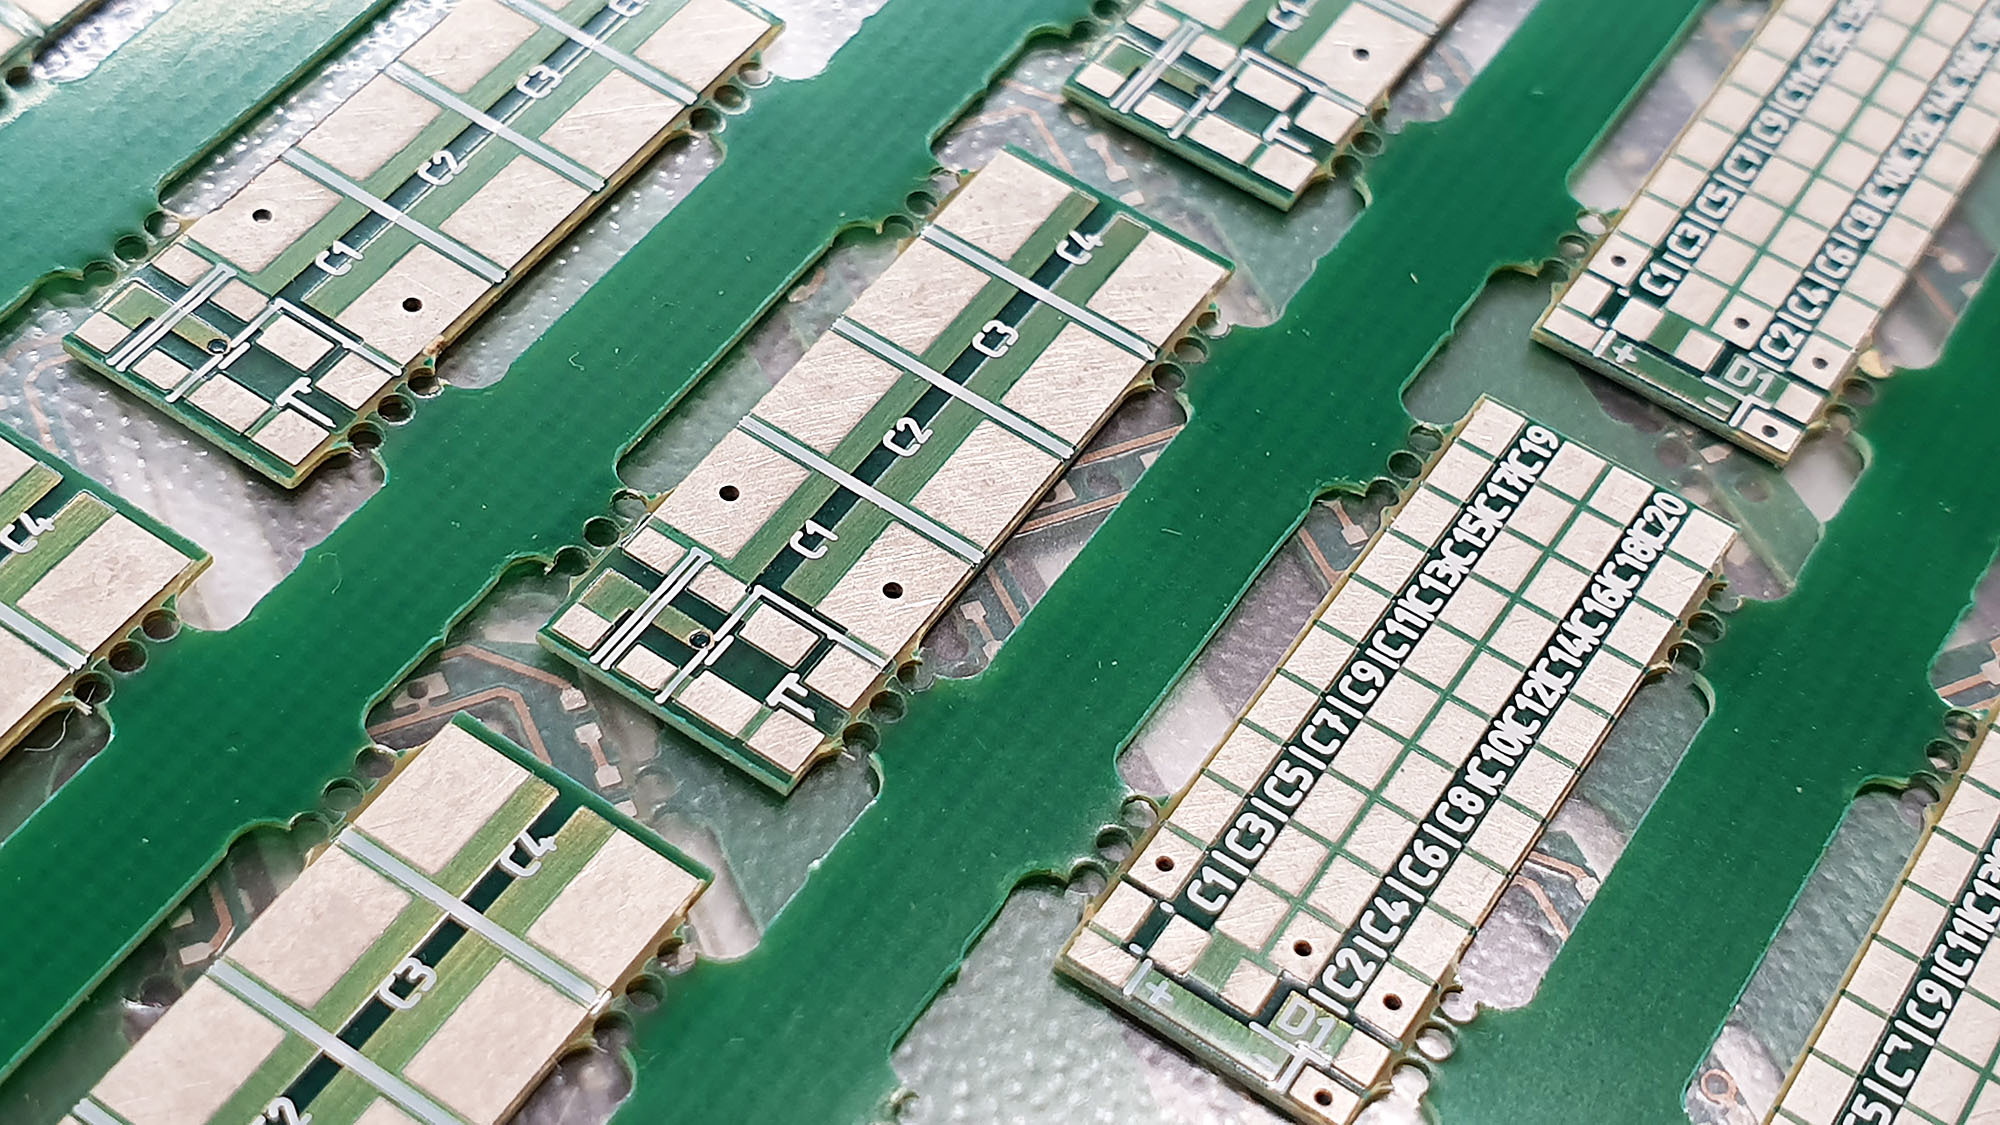 The sizes are given above without a shrinking tube. Buffer boards will be slightly bigger with it. Anyone interested please let me know. Regards, Alex |
|
|
|
Post by scanrail on Sept 1, 2019 9:25:33 GMT -5
Hi Rob, yes, I'm working on train camera module at the moment. You are right, it is the most difficult stage. I have everything in my hands, and what else needs to be done is to put everything in a compact case, and think about heat dissipation. Camera and transmitter make some heat when work for a long time - it should be considered anyway.
Charlie, it is not a problem to fit a camera module into the almost any kind of Z scale rolling stock - the smallest camera module has only 5x5 mm size, and wireless transmitter is only 18x8 mm small. As I wrote above, I need some time to pack everything together.
Alex
|
|
|
|
Post by scanrail on Aug 31, 2019 14:43:13 GMT -5
Greetings to all, Let me introduce you one of my latest and long-time developments. It is not a train model, but it is something dedicated to our scale – Zmodell RailVision – model train camera system. For a long time I explored this subject in order to find a comprehensive camera solution that will be suitable for Z scale. I tried to find existing devices that will match desired requirements and will be possibly free from the most drawbacks. After all, I concluded that actually almost nothing exists for Z scale in this area, even the best implementations are usually with a lot of visual or technical compromises. The most advanced cameras and recorders exist only for bigger scales – you can find everything in H0, and even N scale offers mass produced solutions (for example, Tomix 5594). The most common problem is that it is impossible to fit any of these cameras into Z scale. In addition, those tiny recorders that can be installed on Z scale chassis cannot be controlled externally, and you cannot review a recorded video immediately – first you should copy it from a MicroSD card to PC, and only after this you will be able to look at the results. There is also a number of other disadvantages of such devices, so I decided to develop something on my own. The camera system consists of the following: 1. Train audio/video module: video camera connected to the 2.4GHz wireless A/V transmitter. A small voltage stabilizer with rectifier and low voltage drop powers the circuit. The input range is 5-12V AC/DC. It means that the module can be powered with any kind of source – battery, analog or digital track voltage even without following a correct polarity. 2. Wireless recorder module: a small 10x12x3 cm box made of black anodized aluminum can do everything: – Receive wireless audio/video signal and record it to removable storage (SDHC/MicroSDHC up to 32GB, MPEG4/ASF format 720x576); – Output audio/video to HDMI (1080p), A/V analog (SD) and USB (device is recognized by PC as a web camera). – Wi-Fi functionality: real-time video can be viewed and recorded on any mobile device (such as smartphone or tablet) via dedicated application; – Recorder is equipped with a backup battery, so nothing will be lost in case of accidental power loss. – Built-in speaker that plays audio of real-time and recorded videos, and 3.5 mm jack for headphones. – Two small 3 dB external antennas – for A/V receiver and Wi-Fi transmitter. 3. Monitor: A portable 5-inch (127 mm) 800x480 high-resolution screen is connected to the recorder module via dedicated 3.5 mm 4-pole jack. It is used to play real-time and already recorded videos, as well as to access to the menu and adjusting settings. The screen has brightness, contrast and saturation adjustments. Different languages and aspect ratio can also be set. 4. IR remote to control everything: play, record and adjust settings. 5. External 12V/1A power supply. 6. USB A-A cable. Connection diagram:  Zmodell RailVision set: 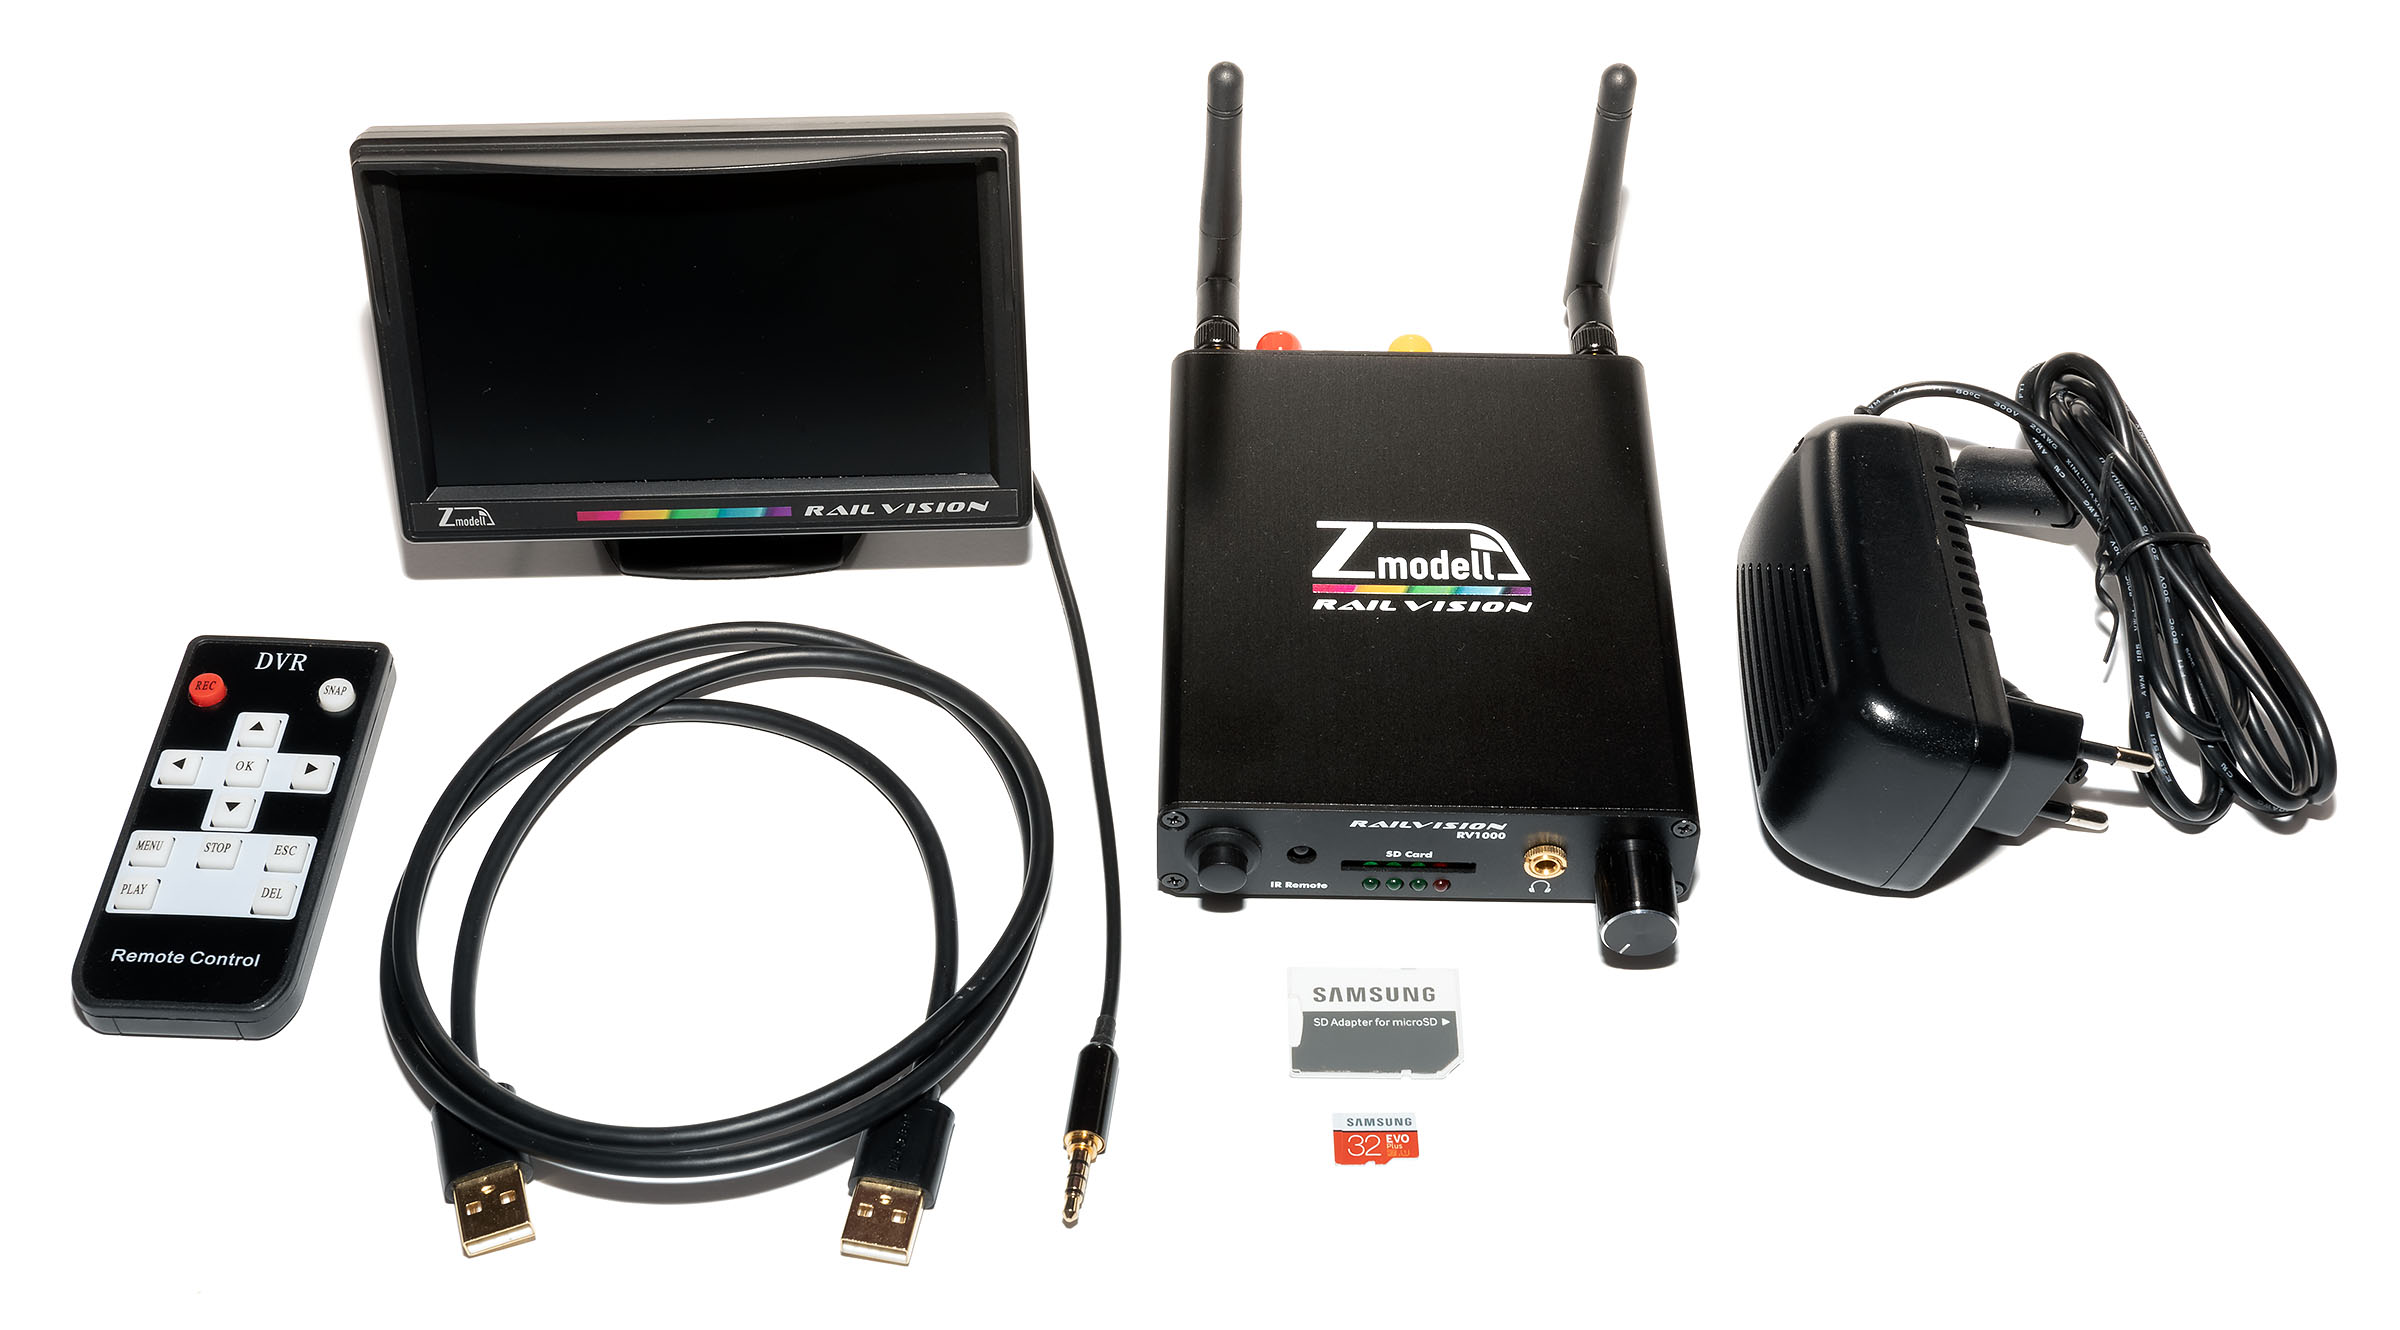  Wireless recorder, front panel:  Wireless recorder, rear panel:  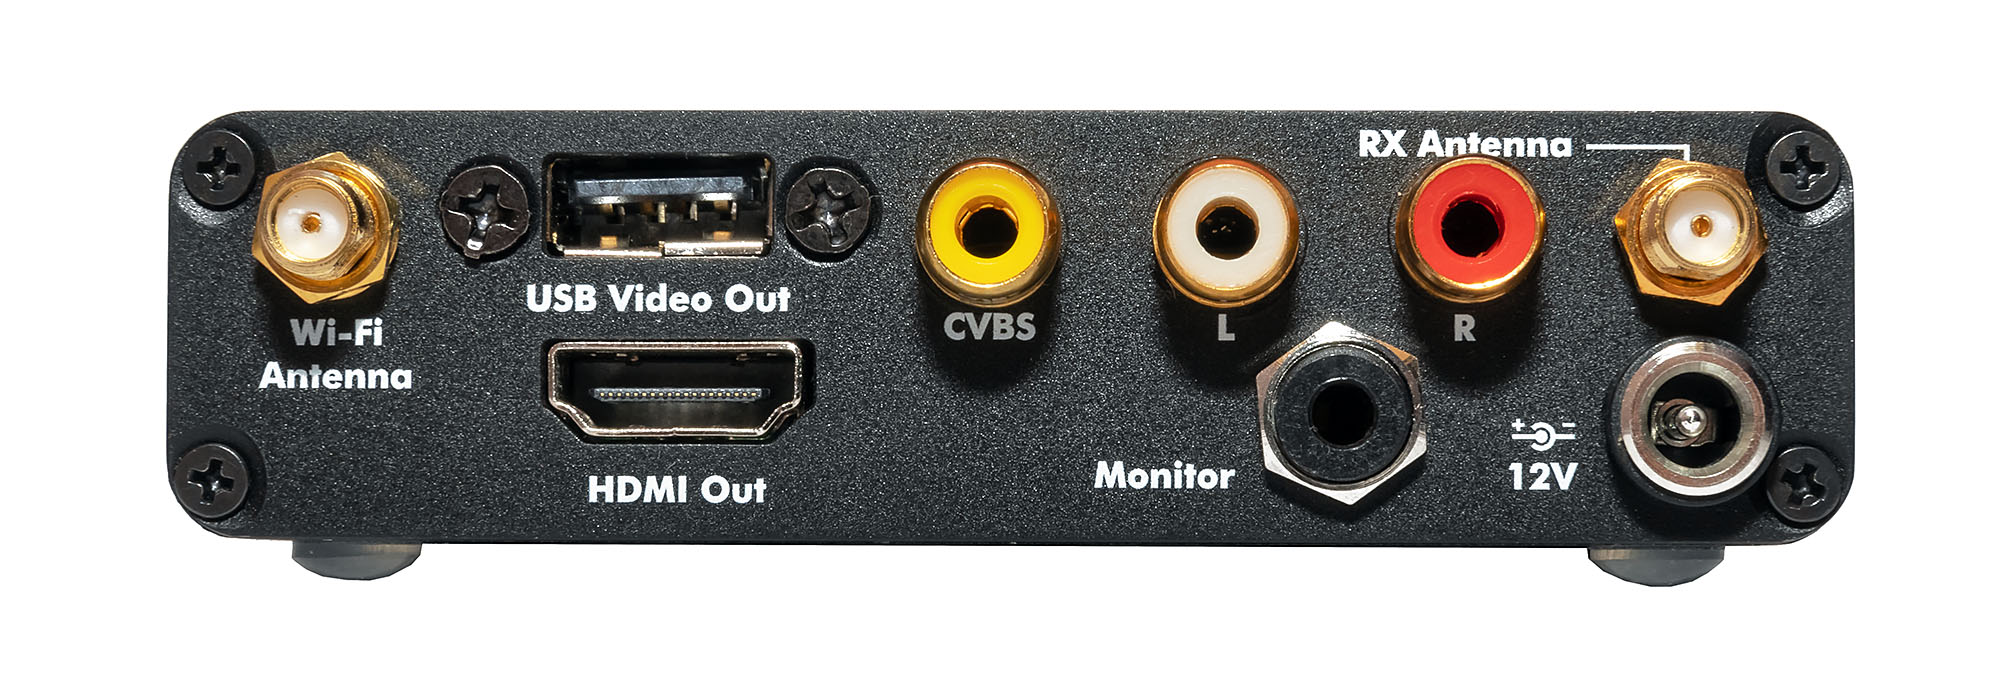 Wireless recorder, bottom side. Built-in speaker is visible: 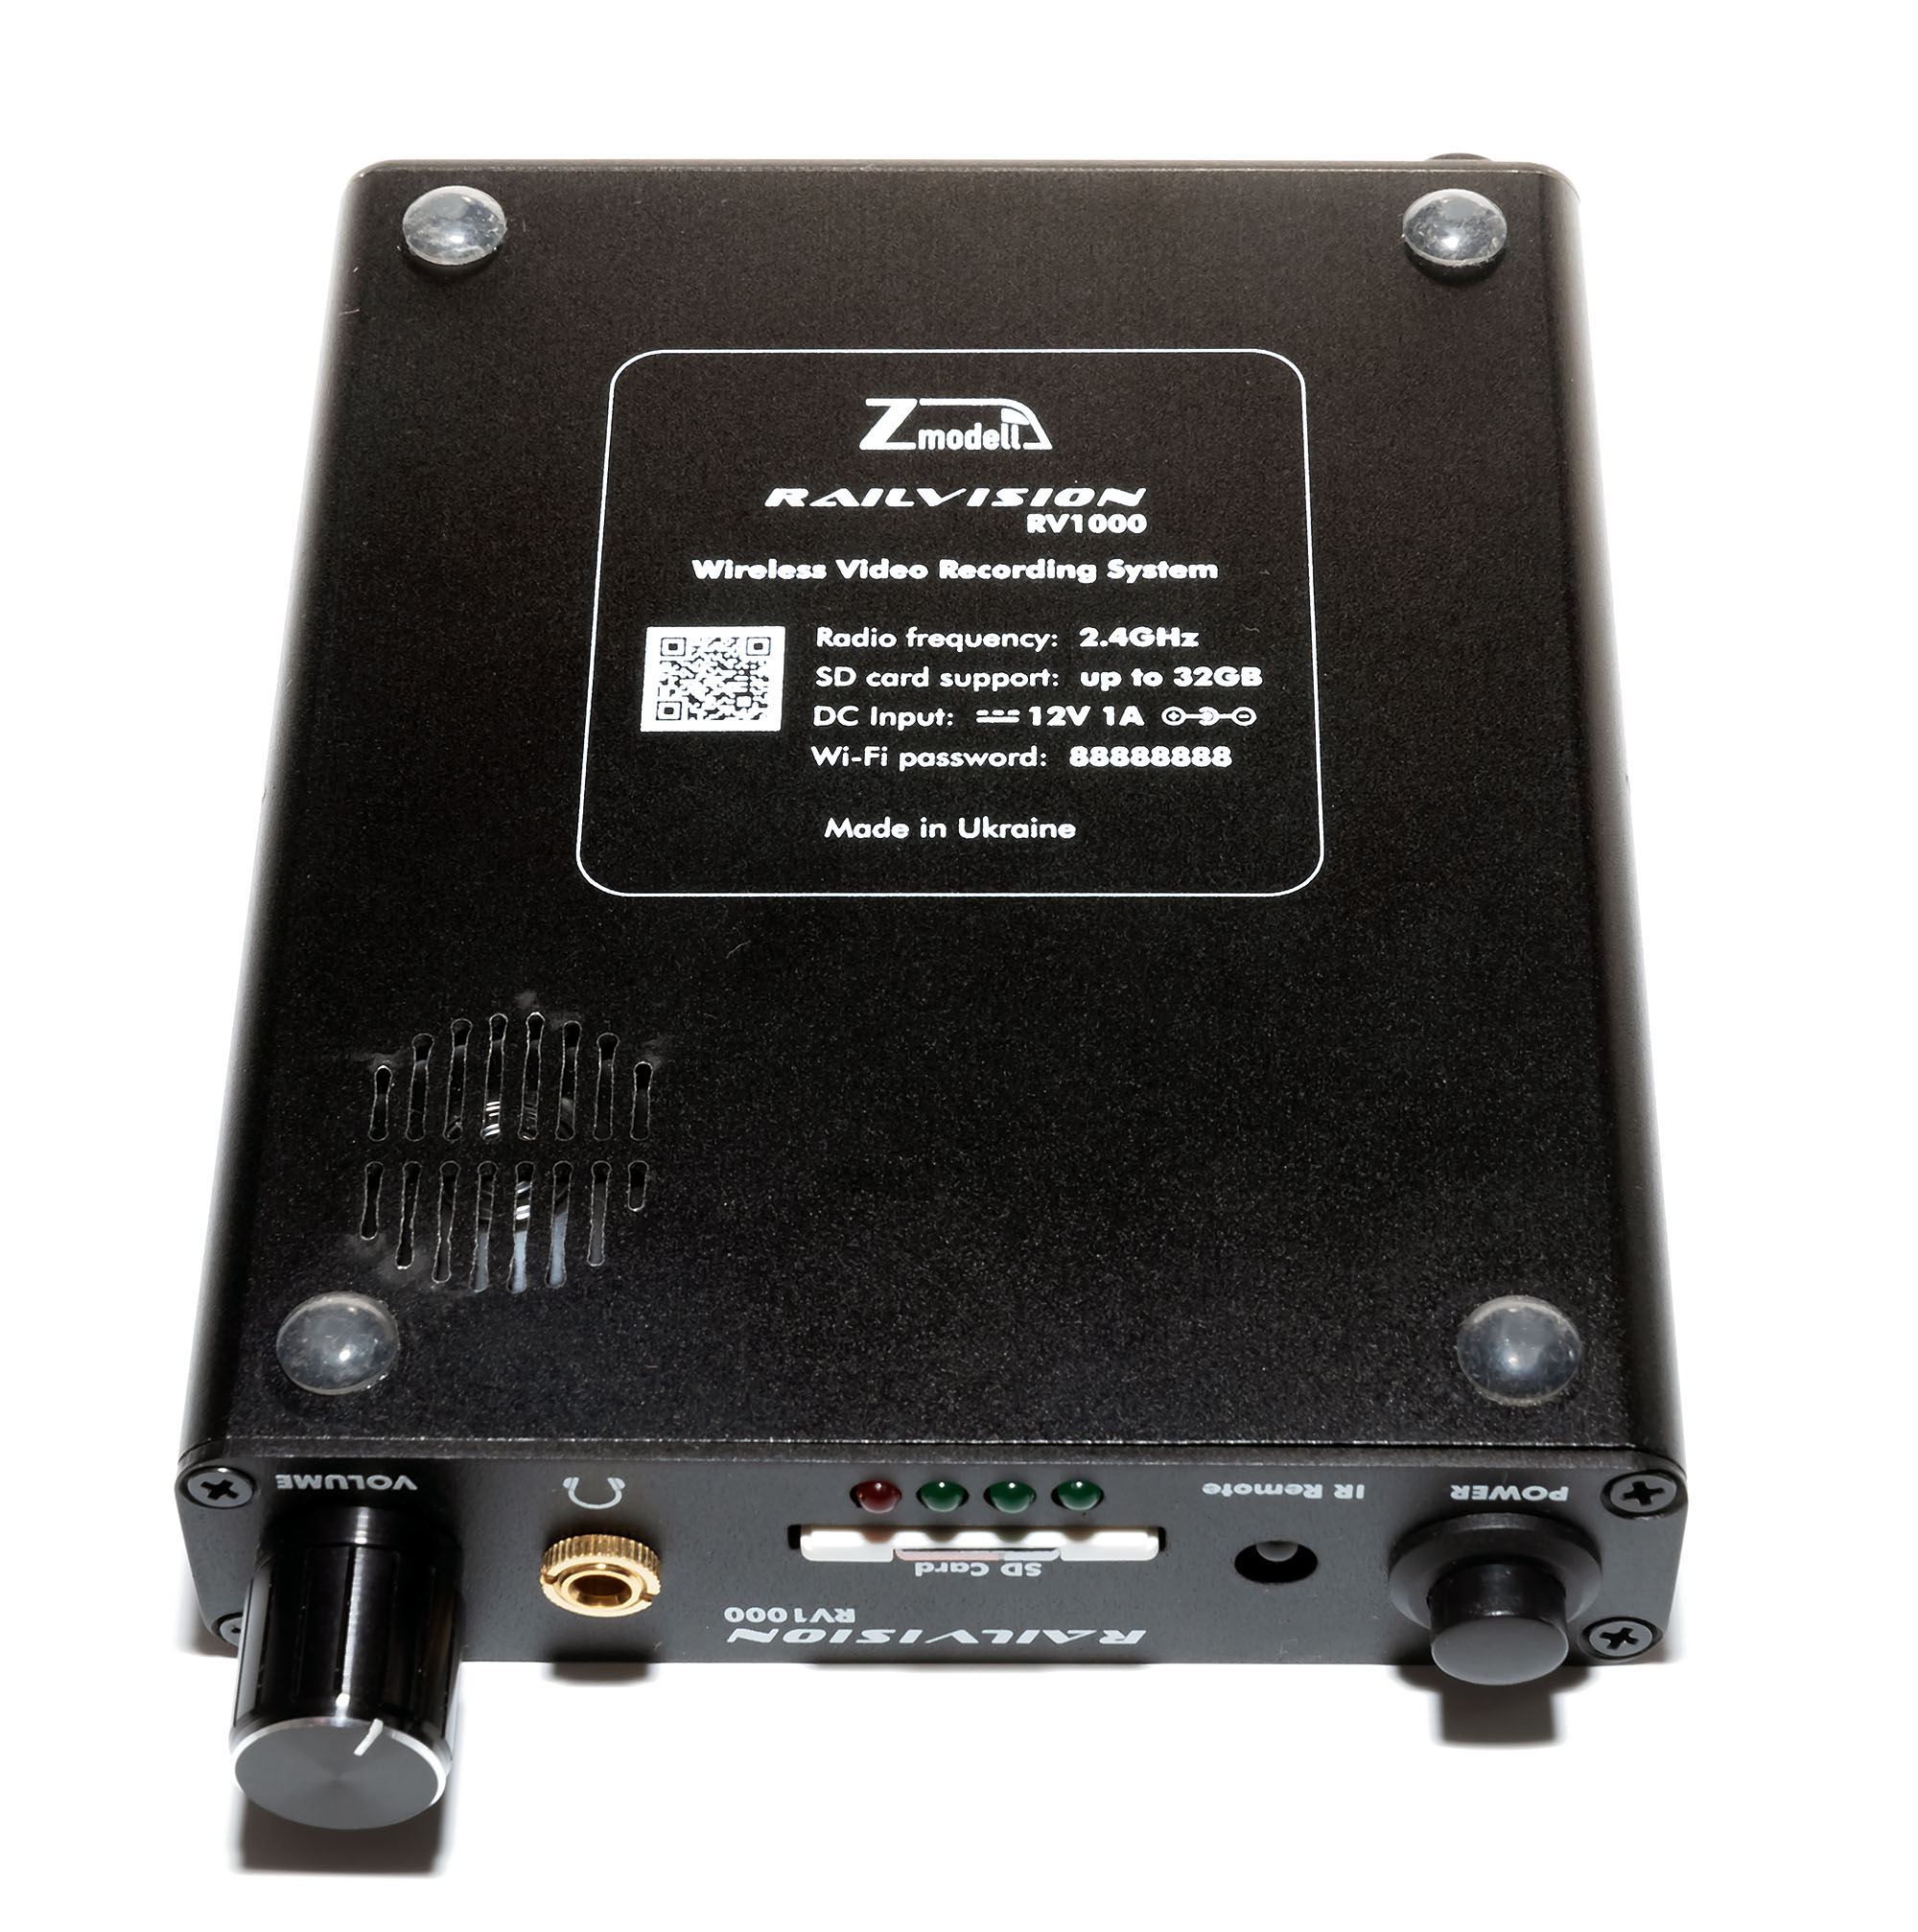 Portable 5 inch monitor: 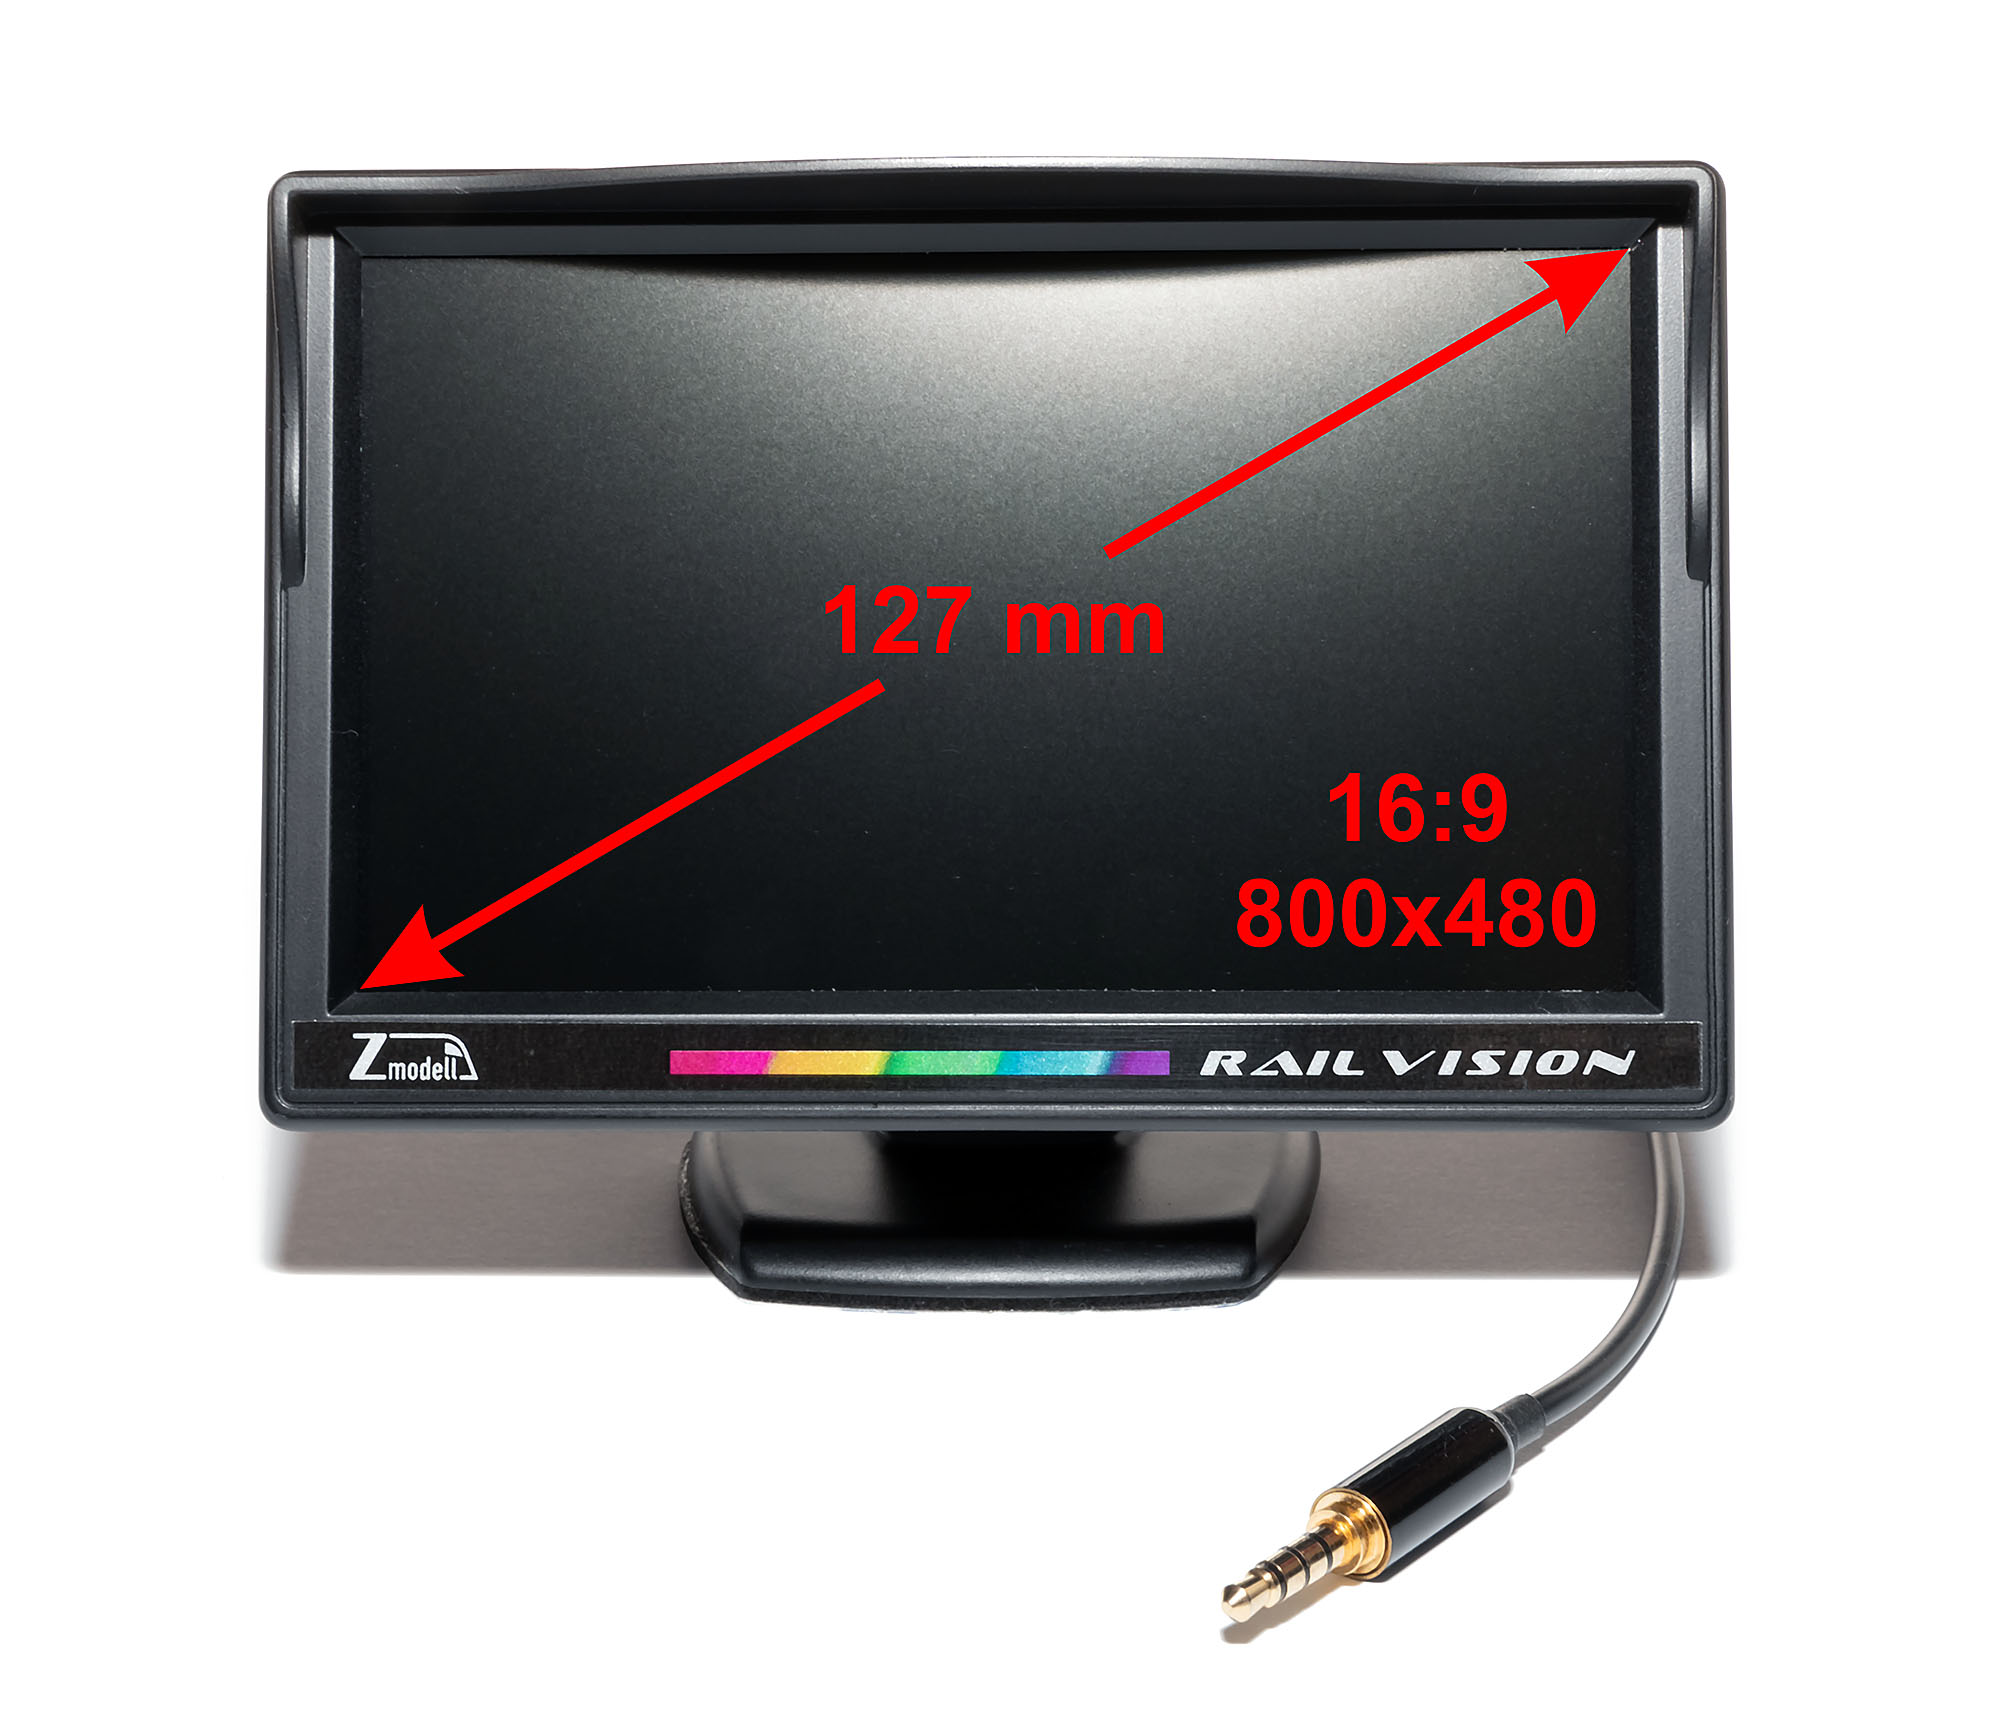 IR remote control: 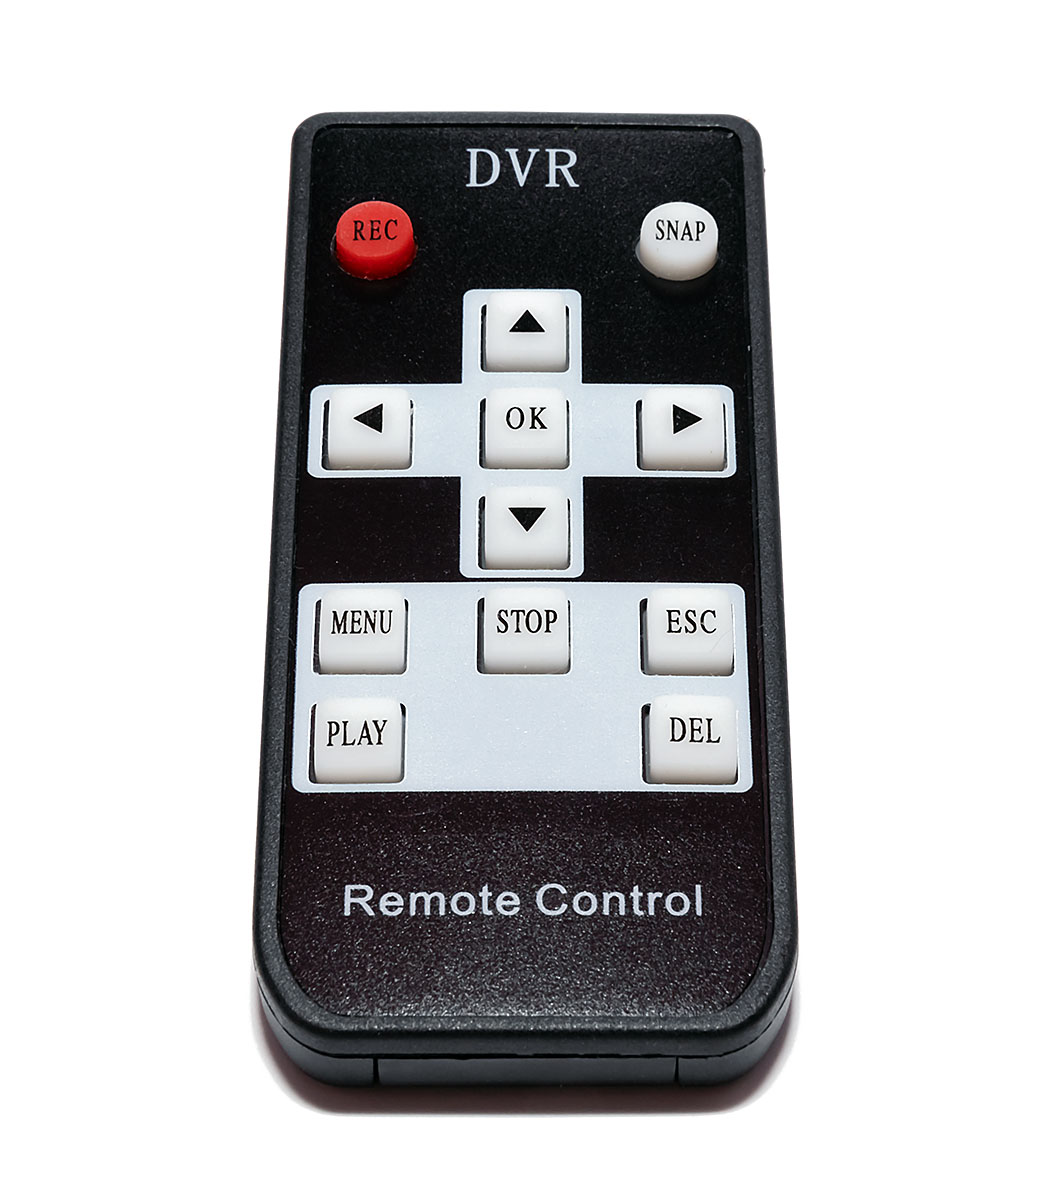 RailVision is turned on, main menu on the screen: 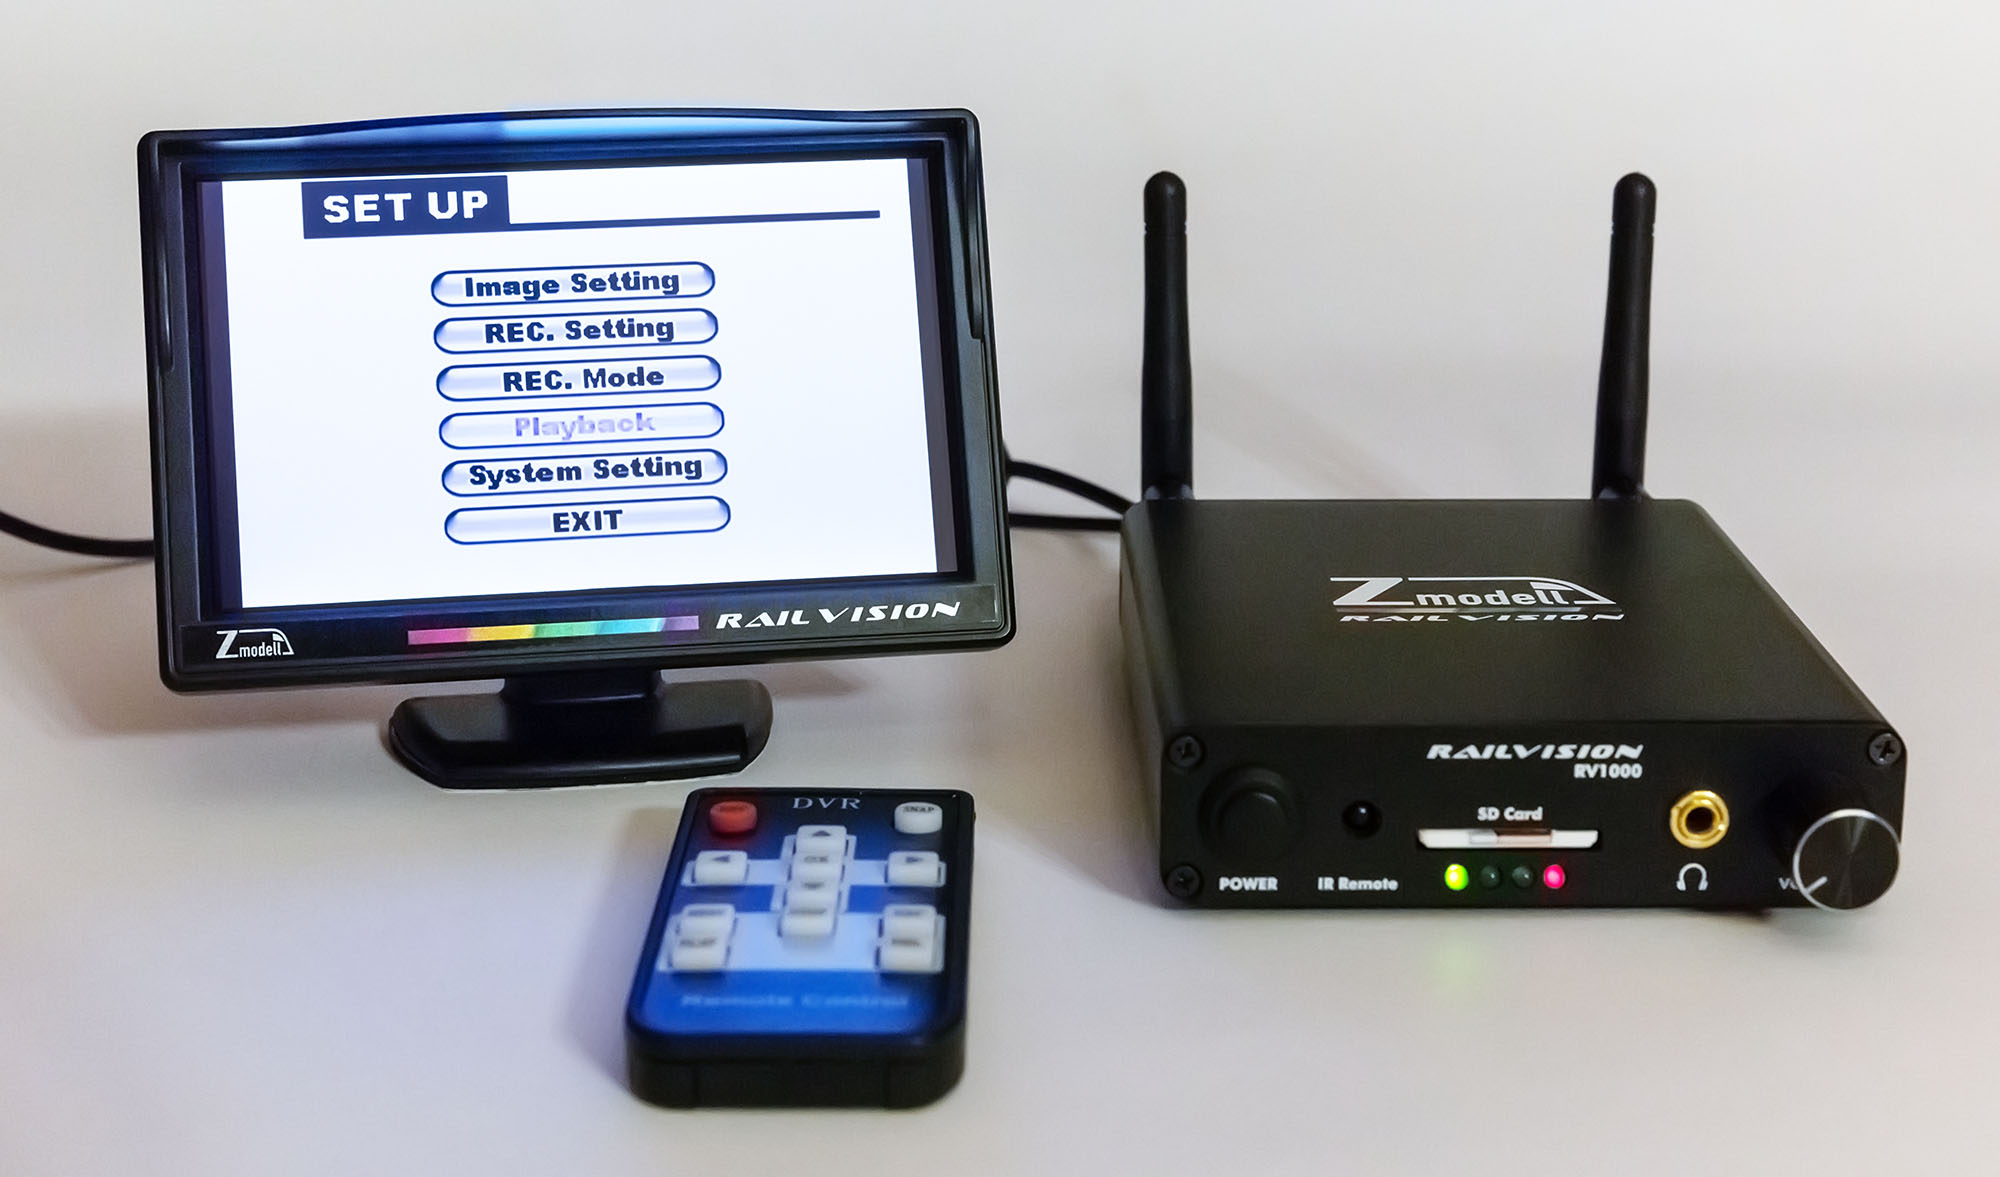 Camera modules are available in different sizes – 4.5x4.5 mm, 5x5 mm, 6x6 mm, 8x8 mm. Resolution varies from 600 to 800 TVL (TV lines). Some cameras are equipped with microphone and able to record audio. Lens can be adjusted to get a desired focusing distance. There are also screw-in wide-angle adapters available for the most lenses, however I didn’t tested them yet. Such adapters can widen a field of view from the most common 45 degrees to 90-120. Wireless transmitters are also differ by size and transmission power: 18x8 mm 100 mW and 27x10 mm 500 mW. Both kinds are suitable for Z scale by size, but bigger one heats up very strongly, and it cannot be used without a metal heat spreader. Typical power consumption of the small transmitter together with camera is about 185 mA, the bigger transmitter consumes with camera about 390-400 mA. I have developed a dedicated power supply PCBs for the both types of transmitters that match the sizes of them. The smaller power supply module can output max. 250 mA, the bigger one – 500 mA. I also placed tiny 2.4GHz SMD antennas on PCBs, so everything can be packed in a very compact size. Video output to monitor, HDMI and A/V analog contains overlay (memory card remaining time, menu, settings etc.), but output to USB and Wi-Fi is clear in order to take advantage of video recording on the destination device (computer, tablet or smartphone). Train camera module is still in development – I still have to develop a case for camera, transmitter and power supply, and test it for heat dissipation issues. The smallest 4.5x4.5 and 5x5 mm cameras offer 600 TVL and give quite a mediocre image quality in low light conditions, but at least acceptable, assuming the limitations of Z scale. The main advantage of such small cameras is that they can be installed inside a cabin of Z scale locomotive without any significant modifications to the loco. Mid-size 6x6 mm camera has 700 TVL and works a little better than the smallest ones. Bigger 8x8 mm cameras provide the best quality and have 800 TV lines – not bad for still such a small size. Furthermore, they work better in low light conditions (and much better than smallest 5x5 mm cameras). According to my tests, 8x8 mm camera with microphone showed the best quality against all other cameras I tested. There are also bigger cameras available on the market. They are about 12.5x12.5 mm size, which is still acceptable for Z scale. Such cameras have a higher resolution 720p or 1080p, however I did not tested them yet. I have also found 1080p camera modules made by Sony. Sellers claim that these cameras have a very good sensitivity in low light conditions, but no surprise they are noticeably more expensive. Mobile application is available for smartphones and tablets with Android OS. The app is not available in Google Play; it should be downloaded here: www.pgyer.com/2MWP. Don’t worry, it is safe. The application allows to view, record and play video in different resolutions. It also allows making pictures from the real-time video, as well as adjusting settings for the Wi-Fi transmitter device (change channels). Some camera modules that are suitable for Z scale and compatible with RailVision (from the left to the right): 5x5 mm, 6x6 mm, 8x8 mm, 8x8 mm with microphone. I added German BR 151 electric locomotive for size comparison: 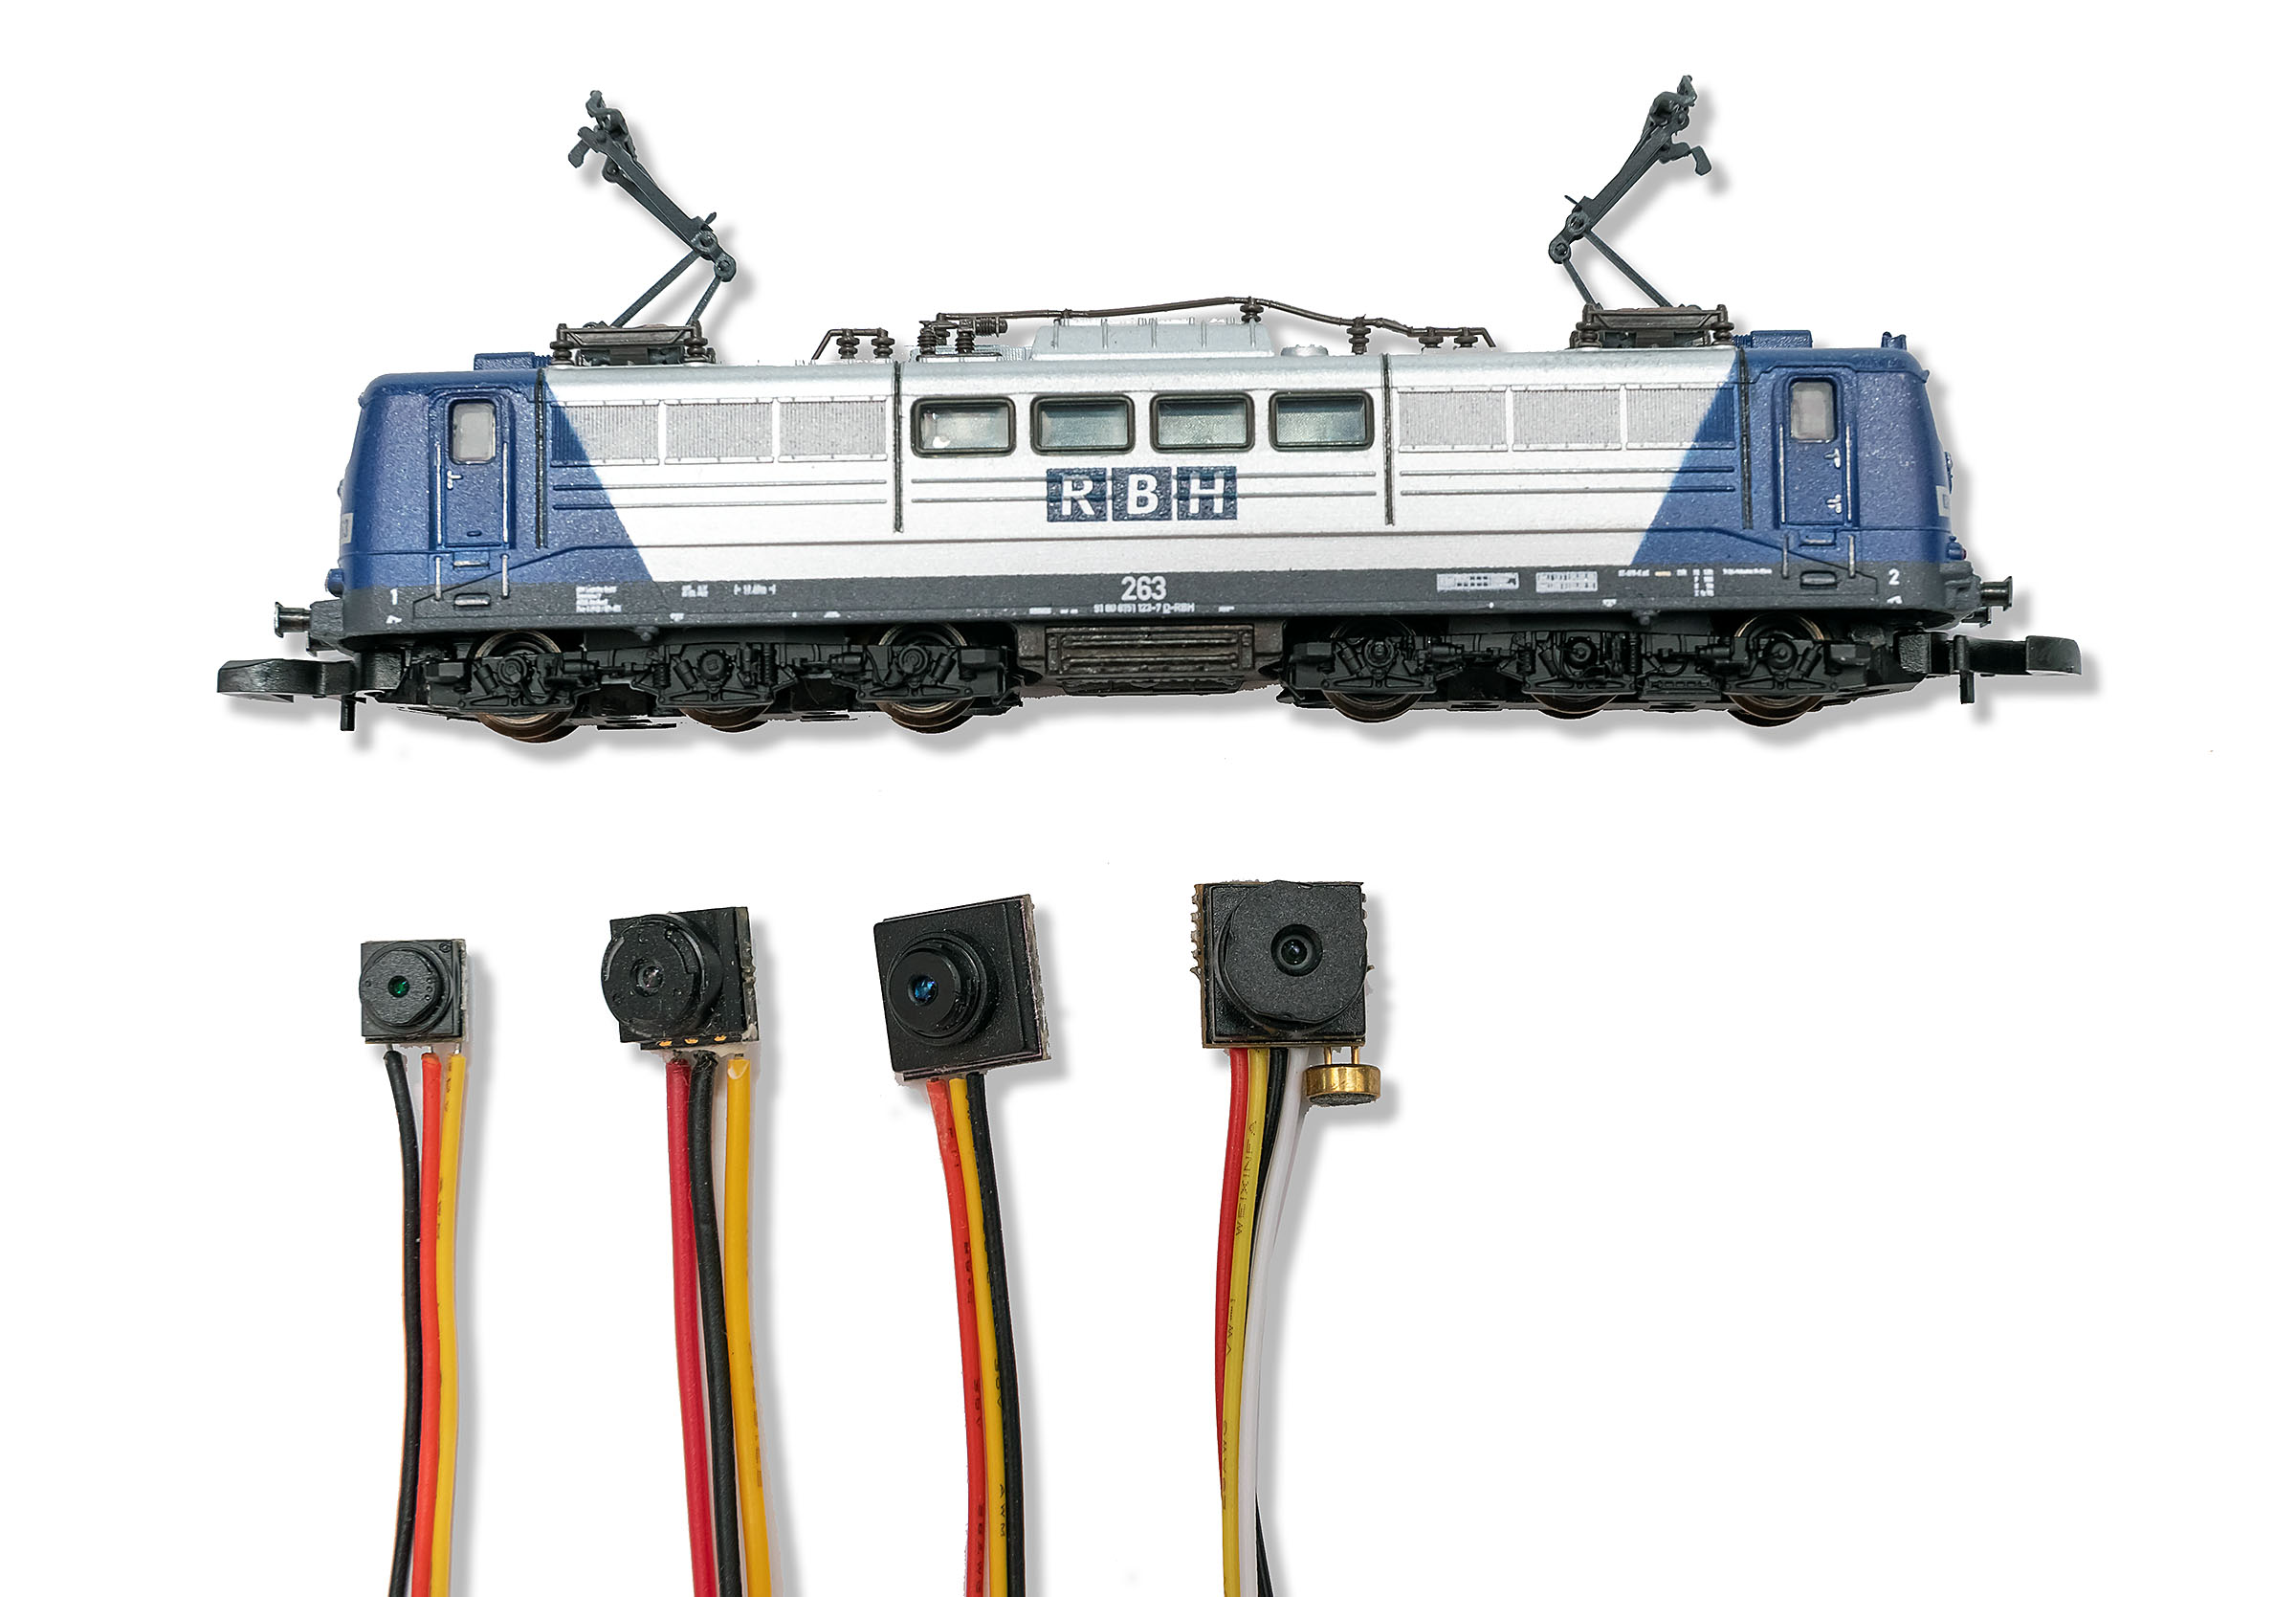 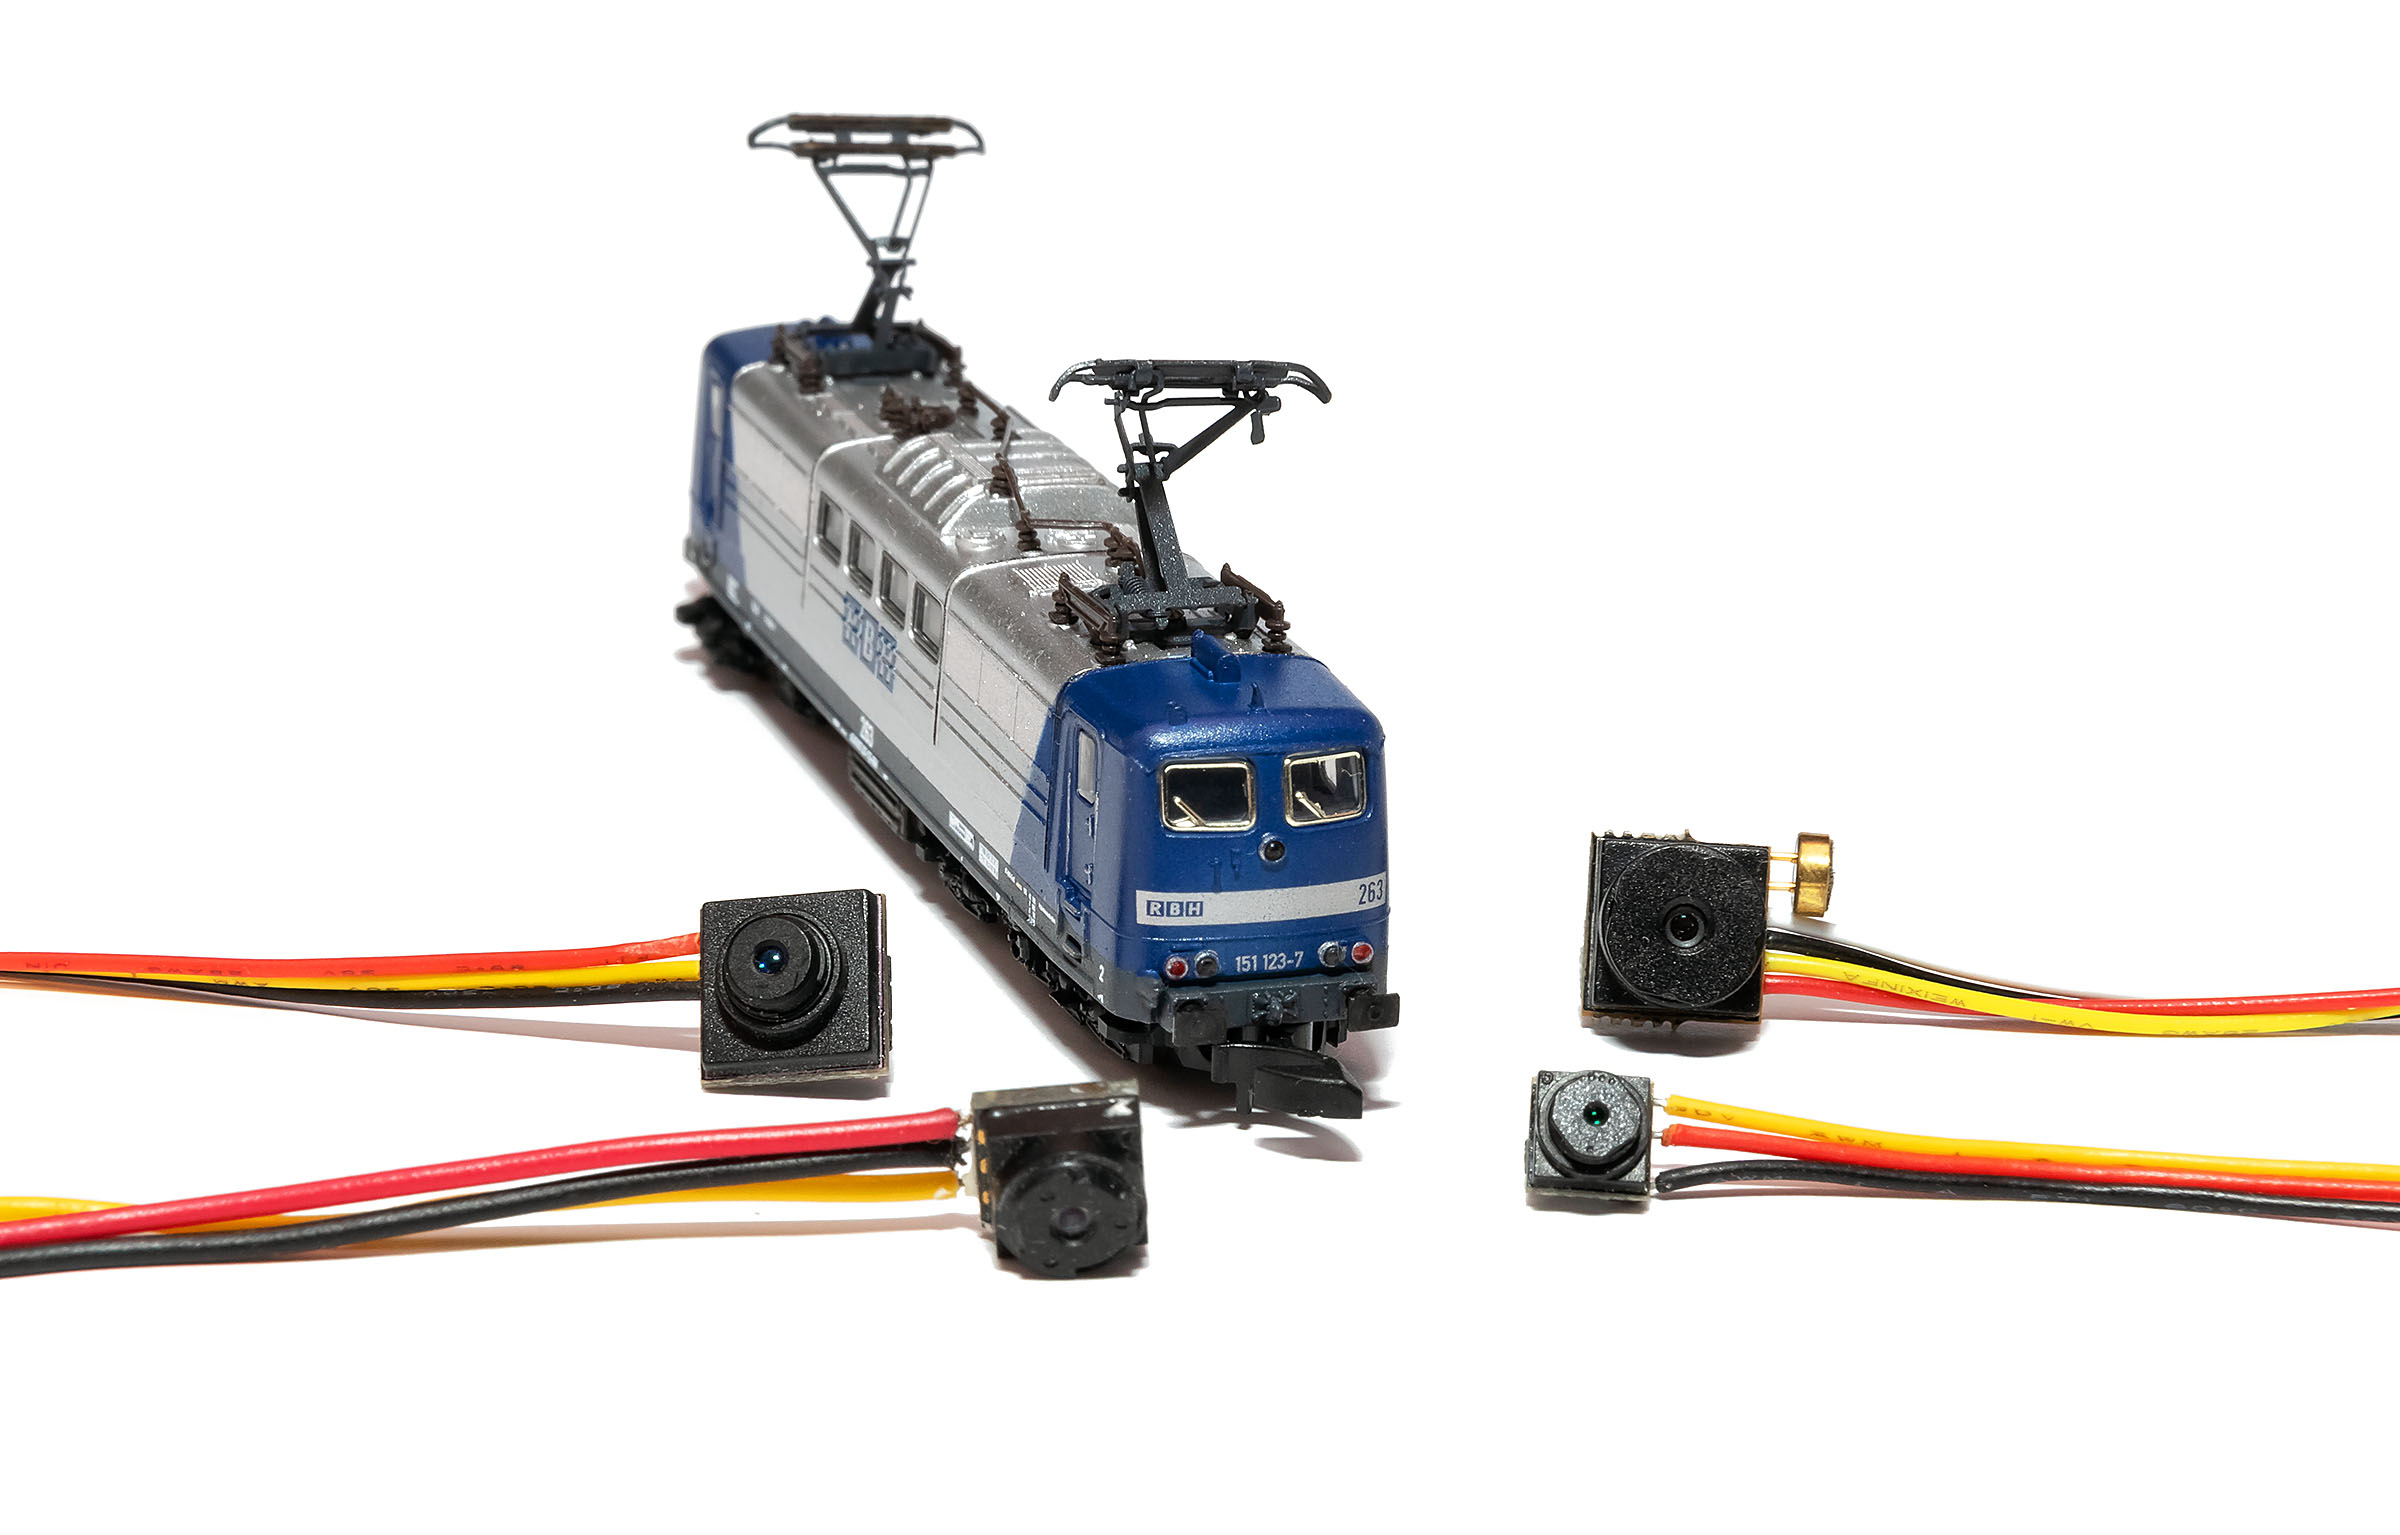 Two models of suitable wireless A/V transmitters - 18x8 mm/100 mW and 27x10 mm/500 mW together with corresponding rectifier/voltage stabilizer modules: 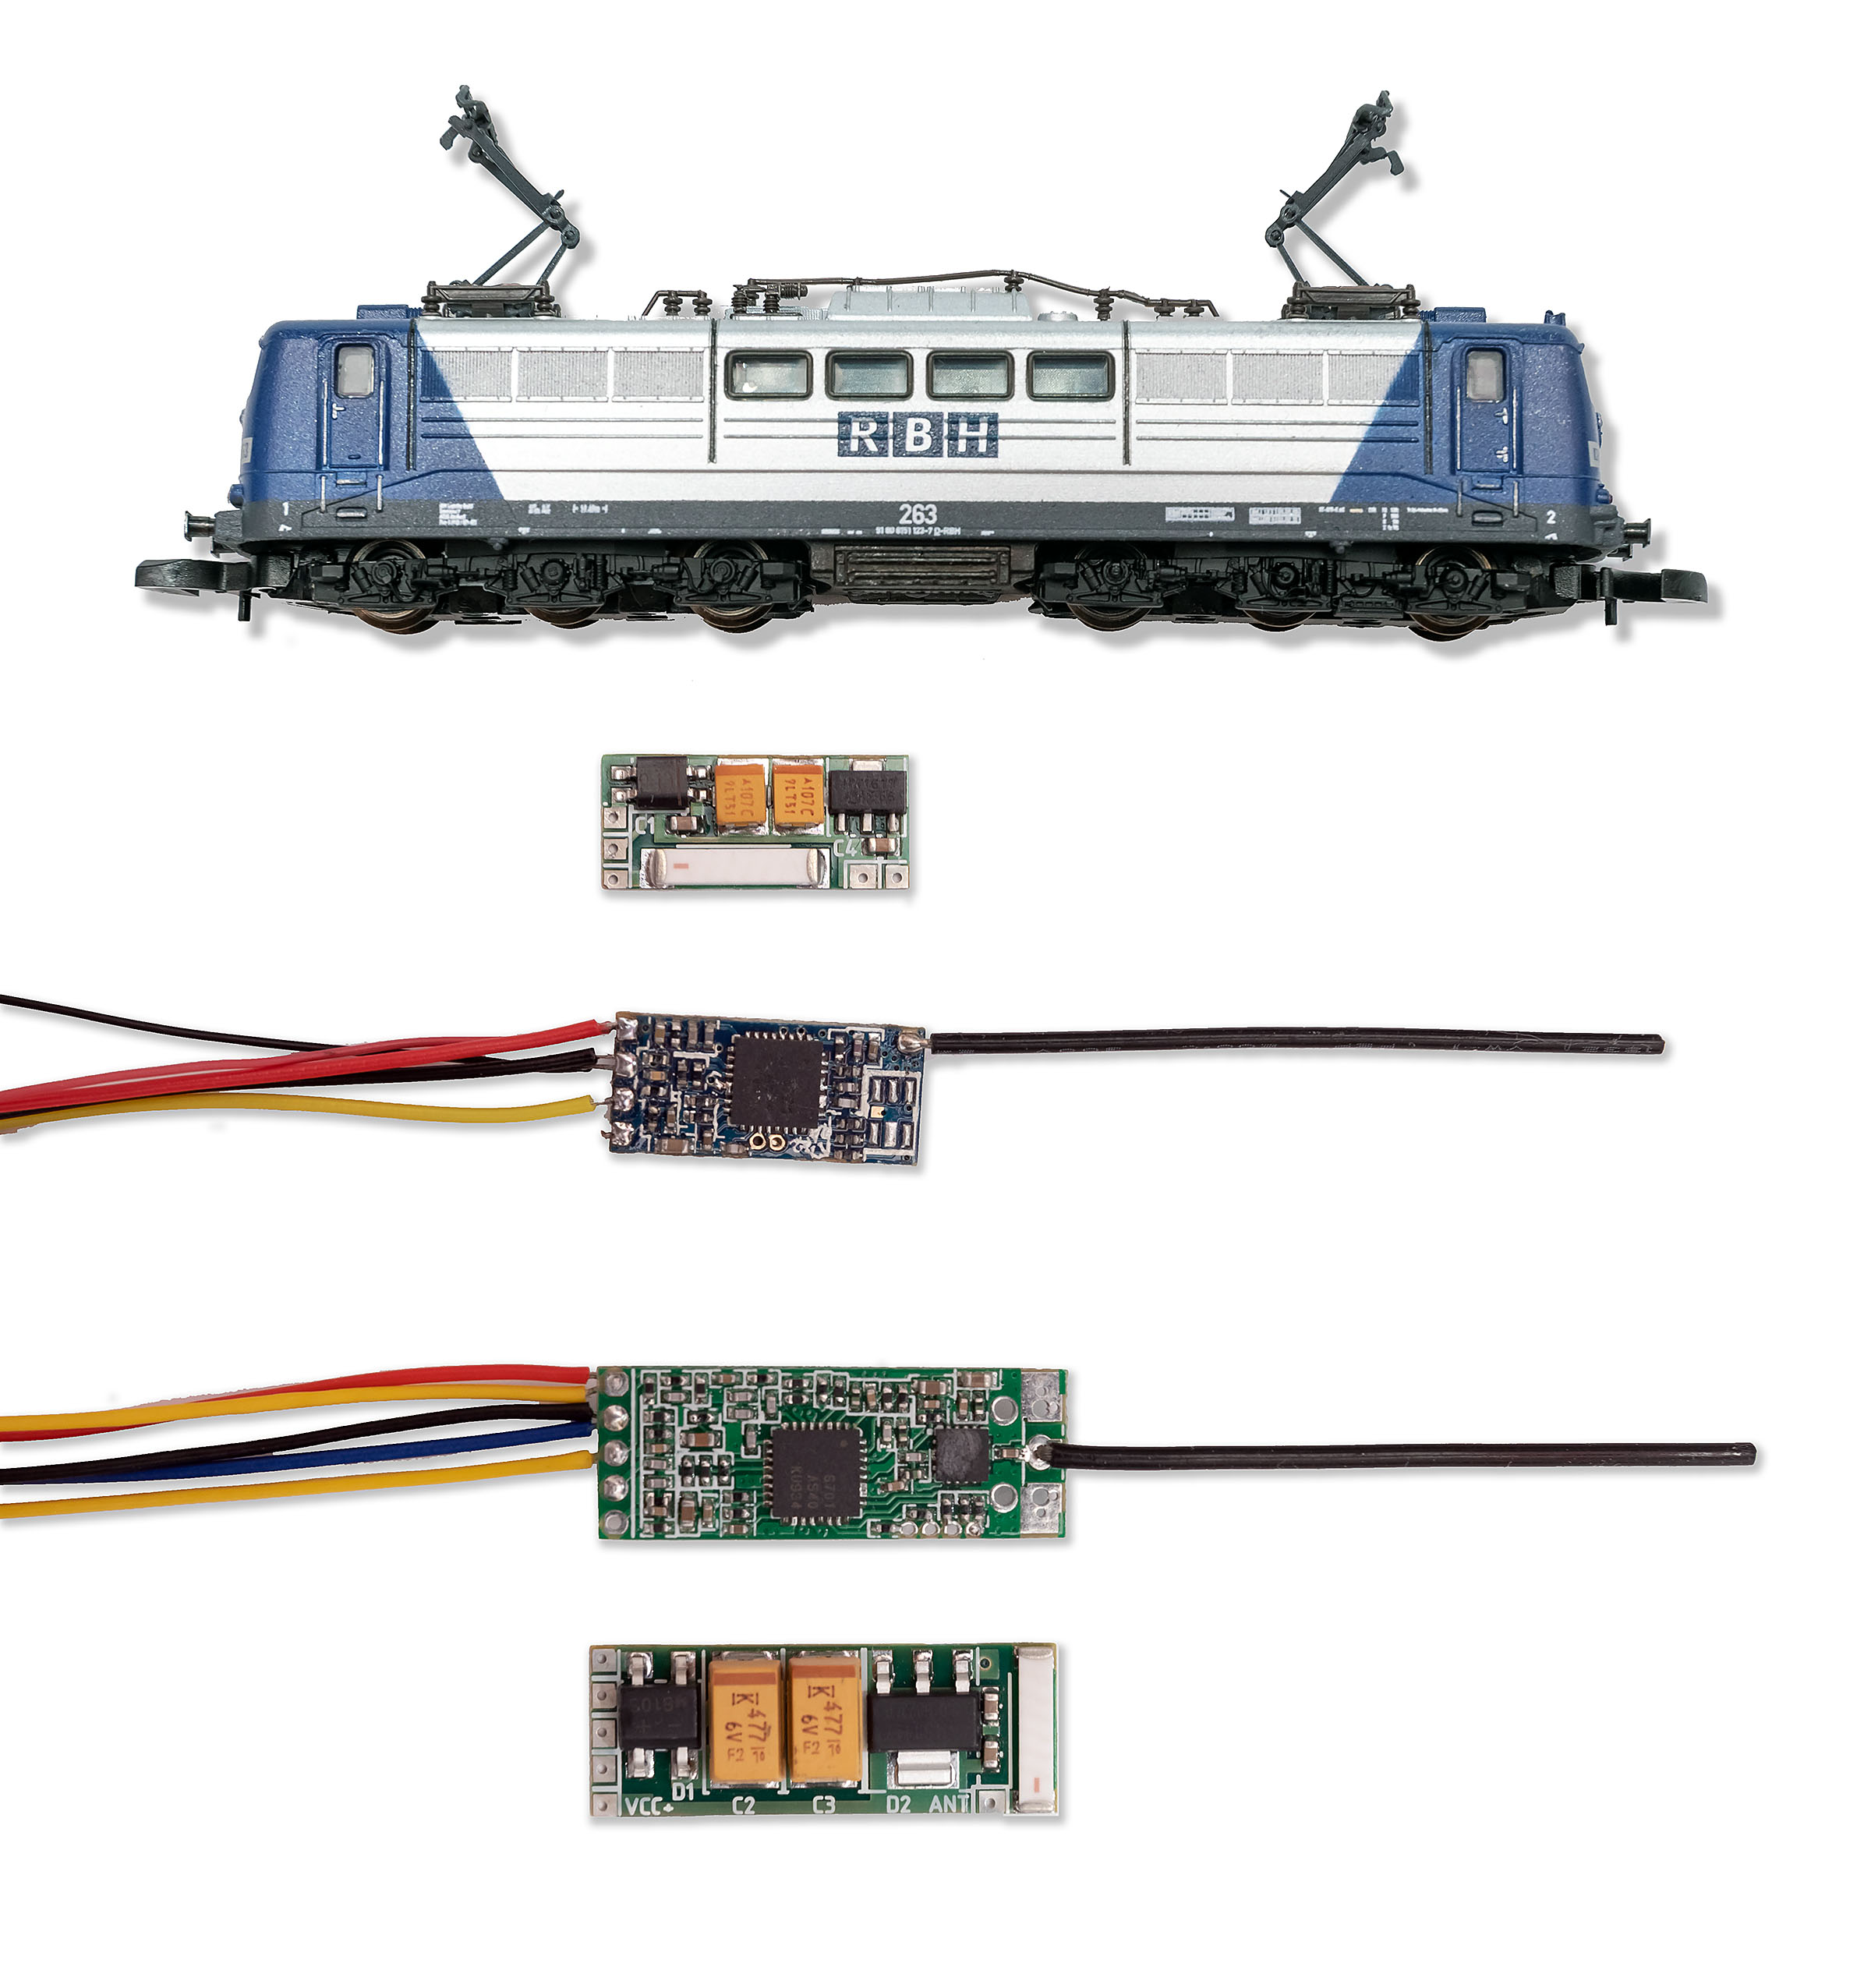 Screenshots of Wi-Fi Camera app for Android (Note: picture in the second screenshot is not native, I added it just for reference): 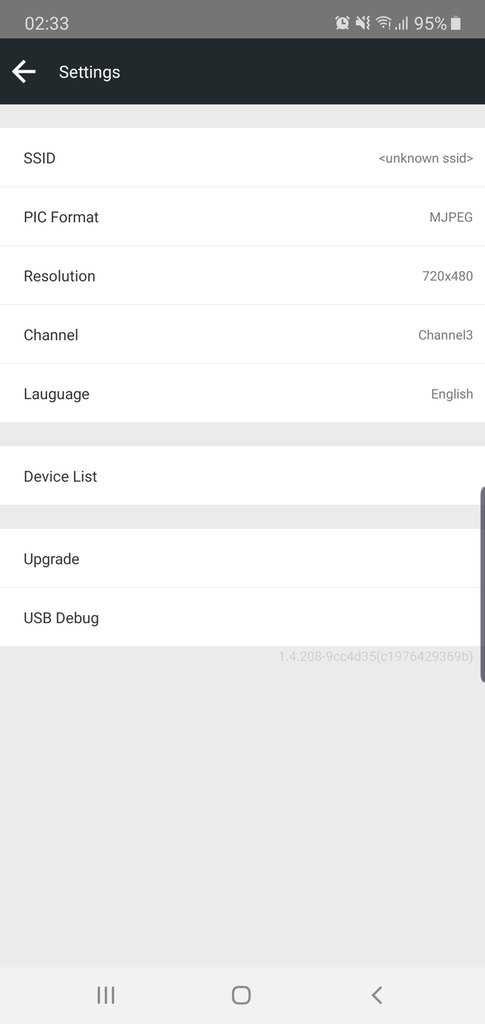 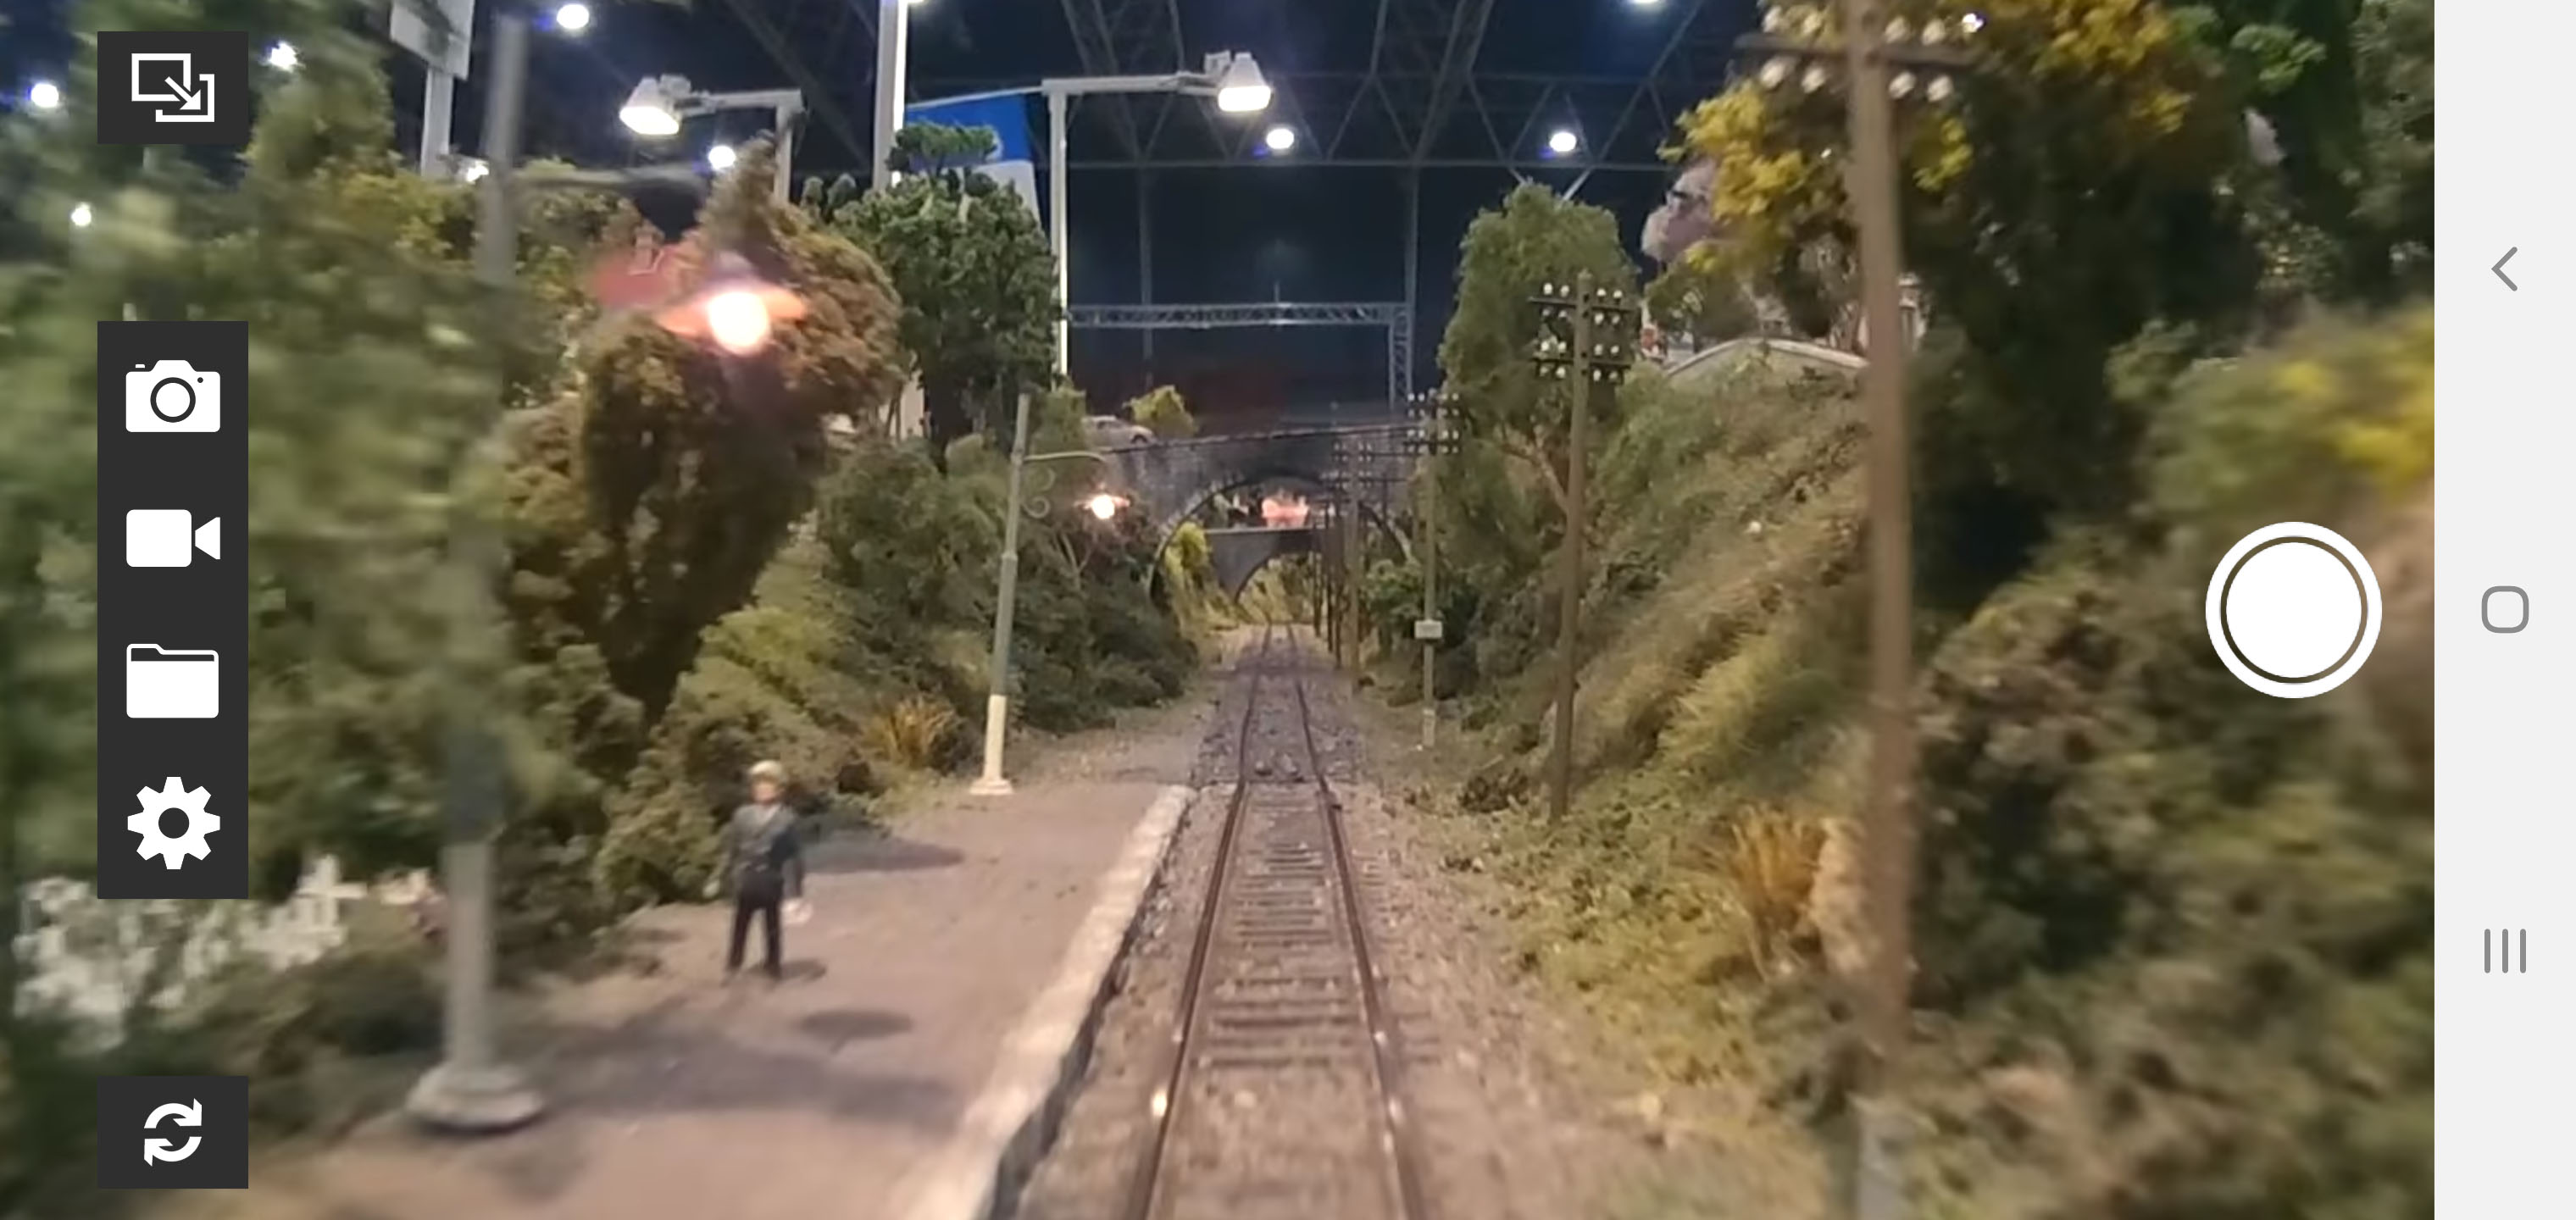 Regards, Alex |
|
|
|
Post by scanrail on Jul 25, 2019 7:19:25 GMT -5
Hi friends, I expanded a very poorly covered category of US electric locomotives with the next beautiful model – Zmodell 99494 – Pennsylvania Railroad class GG-1 electric locomotive in silver color scheme. As always, I was quite disappointed that many Märklin’s models that appear in H0, does not being added to Z scale too. Two years ago, Märklin announced a beautiful silver GG-1 locomotive (Art. No. 37494) in H0. I thought it was easy for them to make it in Z scale too, because it does not required a huge investments since GG-1 already exists in Z (88490, 88491 and 88492). Furthermore, there is no competition here at all – AZL and MTL do not produce electric locomotives at all (and do not even have such plans for the nearest future, as far as I know). However, keeping in mind that Märklin has almost completely abandoned the American theme in Z scale over the past few years, the hope was very small. So again, I decided to fill this gap on my own. The model is based on Märklin 88492. It is upgraded with my own metal weight inserts: azlforum.com/thread/974/upgrading-marklin-prr-electric-locosAs usual, my GG-1 locomotive features fully reproduced prototypical lettering on sides and cabins using UV-cured and pad printing technology (it means that there are NO decals - lettering is printed directly on the surface). The locomotive is available in both analog and digital versions. Velmo LDS609646 decoder is used for digital version. This decoder has a small bonus feature: separate interior lighting for both driver’s cabins (switchable via F2 and F3). I have also upgraded headlights – old dull yellow LEDs were replaced with new warm white 0603 SMD LEDs. I had to develop a dedicated circuit board for this, since original light boards were not very good for upgrading. A hole for the catenary switch was also completely removed. The model is packed in a specially designed package.    Silver GG-1 with Märklin Pennsylvania lightweights set (Art. #87847):  Real life prototype:    Regards, Alex |
|
|
|
Post by scanrail on Jul 5, 2019 17:40:53 GMT -5
Hi Rob, Thank you for detailed info and explanation! I'm aware about extreme costs of the each new tooling. Rough calculations show that to justify the production of each new model you should sell it not less than 1000 times (and more is better). As for me, I'm not focused only on the models I'm familiar with (or which I just seen or used them). Basically I collect everything that is interesting for me in this or that aspect. That's, by the way, why I'm here I'm from Europe, but I like US railroad fleet very much due to its diversity and totally different design (in comparison with European models). Why am I telling about this - just because I hope that there are railroad hobbyists in the US who don't concentrate on the domestic railroads too, but collect something different as well. I often envy what a huge assortment all other scales have! Even N-scalers have everything that can be ever desired. This includes US electrics too. Just remember N scale ACS-64 by Kato and their beautiful Maersk sets. Another reason is that almost every track is electrified in Europe, and anything non-electric look a bit unusual for the everyman from Europe I know Harald Freudenreich, he makes very good and detailed models. I also own X995, but in native Swedish livery. The only problem is that he sells everything for the price that is noticeably higher than an average level affordable for most buyers. While $150-200 per loco is mostly Okay for everyone, $500 locos will be too pricey ones. In the end, all that remains to be done is to cherish a hope that one day the dream come true and we will see anything from this in Z scale: 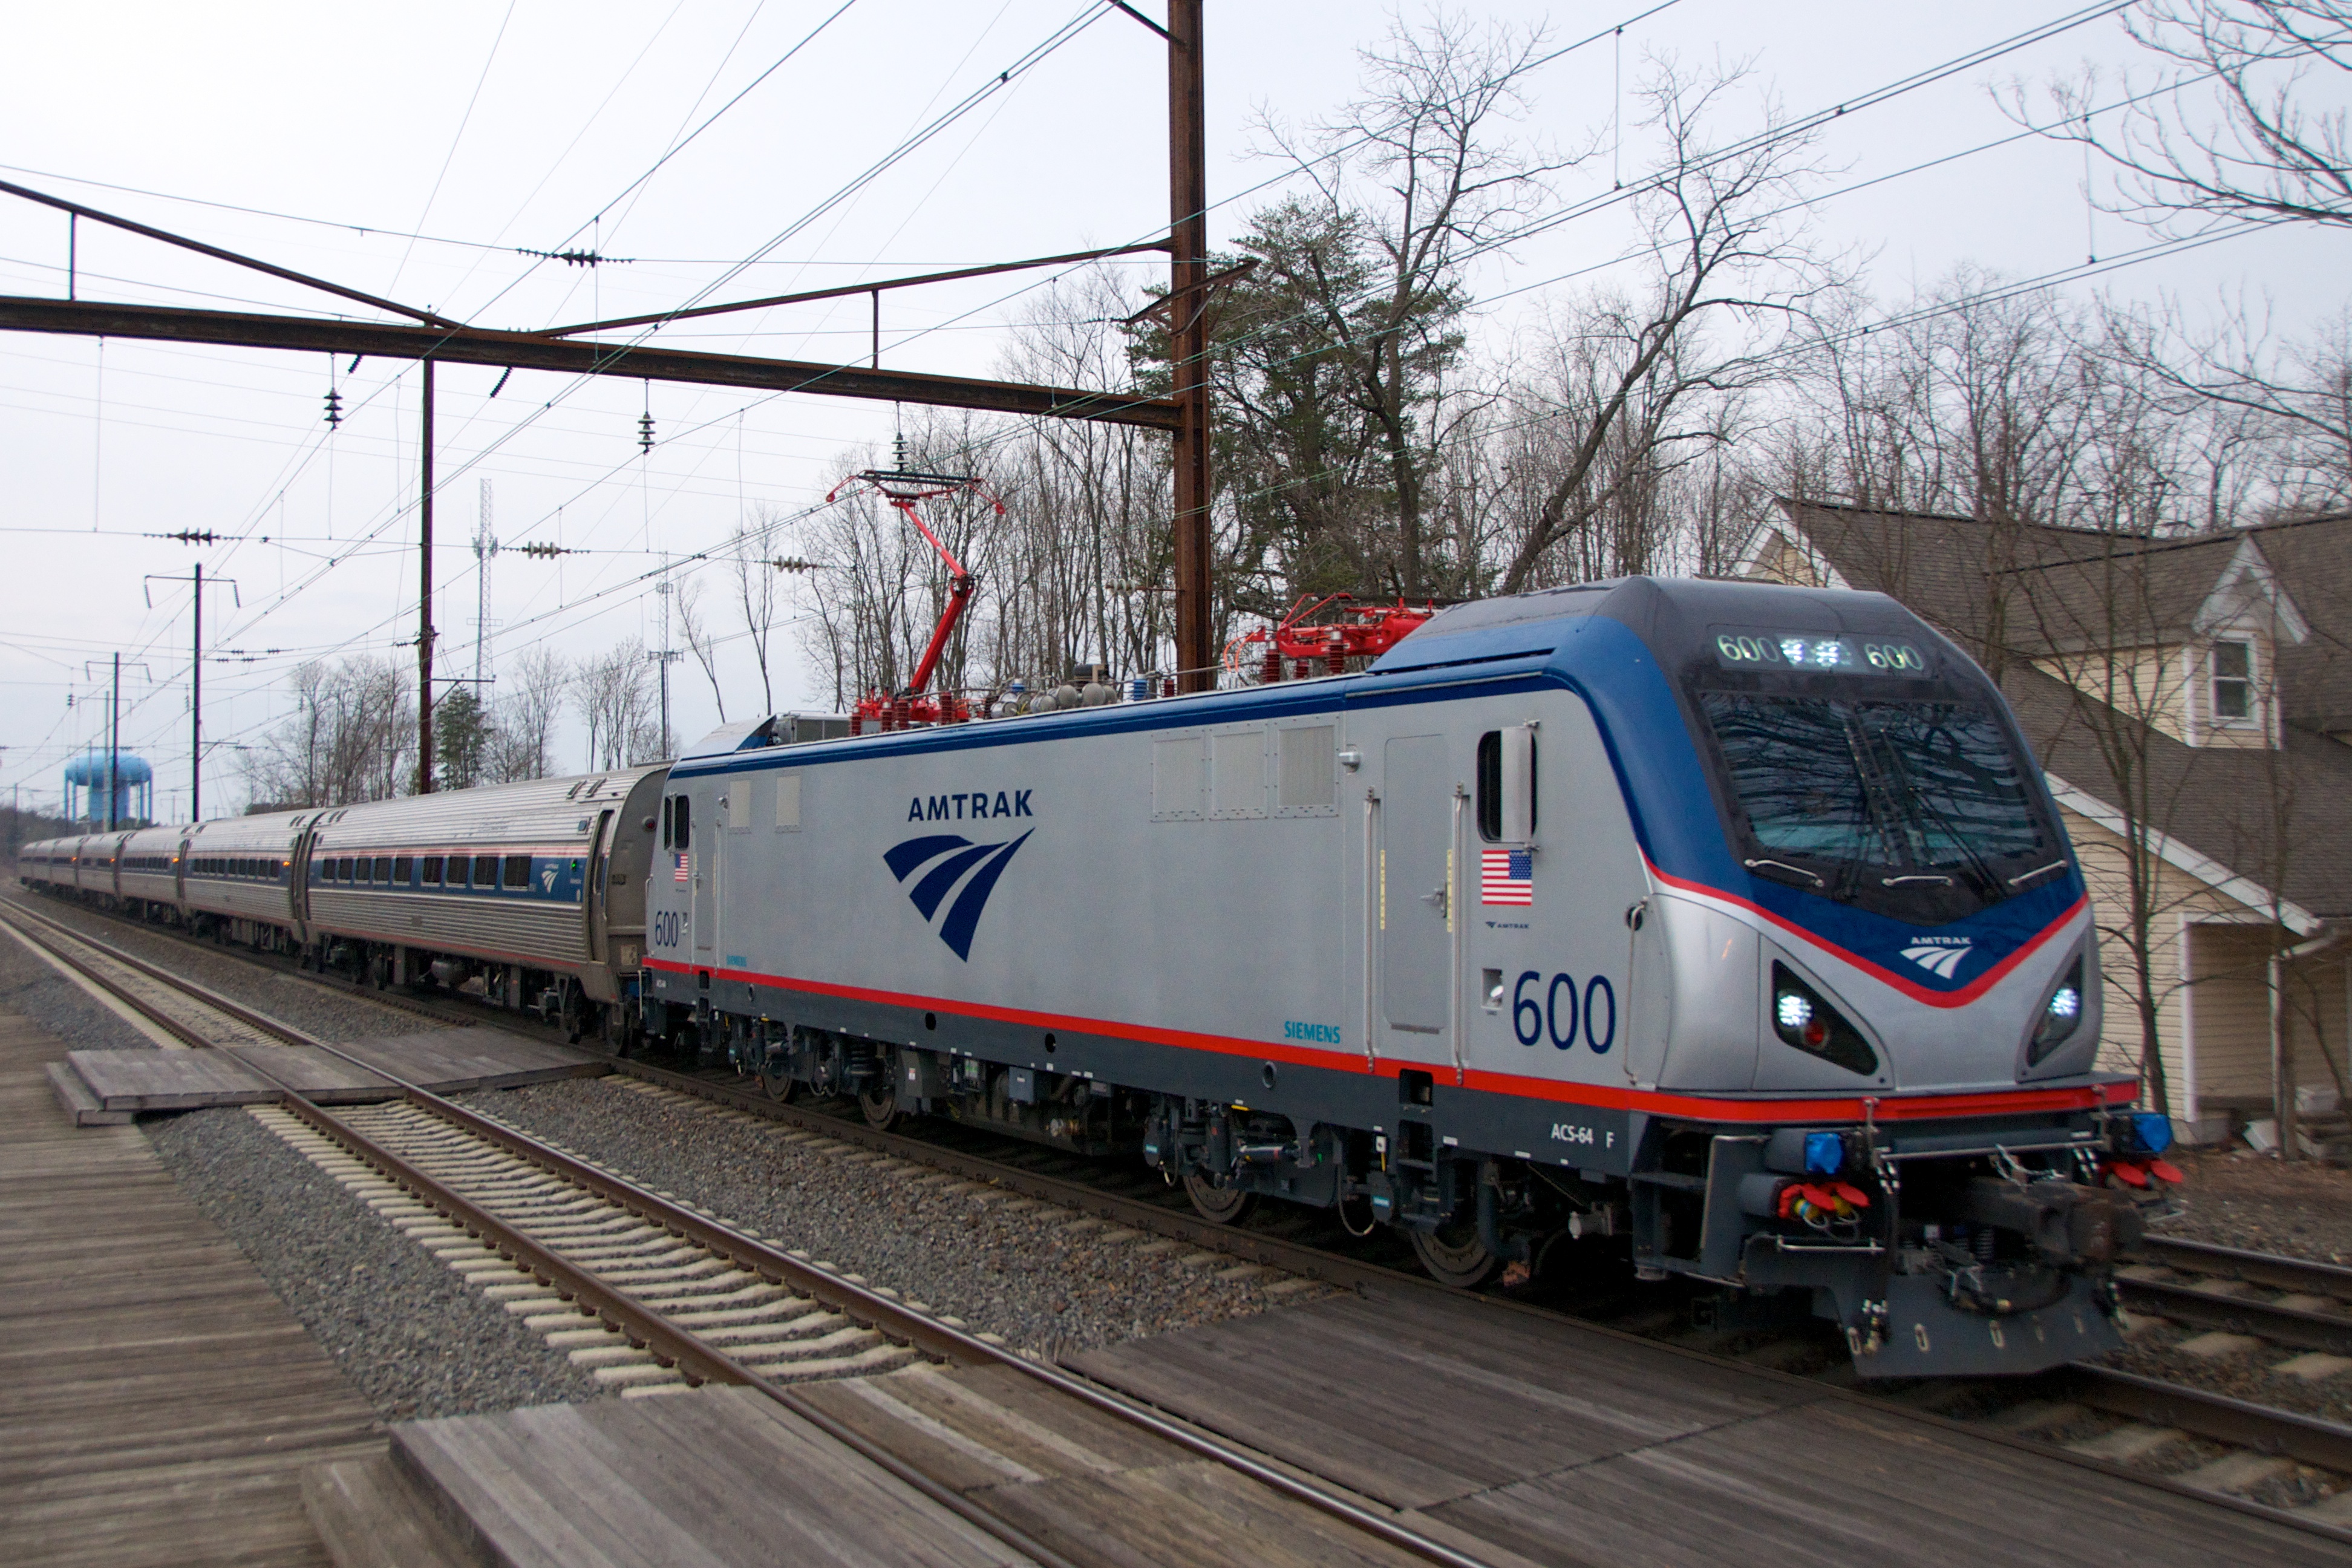 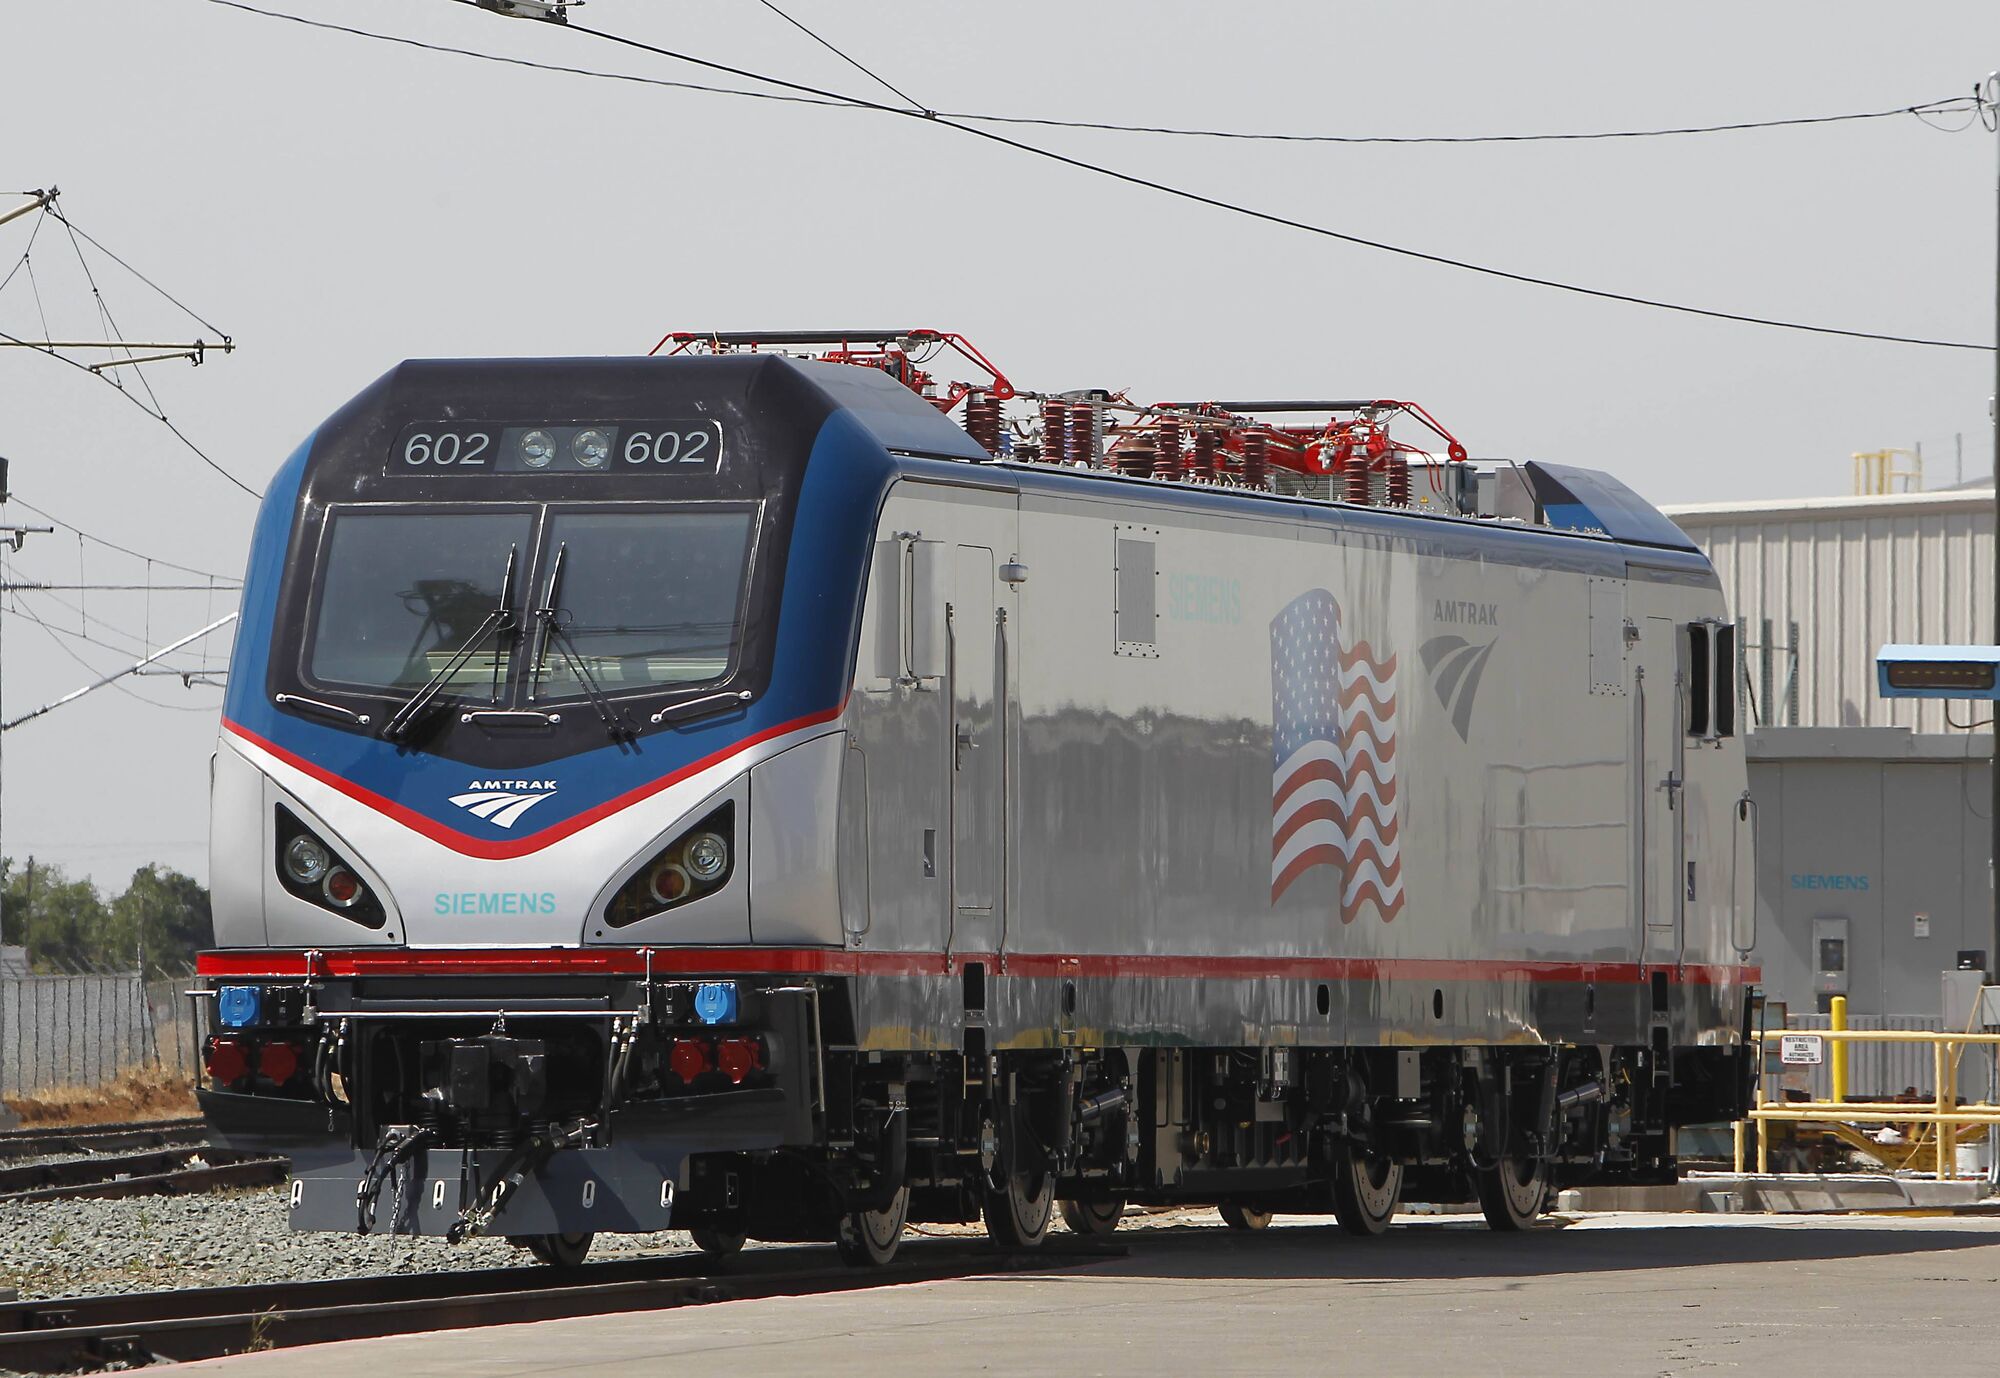   Regards, Alex |
|
|
|
Post by scanrail on Jul 1, 2019 14:49:01 GMT -5
It may not be related directly to the topic, but following cwrr's question, I would be happy to hear from AZL: when will the Electric Era finally come to Z scale? I don't even want to name specific models, please can anybody tell - when will we see at least anything electric here? Despite I'm Z scale fan since 2006, I assume that I may not understand priorities of US model railroaders too deeply (just because I'm from Europe), but the fact still surprises me: during last 10 years AZL produced a countless number of different locomotives and cars (importance of which beyond any doubts), but there is still no place among them all for any electric rolling stock unit! Alex 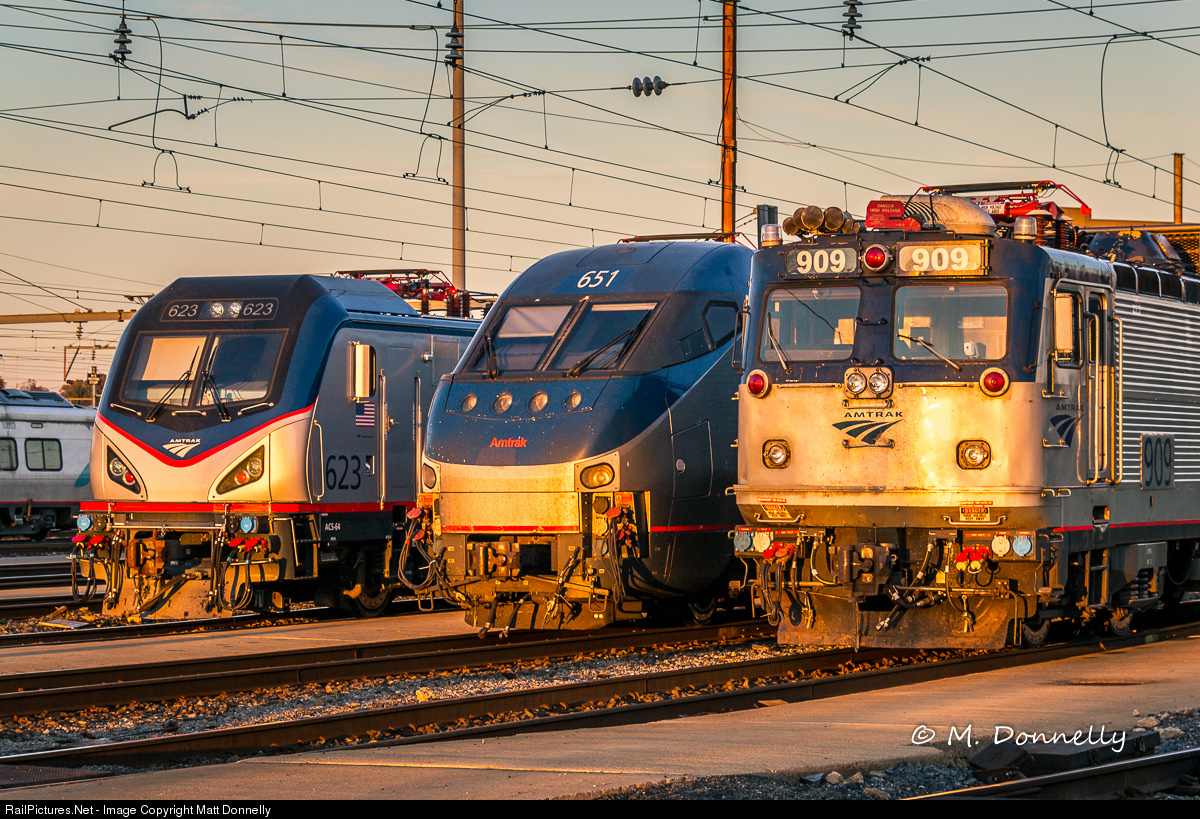 |
|
|
|
Post by scanrail on May 10, 2019 6:15:24 GMT -5
Hi friends, Yesterday Märklin announced Summer 2019 New Items: streaming.maerklin.de/public-media/son19/en_ma_sonh_2019.pdfAlong with other stuff they announced unexpected and a bit weird model - Swedish loco in US Great Northern color scheme. The prototype is TMY series diesel locomotive of the Swedish private railway TÅGAB. Former Danish series MY 1100. 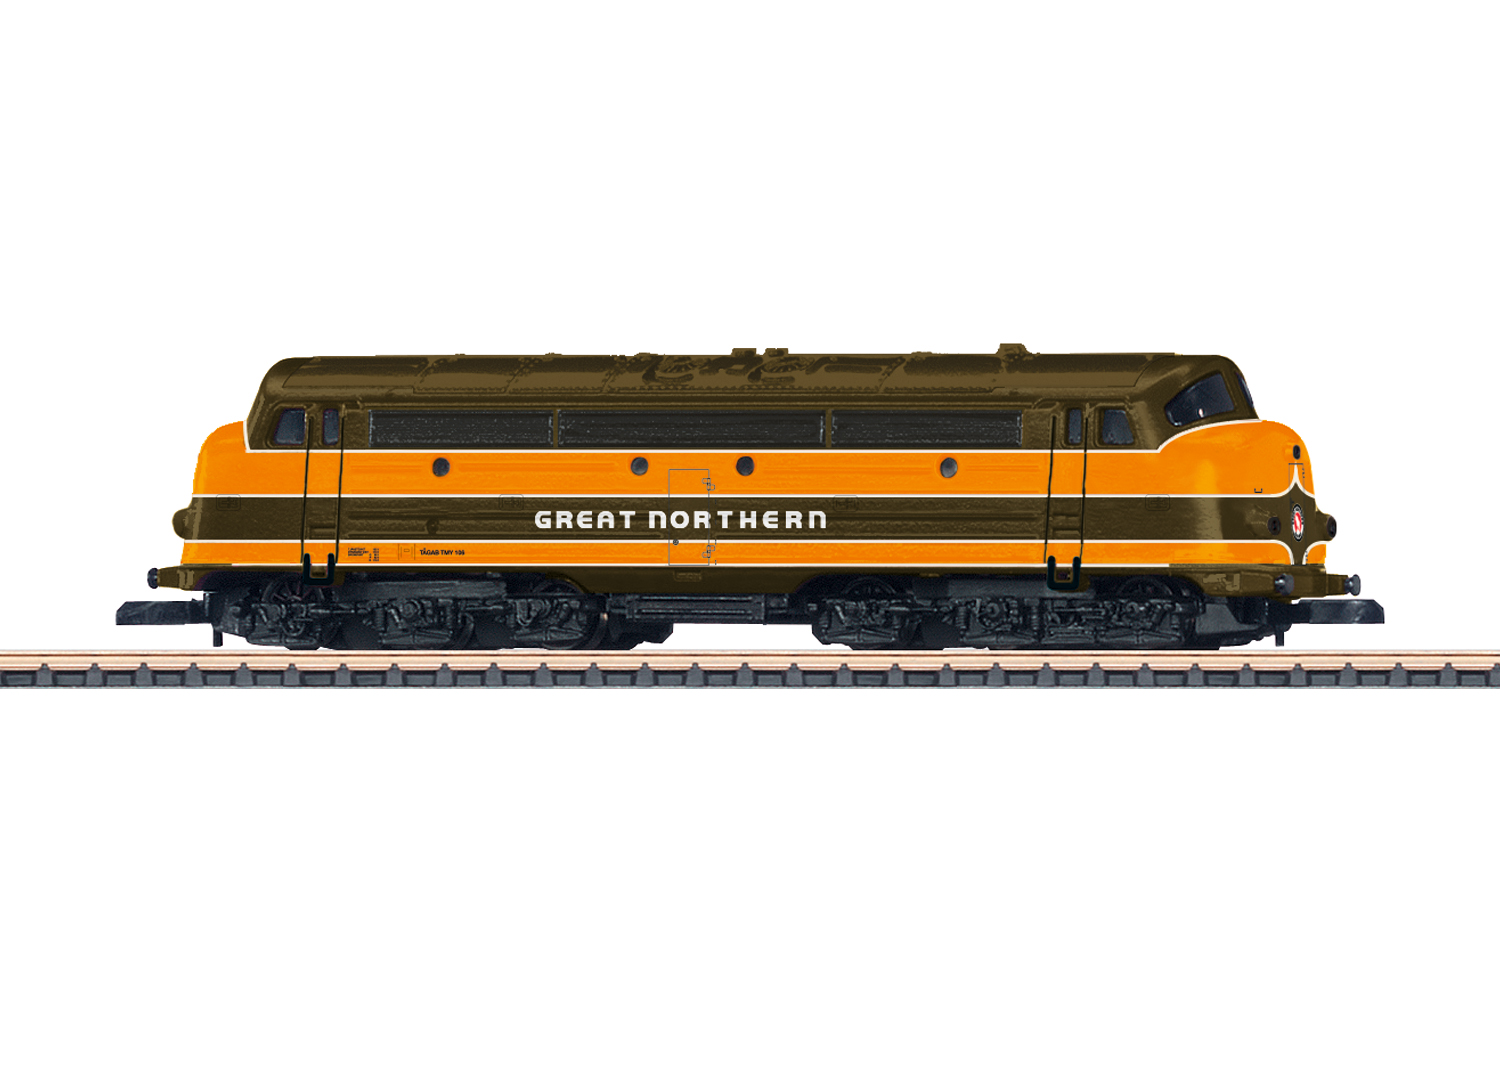 Link to the product page on official website: www.maerklin.de/en/products/details/article/88636The story of this locomotive is quite interesting (found on another forum): Prototype:  Another picture of two Swedish locos - TMY and T43 switcher repainted into Great Northern scheme:  Original EMD F7 in Great Northern color scheme for comparison:  Greetings, Alex |
|
|
|
Post by scanrail on Feb 15, 2019 18:25:48 GMT -5
Great news about F40PH! I hope it will be an affordable molded plastic variant rather than an expensive (and a bit less detailed) brass model?
Greetings,
Alex
|
|
|
|
Post by scanrail on Feb 13, 2019 12:36:39 GMT -5
My question about VIA Rail lightweights: whether other types of cars will be released in the future for this road name? For example, dome car and others: 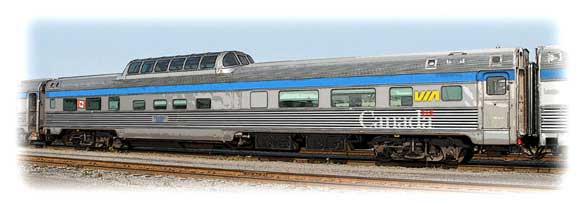 I see that VIA Rail is not listed in announced road names, so in order to make a complete VIA Rail train set, should I just buy several AZL-73751 coaches, or there will be also other car types in future? Greetings, Alex |
|
|
|
Post by scanrail on Jan 13, 2019 12:36:37 GMT -5
Technically, AZL UP color scheme is 100% correct. I even compared colors in Photoshop. But MTL's UP shade of gray is still much lighter than the lightest variation of gray on real locos on attached picture:  |
|
|
|
Post by scanrail on Dec 26, 2018 12:30:54 GMT -5
Ingo, you are absolutely right. I noticed the same effect - the smaller the scale, the lighter should be original colors. For example, some Marklin Z old German locomotives and passenger cars from I-III Era that are painted in prototypically correct dark green colors, actually look almost like black.
But in case with Union Pacific colors I believe MTL went too far. I'm not one who like to weather rolling stock, so for such users it is necessary to have more correct colors... Even more: I have to say that while red and white are correct colors for SOO line, they should have used a darker, more grayish tint of white for their F7 units to get more realistic look, even without weathering.
|
|
|
|
Post by scanrail on Dec 24, 2018 20:18:03 GMT -5
Hi all, Merry Christmas to everyone! Recently I received my MTL SD40-2 Union Pacific from new production run, and I would like to share my thoughts about this model and discuss some of its features and issues. I don’t know if some of these features have been already discussed, but I hope it makes sense to talk about them anyway. This is my first MTL SD40-2, I did not owned old version or used it before. First, I have to say that this model is a very nice locomotive, with good level of details (while a bit lower than top models from AZL like new run of SD7x family and its similarities). It also has good driving characteristics, for me even better than AZL. Some users reported that it achieves full speed too early, but for me it is not an issue, especially considering that it can be digitized, and you will be able to choose or make your own speed tables. Now let me tell a story about how this loco was digitized. In some aspects it became quite a big challenge. I ordered Digitrax DZ123M0 decoder together with loco, and I found that it is not a ‘droppest’ drop-in decoder as it claimed, at least for this locomotive, and installation manual is actually useless at many points. First, there is no feature ‘slide to remove PCB’ in new SD40-2 (actually I don’t know how removal of PCB was made in the old SD40-2, but installation manual claims that it was so). Locomotive frame should be disassembled in order to remove native PCB and install a decoder. Then it turned out that DZ123M0 decoder is very poorly adopted for drop-in installation into SD40-2. Original PCB is equipped with springs to make a contact with halves of chassis, and I had to make the same springs on my own and solder them to decoder’s pads. Onboard LEDs of decoder became the next issue. Original PCB is equipped with LEDs with wired outputs, so they extend towards front and rear light holes of the loco’s shell and therefore give a better-focused light beam. Decoder’s onboard LEDs shine in all directions, so the whole shell glows from inside and it looks awful and unnatural. I decided to unsolder them and replace with some nice warm white wired LEDs: 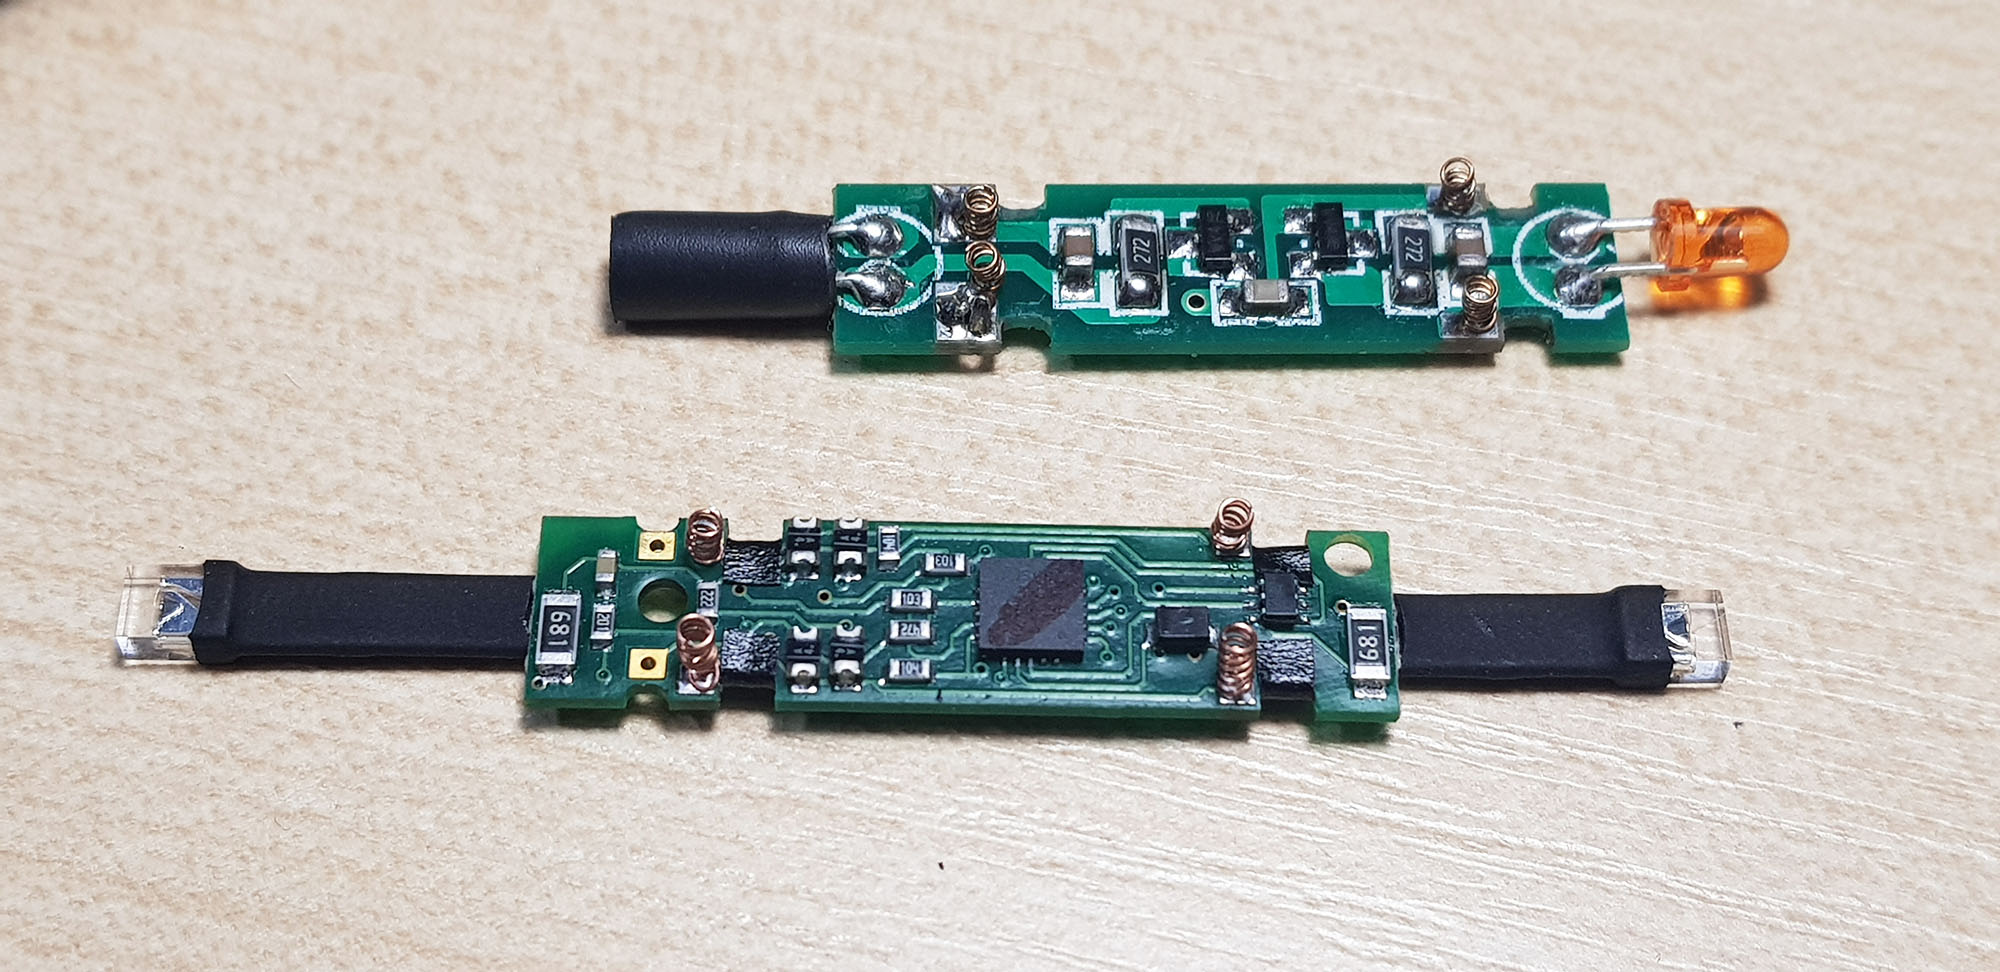 Next challenge was a high risk of short circuit and therefore insulating everything everywhere. While all seemed to be made correctly, after first installation locomotive did not run and after some strokes central station switched off automatically due to a short circuit detection (for info, I have successfully installed about 500 different decoders into various Z scale models during 5 last years). I noticed that motor outputs could easily come in contact with frame, and isolated them with small pieces of shrinking tube. I did the same with springs that connect motor outputs with pads on decoder’s PCB. After decoder installation, these springs arranged diagonally instead of being vertical due to the lack of sliding action. I even had to apply pieces of adhesive tape to the fragments of PCB where decoder comes in contact with frame clips, because I discovered that clips can possibly touch vias on circuit board. 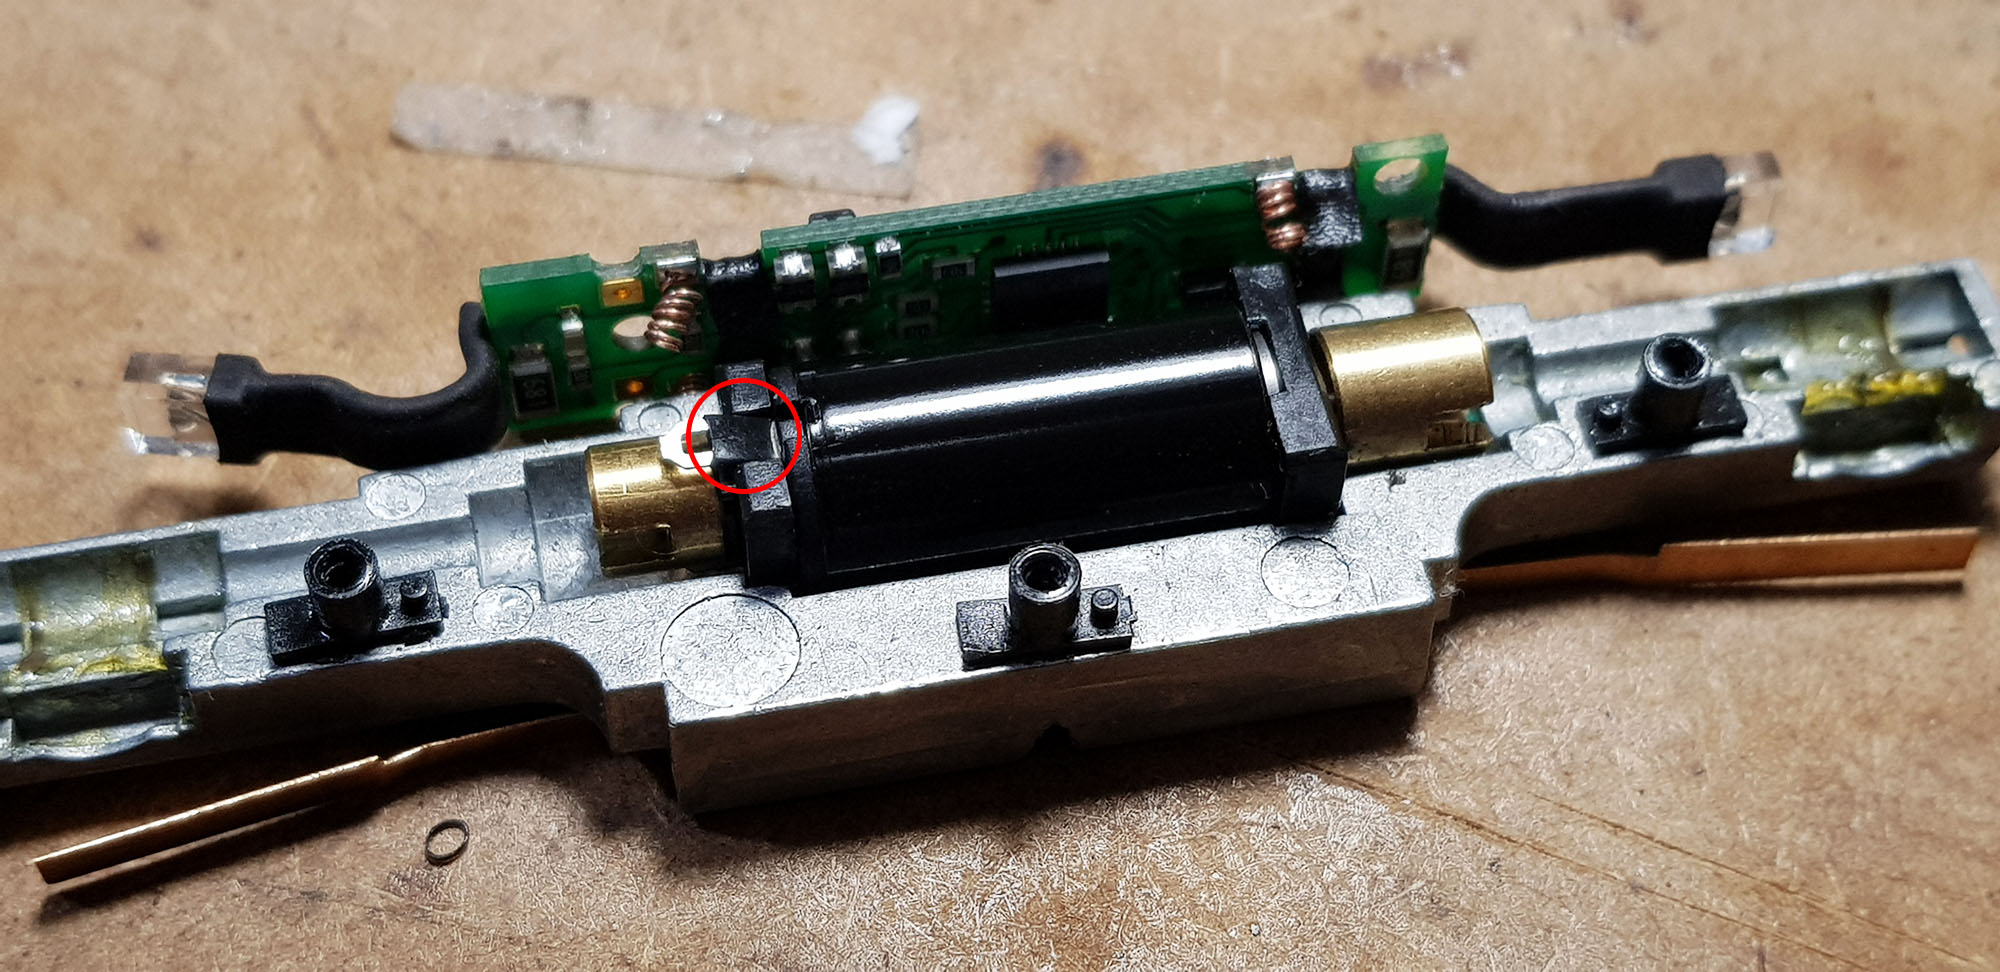 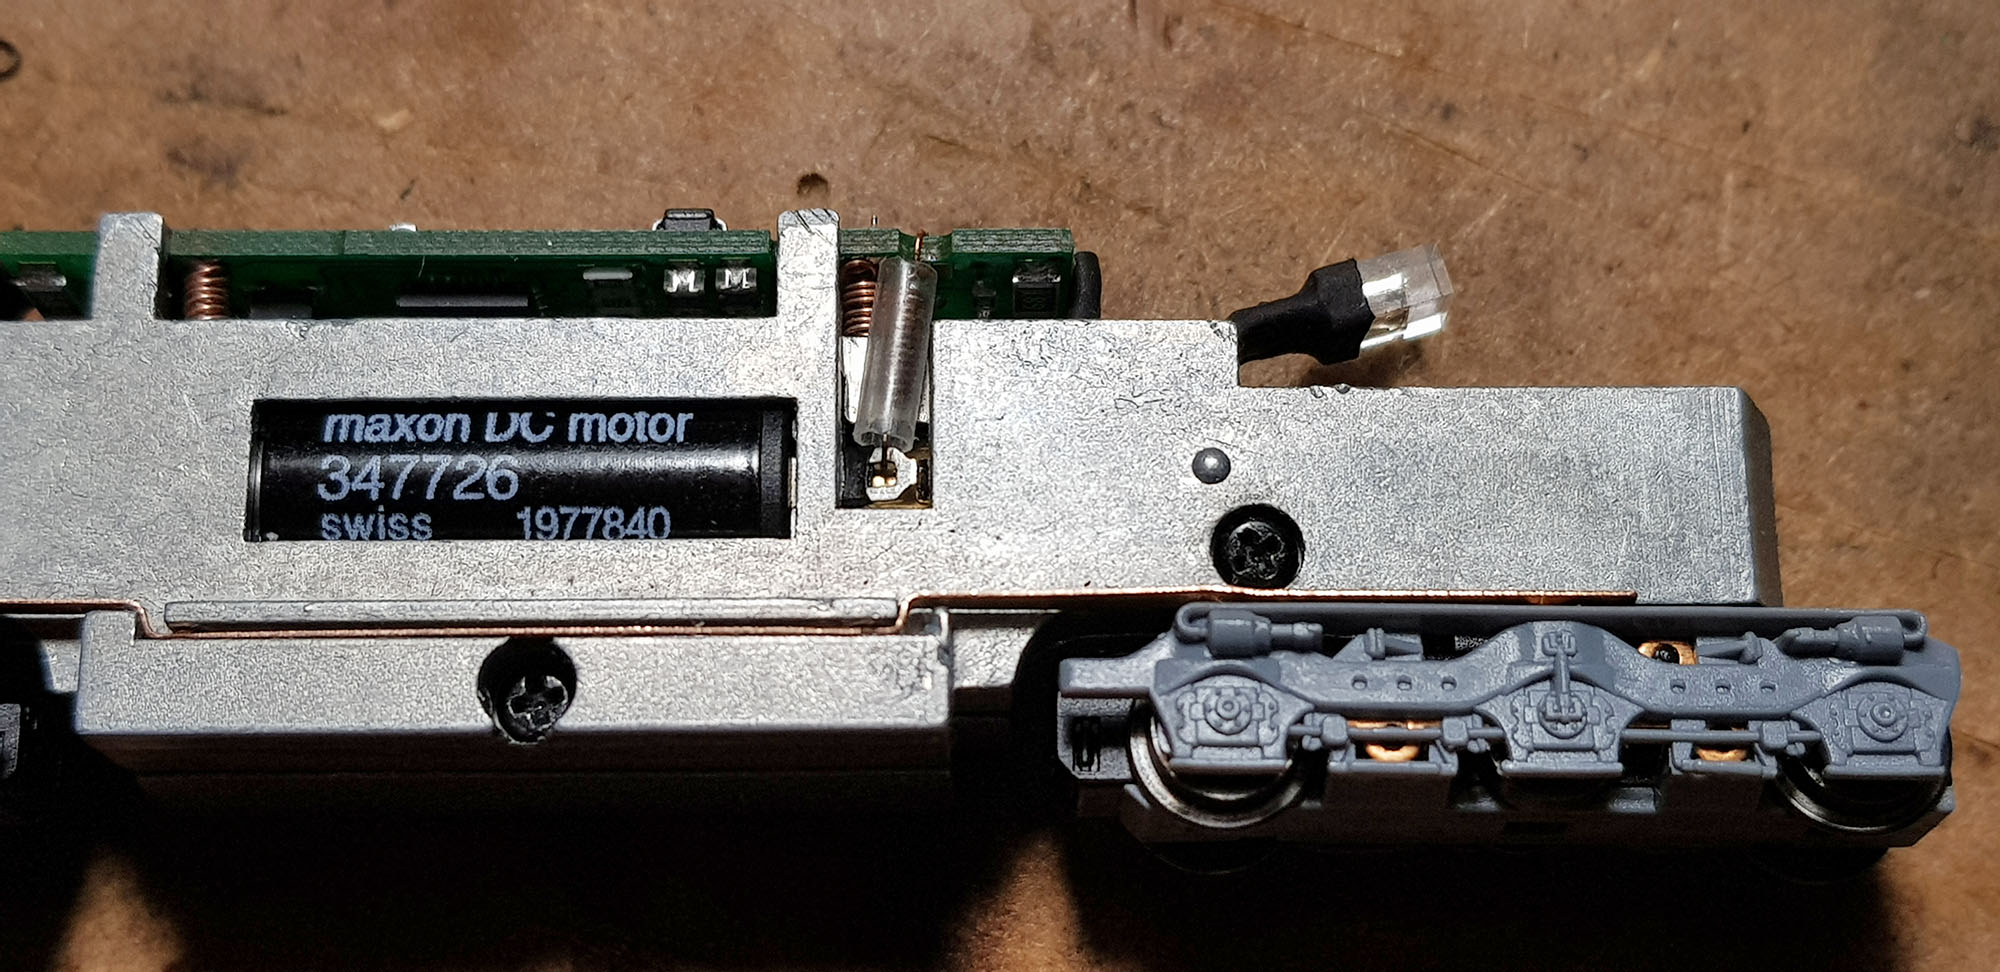 Finally, after all these measures everything worked right. I liked that SD40-2 did not slowed down after digitizing (like AZL locos that are very slow by nature and become even more sluggish after installing decoder). Now I would like to discuss some issues (or features?) that I don’t like in this locomotive. First, it is a shade of gray in Union Pacific livery. I think that it's noticeably lighter than it should be. All AZL locos in UP color scheme look way more naturally. Compared to all other UP engines I have, SD40-2 looks odd among them: 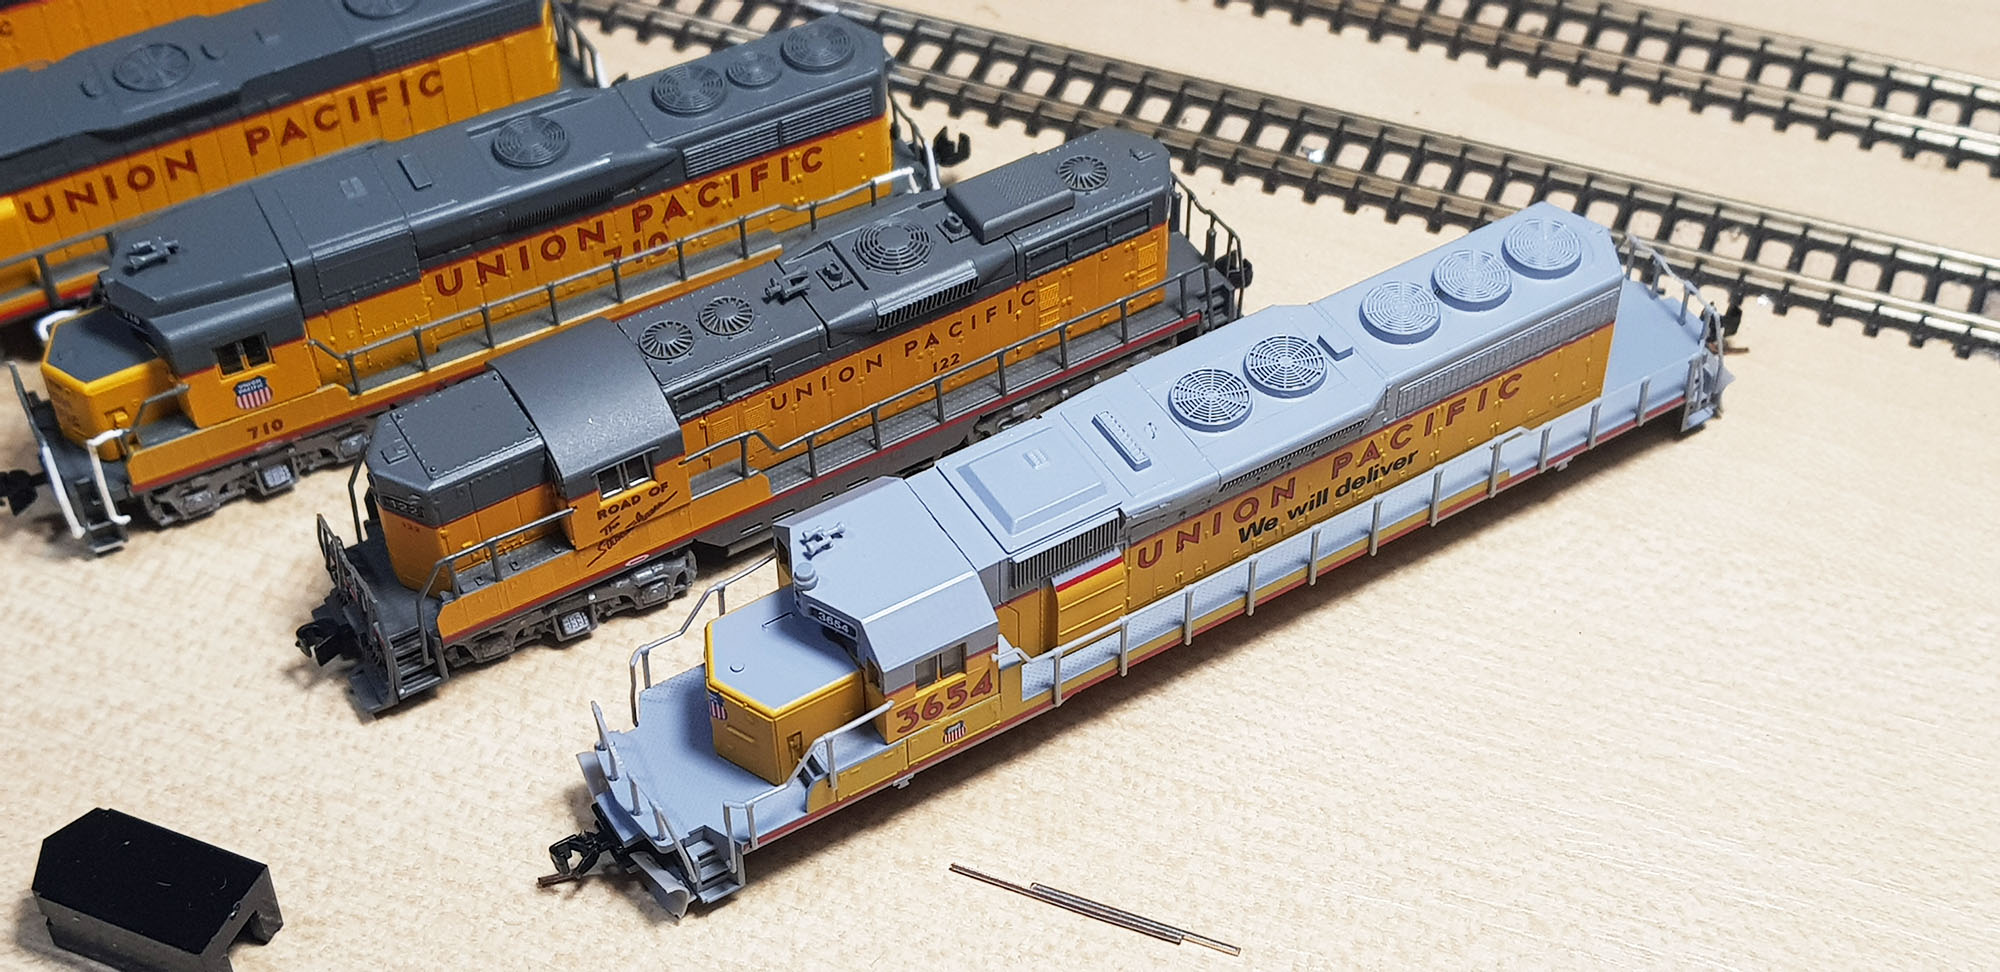 Then, there is a poor light isolation inside loco, despite of the black plastic parts that intended to serve this function. There is too much light come out of cabin together with headlights, and a significant part of engine’s body visibly glows when rear lights turned on. For the rear part of engine it is so because of a clear plastic part that transfers the light to the rear number plates and taillights: 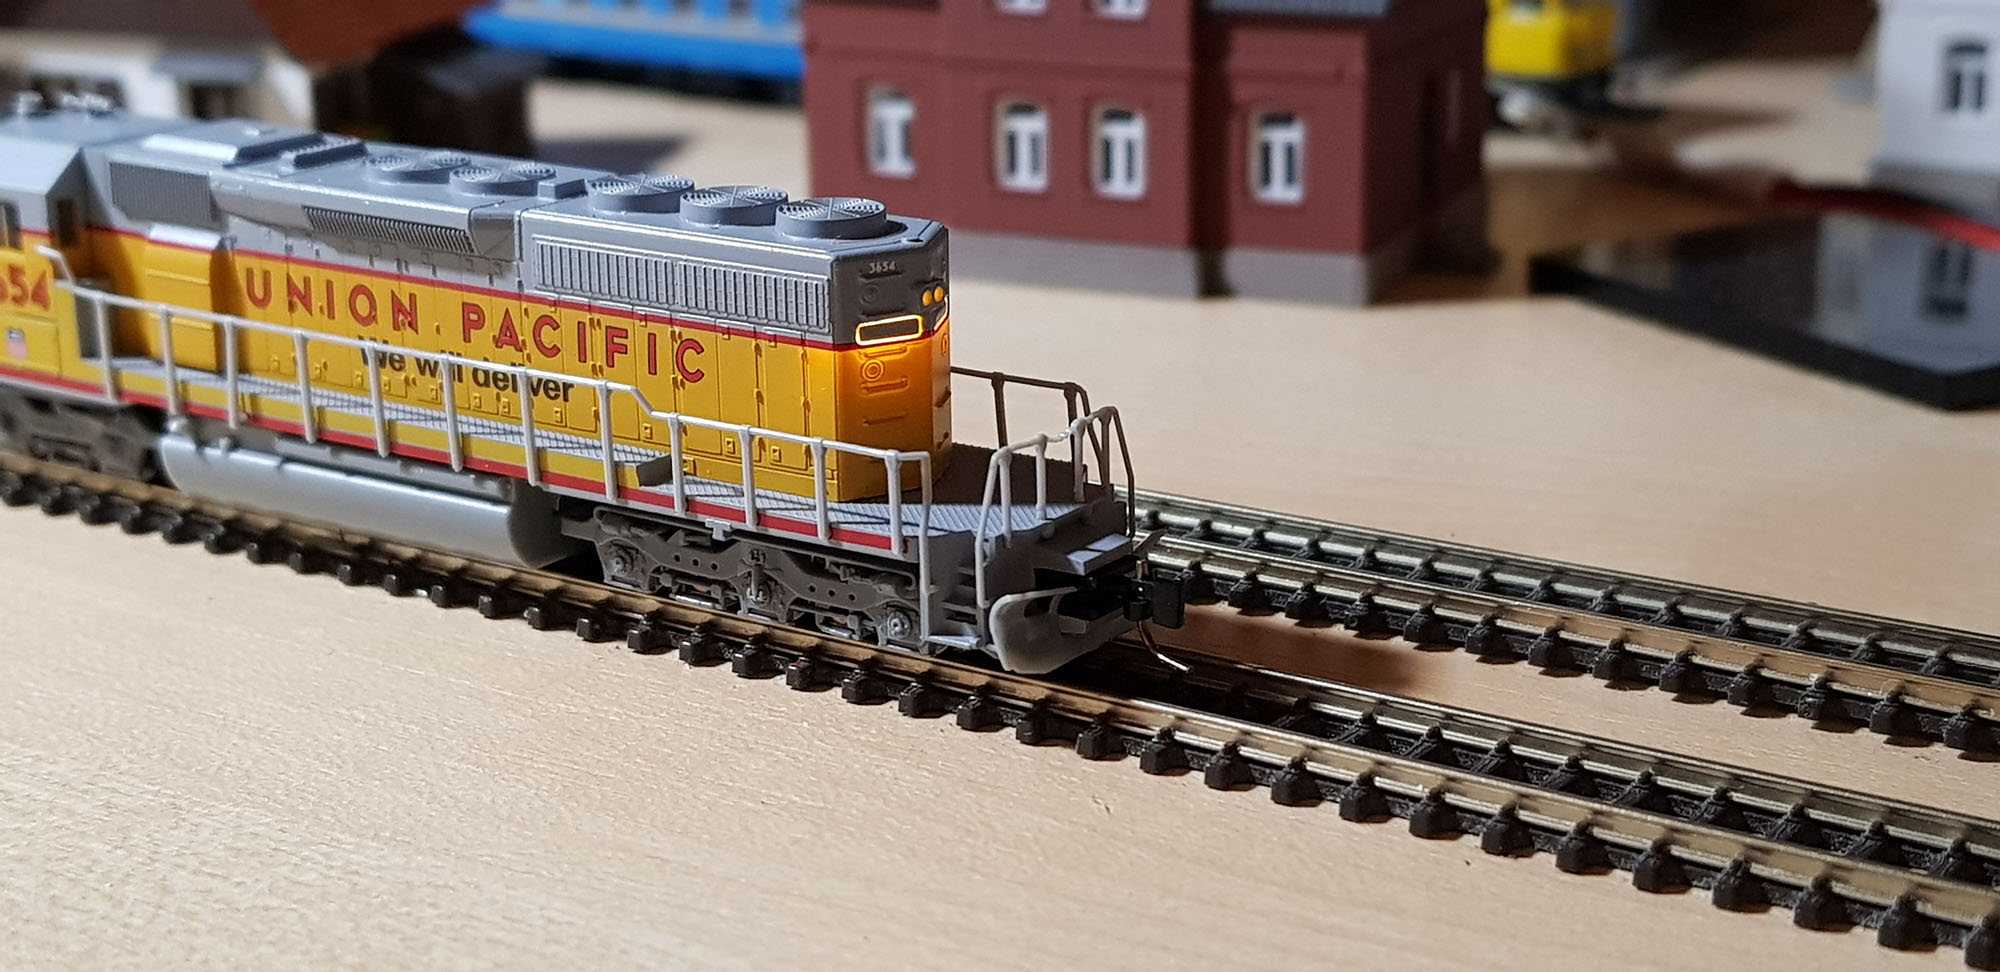 I found this issue critical, removed this part, painted this area with black and installed it back again: 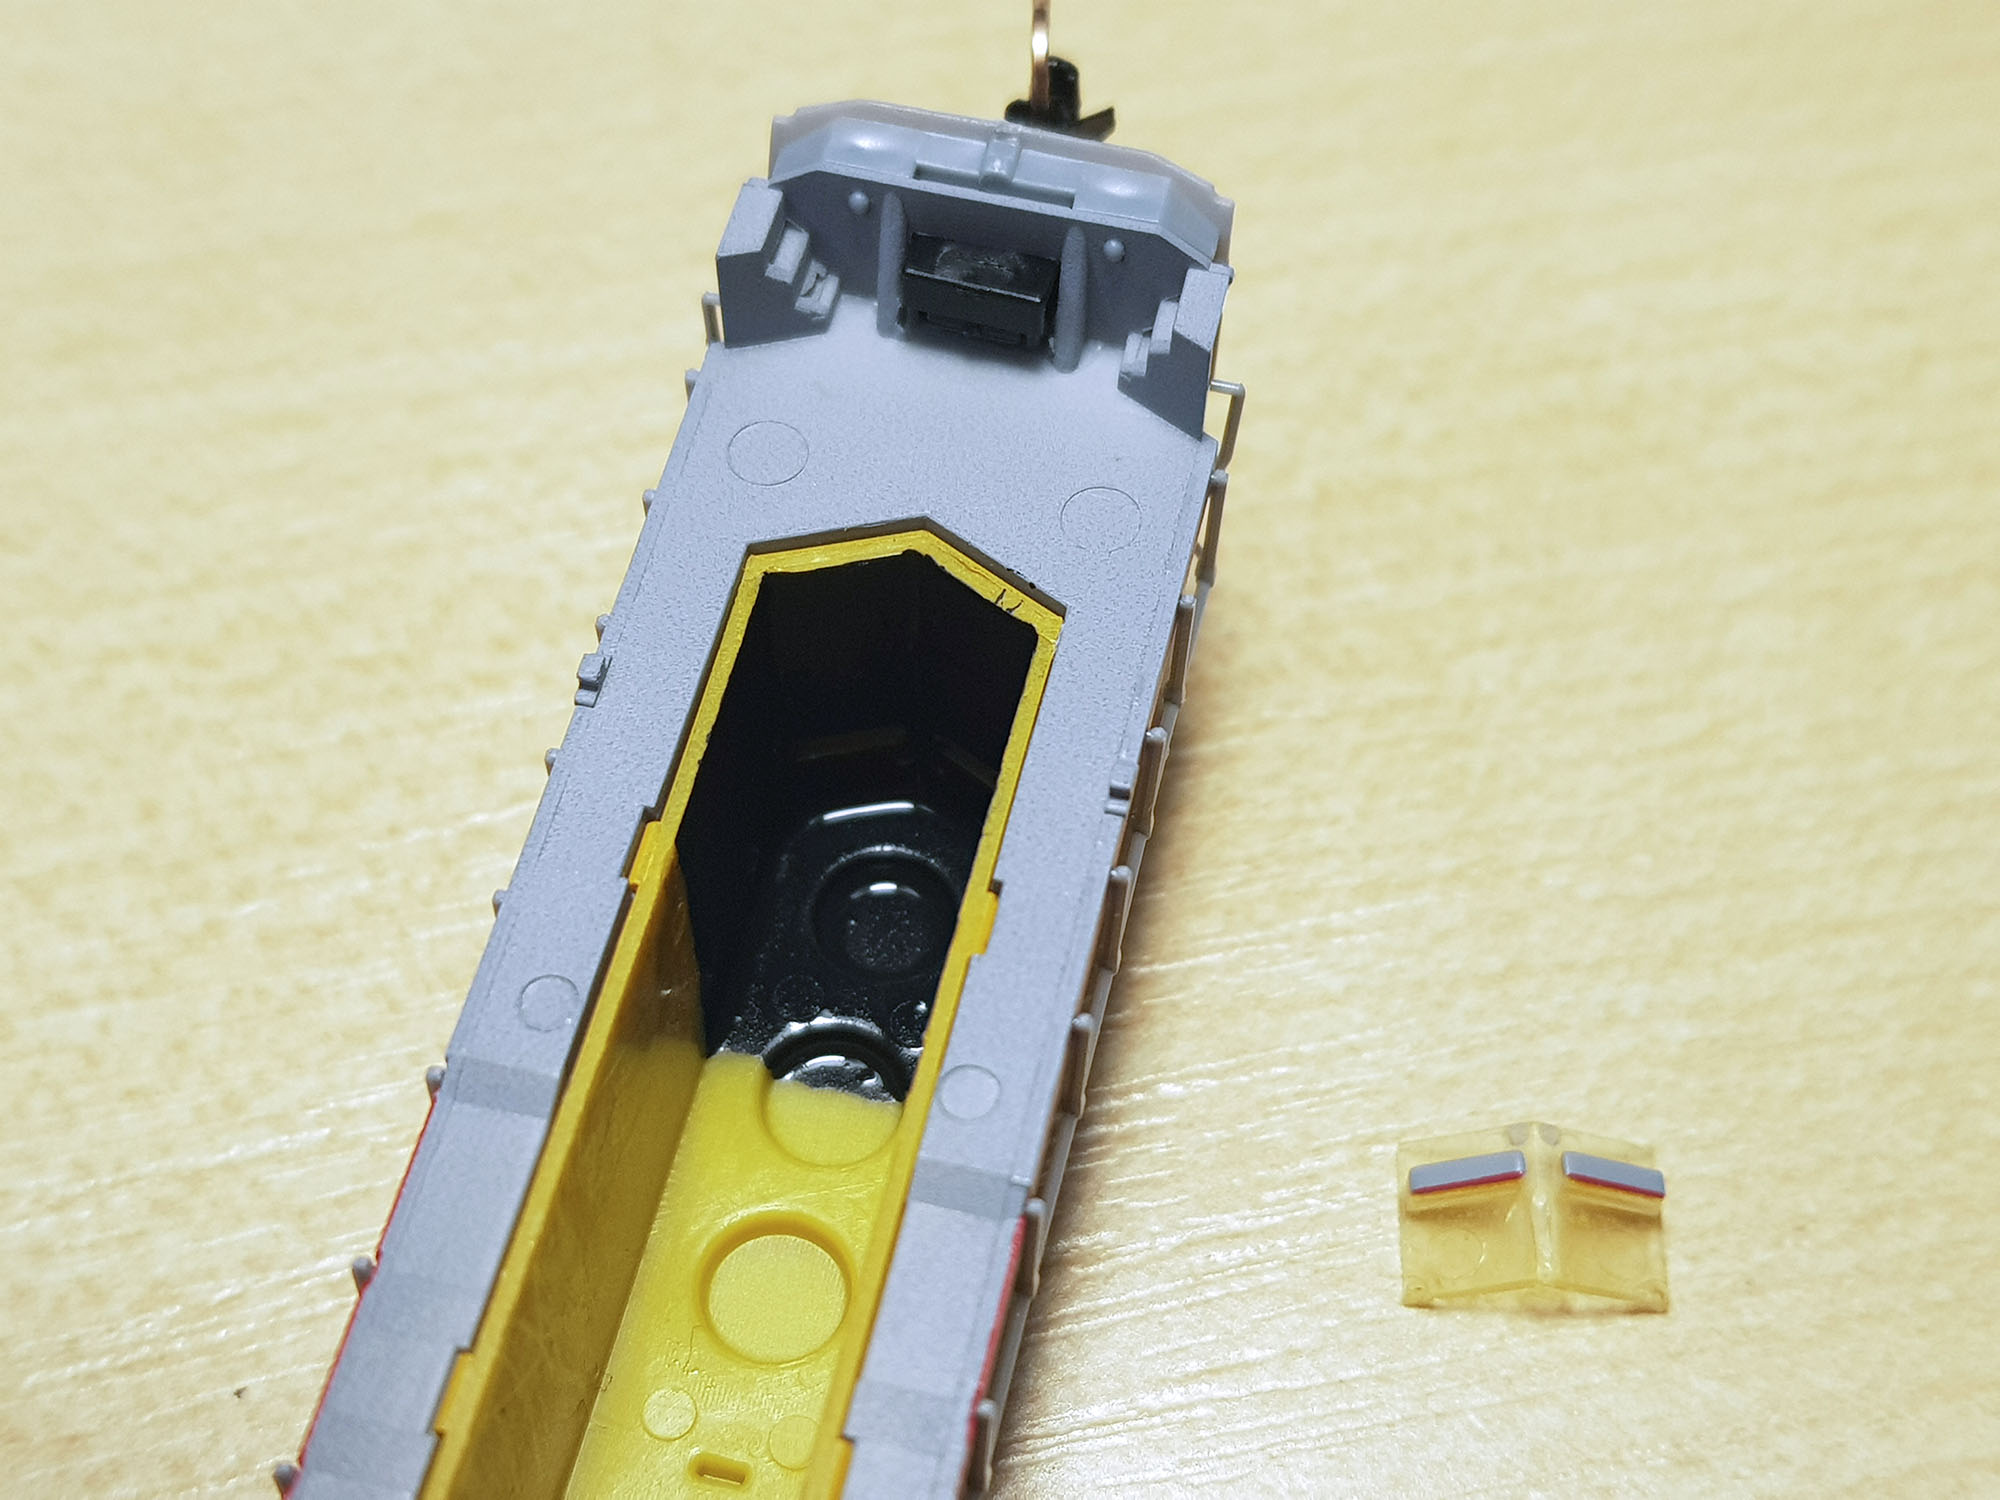 Then, I noticed that holes for headlights and taillights are empty. They simply lack light guides. Why it is so, MTL? Just to reduce production costs a bit? But it looks unnatural… I fixed this too – I filled these holes with pieces of fiber optic, and lights got a definitely better look: 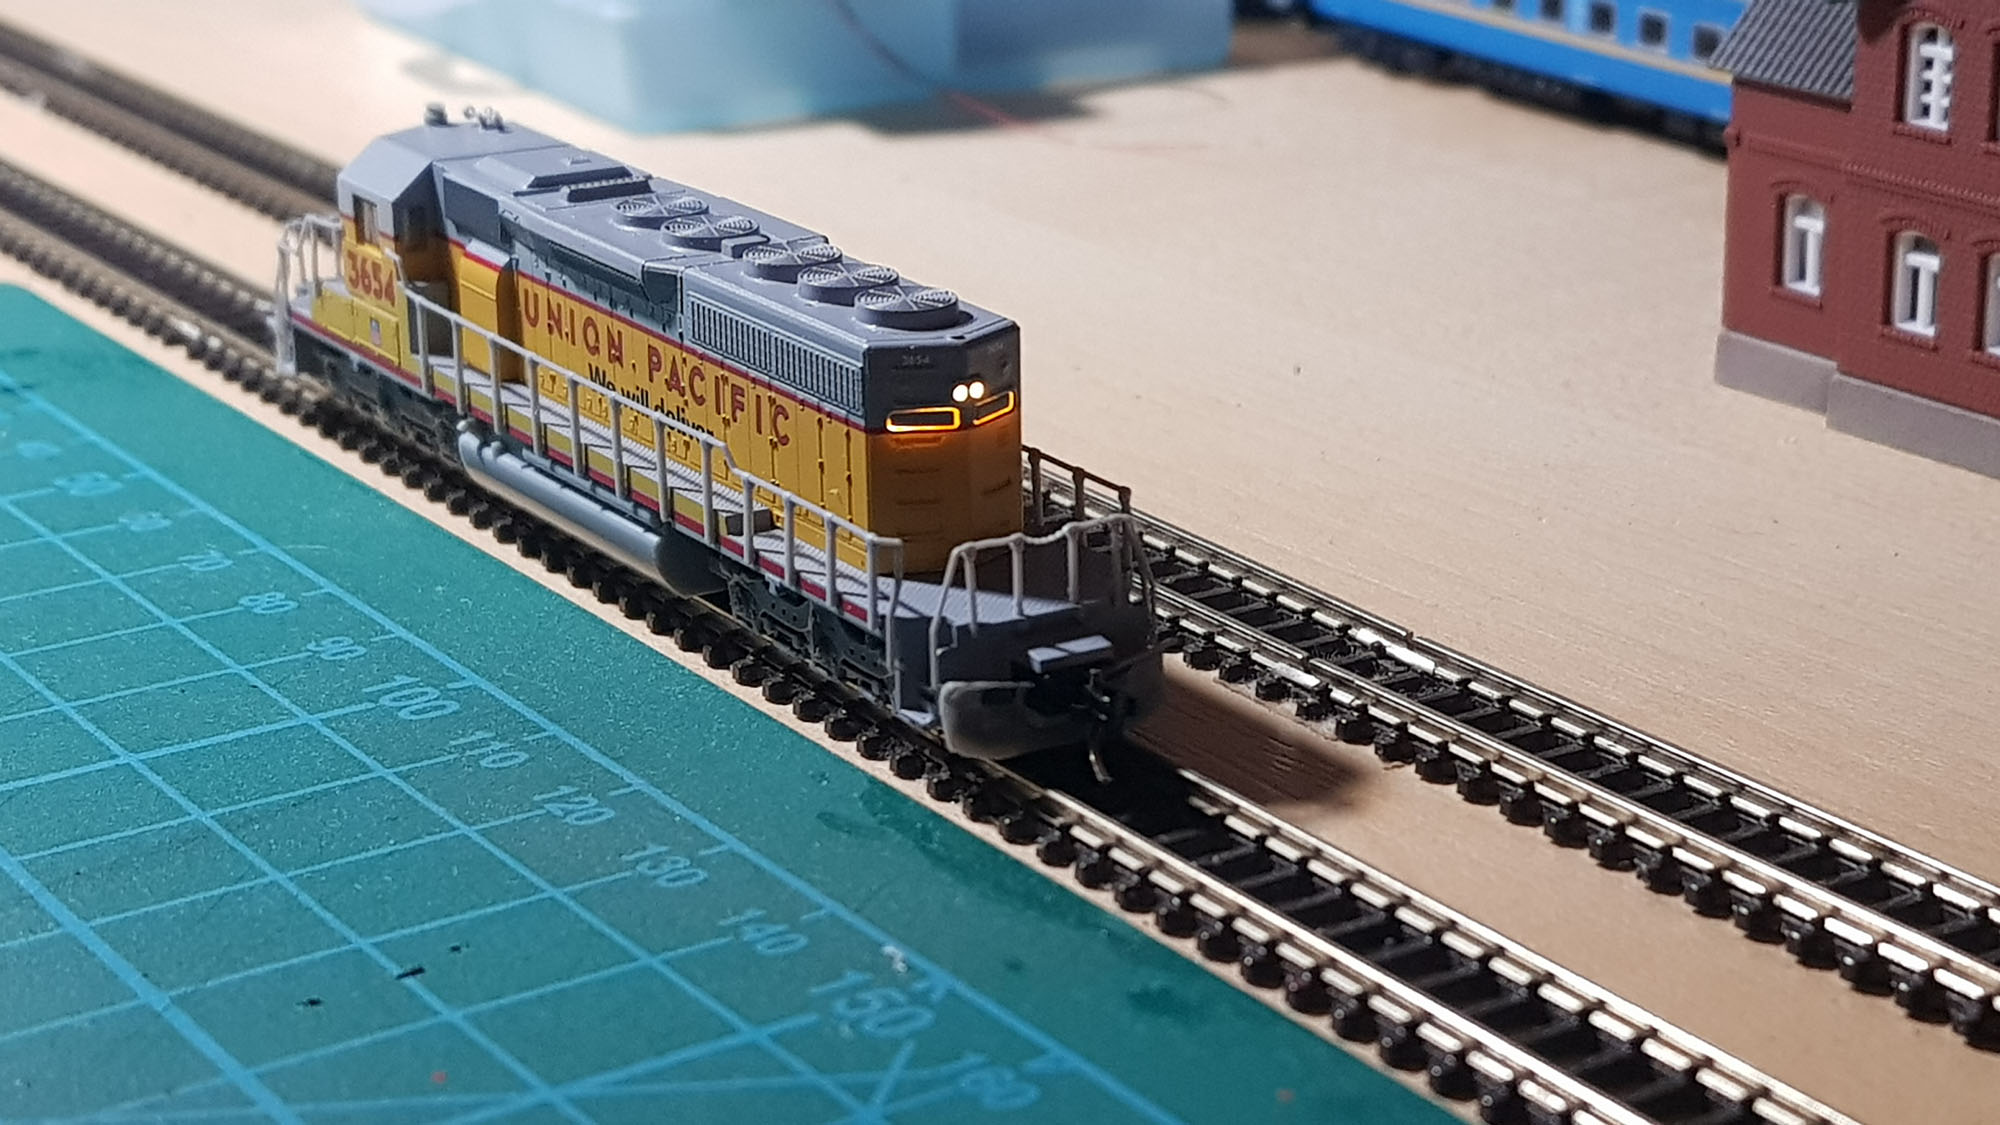 Now about wheels. First, what was the point of making wheels on center axles flangeless? Does it somehow improve running through low radii curves or turnouts? I actually doubt that it really helps. All other 6-axle locos from AZL have all wheels on all axles flanged, and it never cause any problems. Maybe this was done for those who use <195mm curves, but I don’t know anybody who use them. For comparison: MTL SD40-2 (upper) and AZL SD45 (lower): 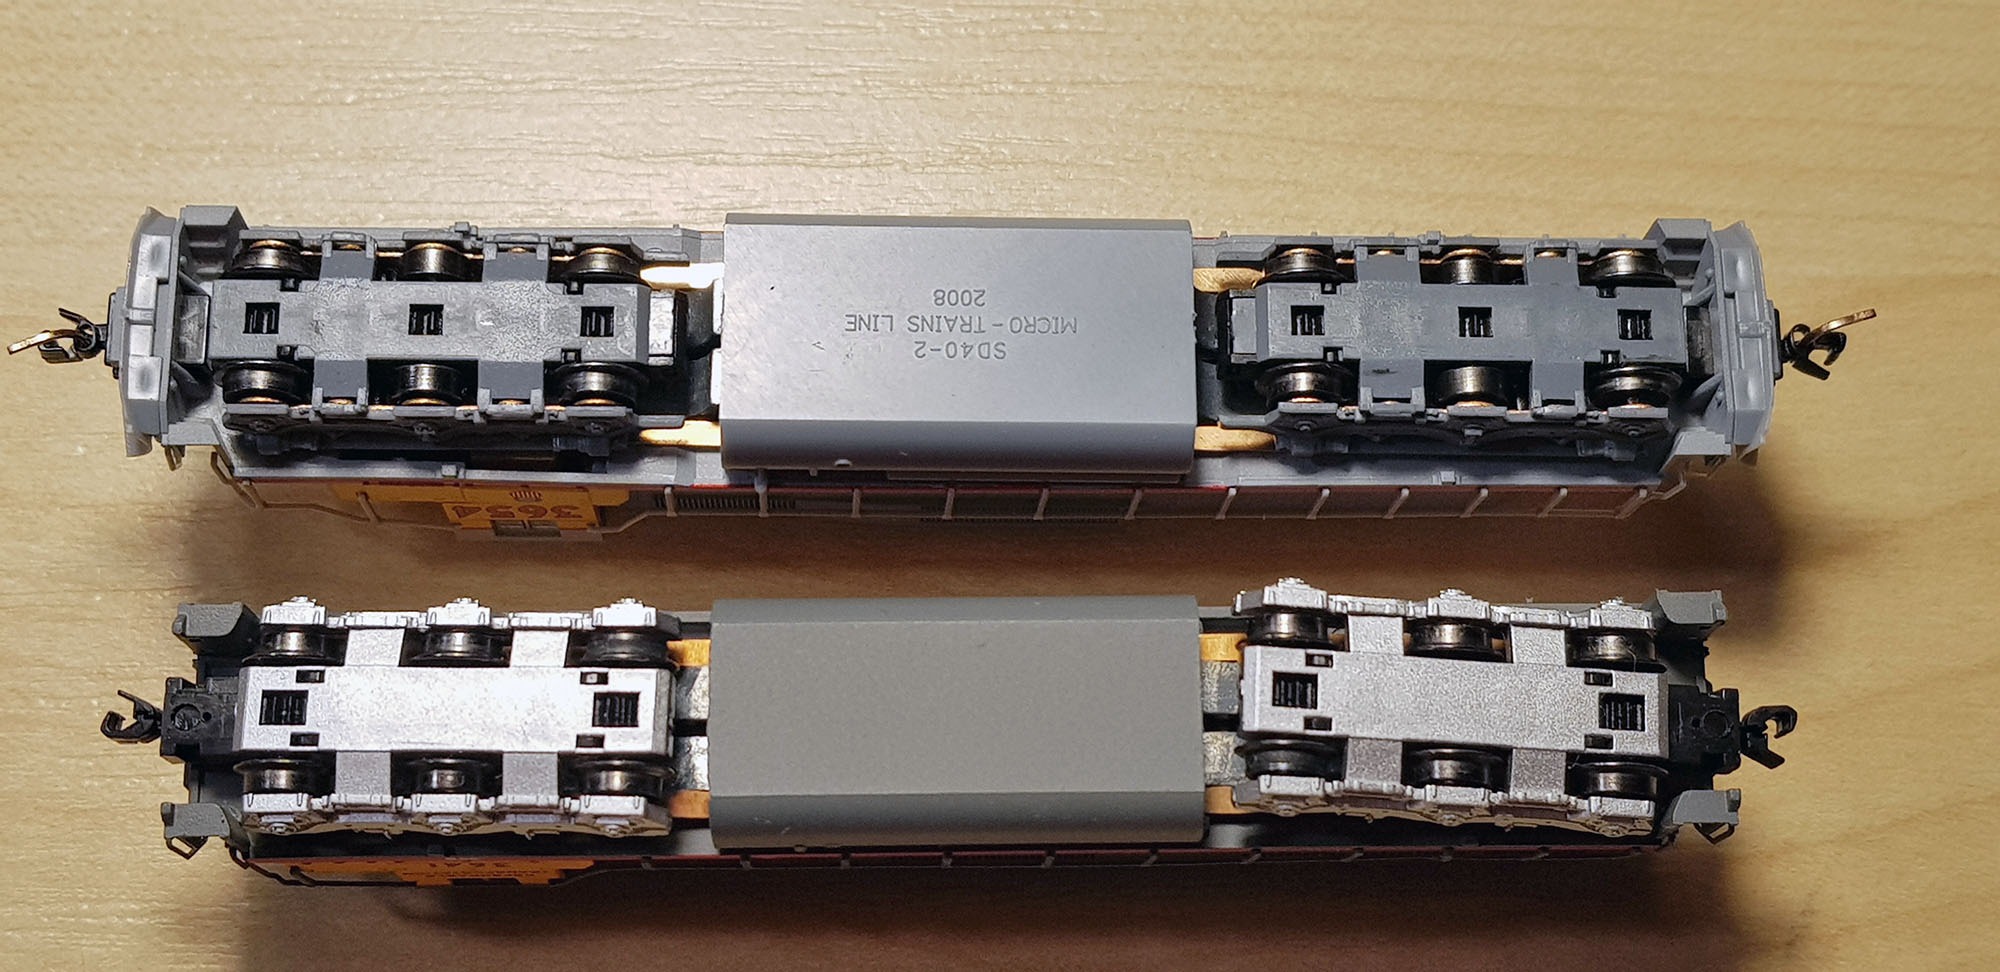 Then I noticed that one of the wheels on one axle is thinner than others. Can anybody explain me this phenomenon? It does not affect running characteristics, but I think that it’s a production flaw. Does anybody noticed the same issue? 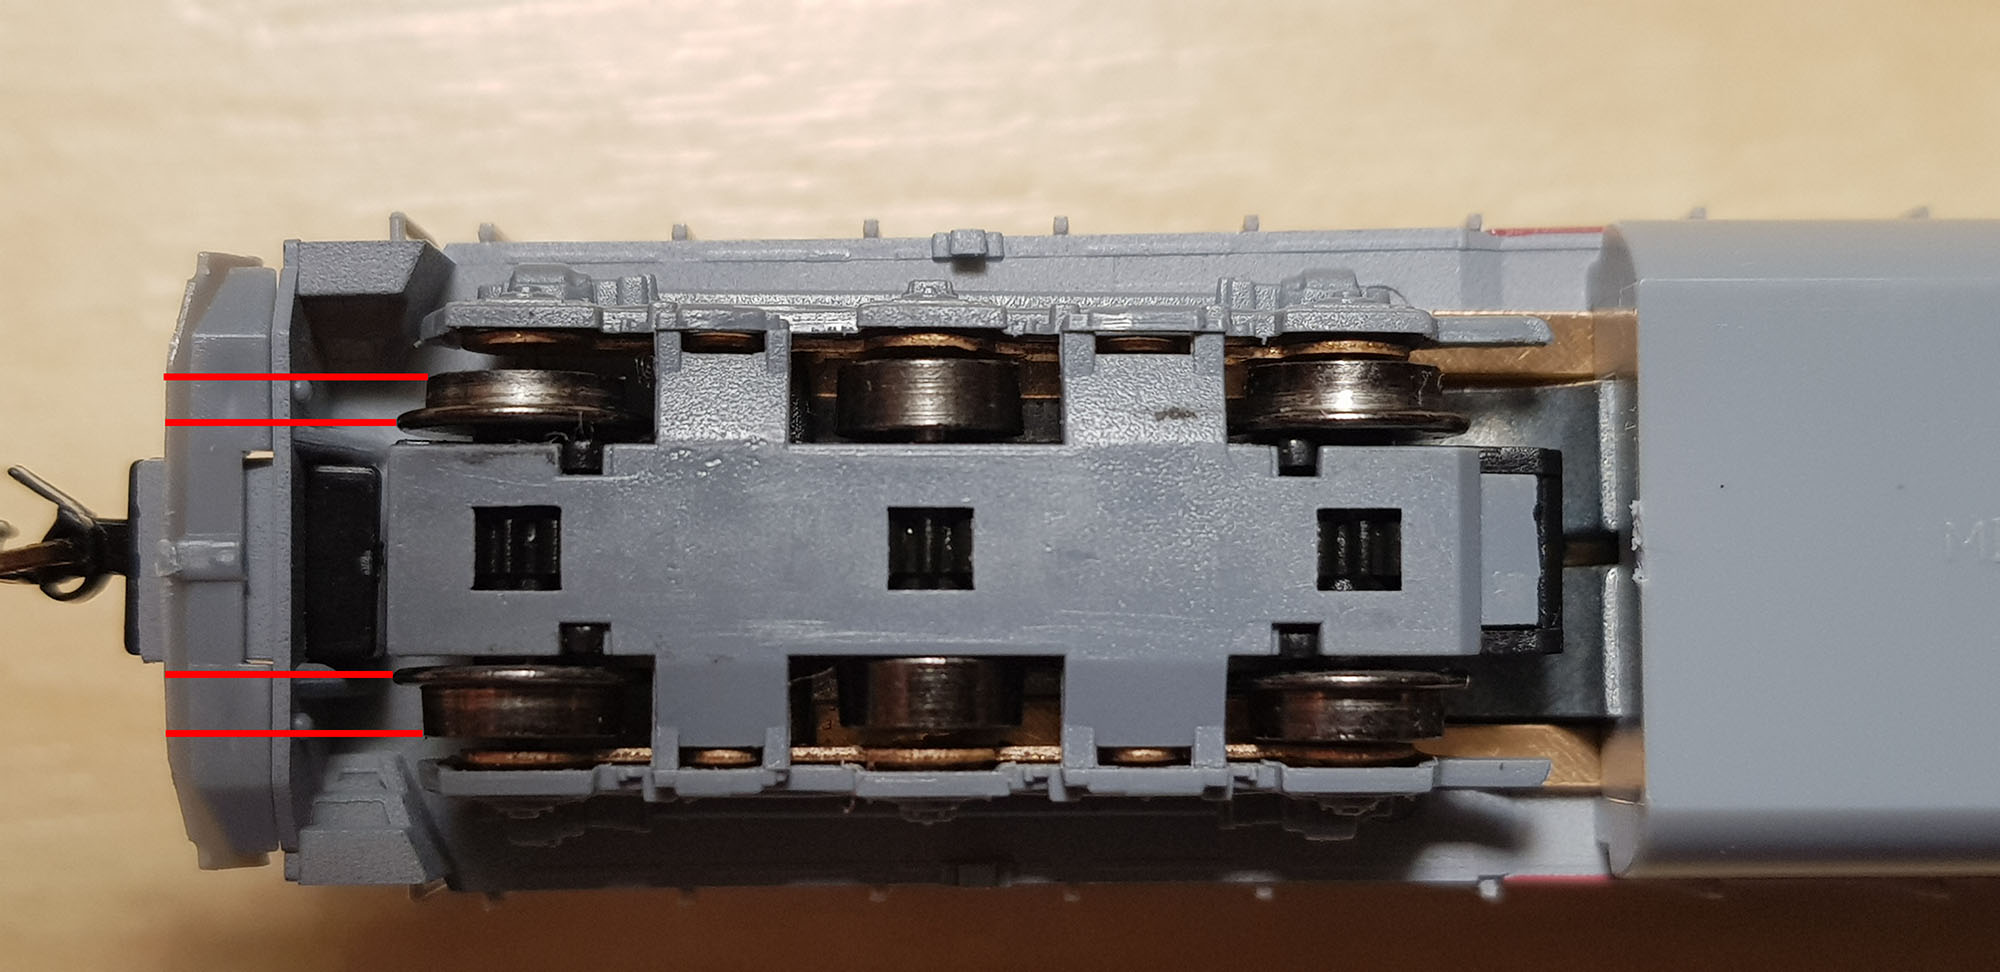 Then, can anybody tell me what is that small round thing on the cabin’s roof? Is it an antenna or light? I looked at tons of real pictures and did not found this device on real SD40-2’s. By the way, it is very easy to lose this small part, because it is not fixed in any way. It is better to secure it with an extremely small drop of glue. It was also a little question for me about why road numbers at the rear end of loco are located not on the number plates, but closer to the top: 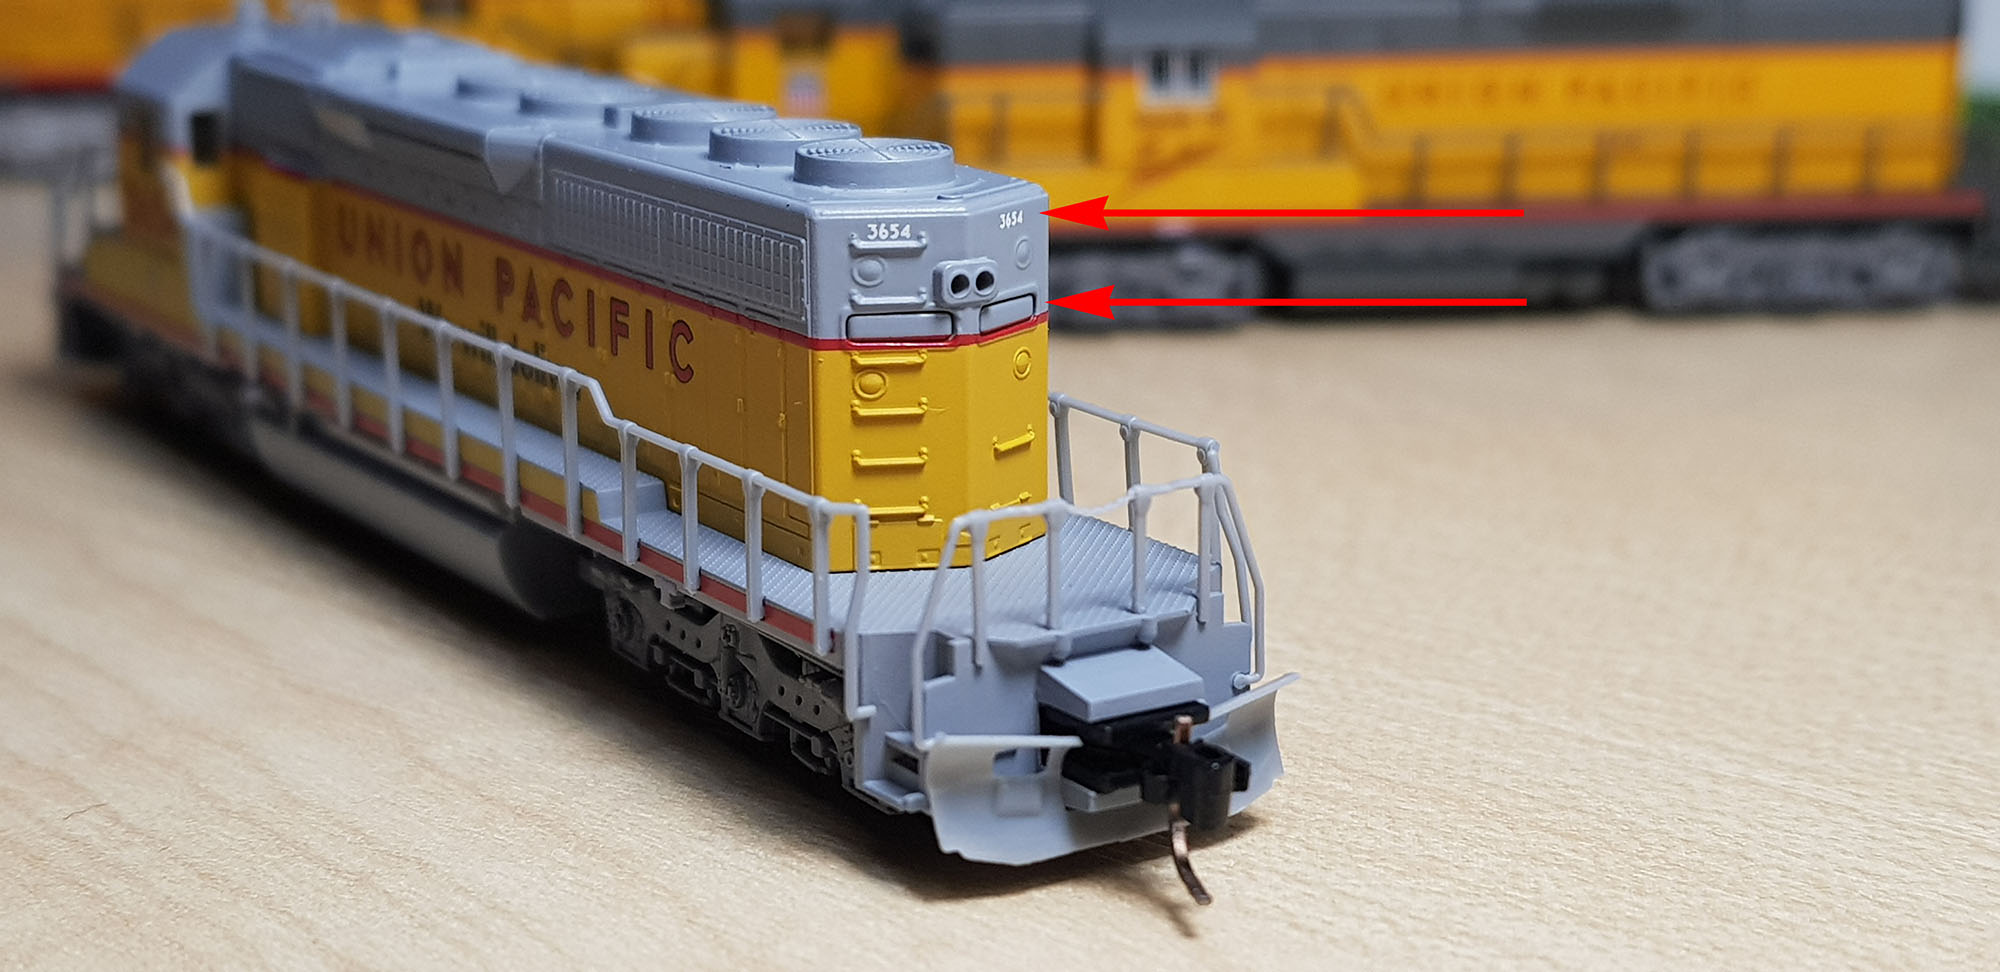 After looking at real photos, I found that actually these numbers can be anywhere: 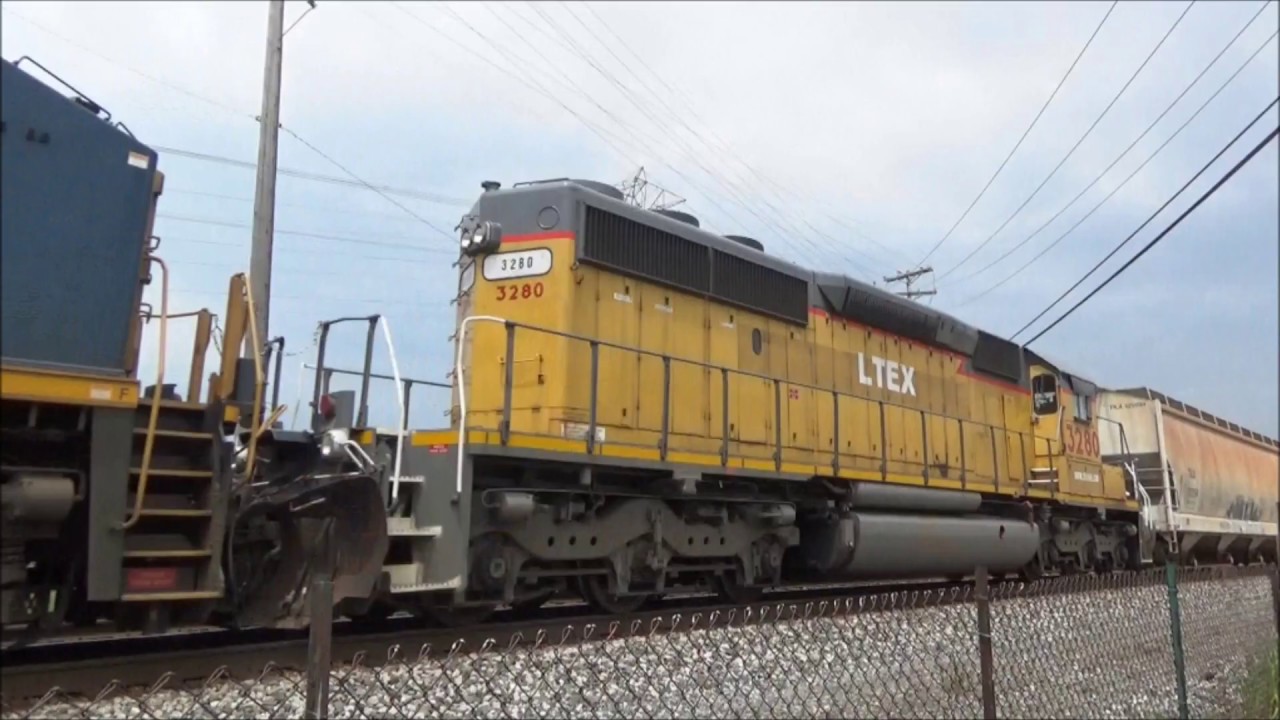 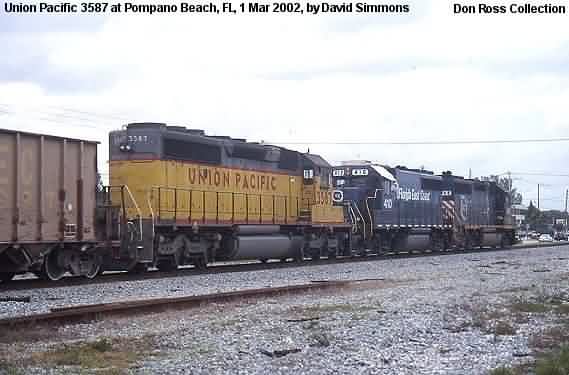 Finally, I would like to say that new MTL SD40-2 is a nice locomotive, and probably most of issues noticed above do not matter for most users, but for the rest of them who are so meticulous like me, it would be much better if all these issues were already addressed at the factory. Thank you all for reading this post, I hope that it will be helpful to somebody. PS. MTL, PLEASE make SD40-2 in Maersk livery! Regards, Alex |
|


 , please use Google Chrome translate):