|
|
Post by domi on Apr 26, 2016 8:29:04 GMT -5
Hi gang. After a few dormant months following painting my GP38 into G&W/FCCM paintscheme, I'm now in the process of swapping its couplers. Basically, I want to remove its AZL truck mounted samples and to put MTL samples on its shell. First, using a MTL coupler gauge I determined I had to glue 1.5mm wide styrene shims on every shell's end in order to have couplers the right height above rails. (Sorry folks, I'm not that used to working with US measurement system, that would be roughly ~1/16" for those who are interrested) Did that yesterday.  Afterwards, I had to cut 2 of my #905 MTL coupler boxes as they are way too long. I cut roughly half way between coupler box's extremity and its center hole in which one inserts coupler box screw.  It's the only way to have a coupler box not too long, that you can screw on shell's styrene shims. However, my problem is that cutting these coupler boxes, looks like the spring that drives the knuckle coupler to its center position gets too lose and is not anymore able to perform its duty. Thus my question: are there folks here who already have done the same? What would your advises be to that prospect? Dom Attachments:
|
|
|
|
Post by domi on Apr 27, 2016 14:45:26 GMT -5
And indeed I've another question today.
Truck's lower plate seems to be hold to upper truck structure with a small plastic pin that protrudes forward from its hole. After hand handling, looks like this pin is hold back in its hole on one of my trucks. Thus the lower plate and coupler assembly are unsteady.
I know that issue was discussed about a while ago.
Any trick here about how I should proceed to set it back to place?
Dom
|
|
ZFRANK
Fireman
 If you can't get it.....build it yourself....
Posts: 91
|
Post by ZFRANK on Apr 27, 2016 15:29:09 GMT -5
Hi Dom, You are proceeding the right way! To fixate the chopped MTL coupler you use the screw that comes with it. The screw will also keep the two coupler box halves together. MTL has a drill and tap set to create the required treaded hole. You can indeed us a styrene shim, but I started to us a brass shim eventually. By using the screw to hold the chopped coupler, you can also replace a coupler when it would be defective.  At the left side you see a little brass pin which aligns with a hole in the loco body when glueing to it. The right side is the threaded hole for the coupler screw. Drill the required holes in a scrap piece of brass. When holes are oke, cut the shim to the required size. This is much easier that making a shim and do the drilling in such a small piece.  This has proven to me a reliable coupler interface.  /Frank |
|
|
|
Post by shamoo737 on Apr 27, 2016 22:59:09 GMT -5
Dom, there's a limit on how much of the coupler you can cut off. You don't want to cut any moving part of the coupler.
|
|
ZFRANK
Fireman
If you can't get it.....build it yourself....
Posts: 91
|
Post by ZFRANK on Apr 28, 2016 5:32:25 GMT -5
Dom, there's a limit on how much of the coupler you can cut off. You don't want to cut any moving part of the coupler. see next picture:  /Frank |
|
|
|
Post by charlie on Apr 28, 2016 15:27:57 GMT -5
Hi, good (or not...) to see a way to exchange these horrible and simply NOT WORKING AZL couplers!! Sorry but they are really not of the quality expected when buying AZL locomotives...and it gets worst with the years (since China...  ). They break, they unlock or get stuck when not expected...a nightmare when you want to mix AZL locos and MTL rolling stocks. It would REALLY be appreciated that AZL think of improving their couplers...all the rest is perfect, why not this simple and important part!!? I just want to keep buying AZL locos but ONLY this makes me wonder for the future.... I'm having the same problems on my GP7s and now F3s. On F3s the thing is that the couplers are built-in on the trucks...no way to exchange...a pity, will need to destroy a complet truck for one coupler! With the old GP7 (Azijn) it was "fine" to solve the problem. On the new one I do not even know how to install the pilots (no instruction from AZL ....only in a $$$ Ztrack issue ...) so I forget about the coupler for now. By the way AZL, still not planning to make extra closed and fixed couplers for F3 AB-BA configuration?
I'll check if this is doable or not on F3, thanks!  Charlie |
|
|
|
Post by domi on Apr 29, 2016 3:07:38 GMT -5
Hi guys, thanks for your input. Anyway, no argument against AZL couplers in my case. I'm simply needing to use a Kadee style coupler as I'm switching oriented. MTL is the obvious solution. Frank, what does show the picture you posted above ? Is the device looking like a small brass cylinder in the coupler's aft side an original component of it? I must admit I'm a little bit lost trying to trim those couplers... Dom |
|
ZFRANK
Fireman
If you can't get it.....build it yourself....
Posts: 91
|
Post by ZFRANK on Apr 29, 2016 5:44:03 GMT -5
Hi Dom, Next illustration from www.zscale.org should help. The 'small brass cylinder' is the spring inside the coupler box. 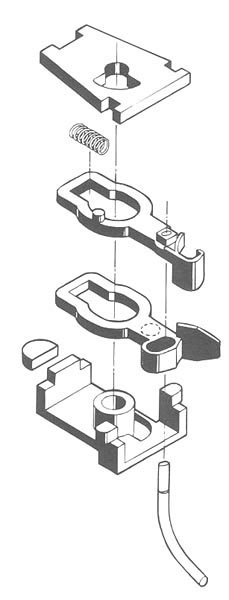 |
|
|
|
Post by zdave on Apr 29, 2016 10:58:39 GMT -5
I just have a small layout and run with maybe 8 cars or so, so AZL couplers haven't been a big issue with me. I actually like their simplicity and they work fairly well for me with the cars, especially for having no moving parts. I found the best way for me to uncouple for such a small scale is to carefully use a dental pick. I insert the dental pick between the couplers and twist the pick a little, usually holding the cars in place with my fingers. With a little practice and care, it works fairly well for me. Good eyes help, too.  |
|
|
|
Post by shamoo737 on Apr 30, 2016 14:41:23 GMT -5
Hi, good (or not...) to see a way to exchange these horrible and simply NOT WORKING AZL couplers!! Sorry but they are really not of the quality expected when buying AZL locomotives...and it gets worst with the years (since China... ). They break, they unlock or get stuck when not expected...a nightmare when you want to mix AZL locos and MTL rolling stocks. It would REALLY be appreciated that AZL think of improving their couplers...all the rest is perfect, why not this simple and important part!!? I just want to keep buying AZL locos but ONLY this makes me wonder for the future.... I'm having the same problems on my GP7s and now F3s. On F3s the thing is that the couplers are built-in on the trucks...no way to exchange...a pity, will need to destroy a complet truck for one coupler! With the old GP7 (Azijn) it was "fine" to solve the problem. On the new one I do not even know how to install the pilots (no instruction from AZL ....only in a $$$ Ztrack issue ...) so I forget about the coupler for now. By the way AZL, still not planning to make extra closed and fixed couplers for F3 AB-BA configuration?
I'll check if this is doable or not on F3, thanks! CharlieI run into problems with the couplers too. I open up the couplers to see what was the problem. The first thing I noticed was this design is different then the first auto latch. The second version of auto latch has a whiskers. The problem is the hole used to connect to a pin is too small, and once installed wont close up completely. It will cause cars to uncouple in straights and curves. |
|
|
|
Post by domi on May 1, 2016 11:12:41 GMT -5
Thank you guys.
-Zdave, I guess your way to operate is the simplest one.
*But I'm sticking to MTL's Magnematic as I definitly want hand off operation.
*Furthermore the visual aspect of pilotless / truck mounted coupler locomotives is definitly repellent to me.
-ZFrank, many thanks for your schematic above. It leads me to the conclusion one can't mostly trim these MTL couplers without messing their spring.
BTW I came myself to that conclusion this afternoon. I still had to trim mine furthermore in order to fit them to place, until their springs flew away. Afterwards I just had to throw their remains in the trash basket.
While messing this pair of couplers, I did the same with one of my locomotive's trucks. Indeed I used a nail cutter to remove their coupler arm. Not a matter, however, while working on 2nd truck I almost had the first one doing half a full rotation (180°) around its vertical axis... I'm far from home until tuesday morning and I can't test the unit yet but I'm fairly sure I wasted its center gearing, the one that is in contact with the motor shaft's brass worm.
However, wasting this truck was not totally unuseful because it made me realize that truck's center beam opposite to coupler's arm is way shorter than on coupler's arm side, even after cutting it.
So, what I'm going to do in the future for this locomotive and its sisters:
-First I've just purchased a spare truck on AZL's website to replace the one I messed.
-I will cut its coupler arm prior to installing it on the unit.
-I will remove every truck on existing units, then I'll cut remove their coupler arms.
-I will reinstall every truck 180° from its normal position.
-I will put every locomotive's chassis back into its shell, then I'll screw an untrimmed MTL coupler box on every end of the unit's shell.
(Then I'll set pilots in place, with a matching square hole in order to accommodate coupler boxes. I didn't decide yet how I'm going to do, I guess they will be made with a a very thin styrene sheet).
The only drawback beeing that I'll have to remove at least one coupler when I need to work on the unit's chassis (for example to put a DCC decoder).
I wouldn't have imagined the process of swapping couplers was that tricky, however I definitly refuse any accomodation on my locomotives that isn't prototypical and that prevents me from performing hand free operation.
Dom
|
|
|
|
Post by zdave on May 1, 2016 16:15:58 GMT -5
Thank you guys. -Zdave, I guess your way to operate is the simplest one. * Dom Yes, with my small layout, that was one of my requirements, keep everything simple. My layout is only about 2'x 4', with no grades, and, as I mentioned, my freight runs only average 8 cars or so and most of the time I'm running switching ops. With the small layout size, I can easily reach everything and do a simple uncoupling op. But even with a small layout, I've got a double track mainline, a nice little railyard, and three rail-served industries. Man, I love Z scale and REALLY appreciate what AZL is doing to make it all possible and much better than what it was, with a variety of just really cool, fairly reliable, and smooth running cars and locos. That said, I certainly appreciate what others are pointing out for improving the couplers and I'm glad AZL is taking note. |
|
|
|
Post by christoff on May 2, 2016 13:40:56 GMT -5
I successfully swapped a truck mount coupler on a gp38 but when doing the other side I snapped the peice on the truck that holds the couplers height. Only thing is it's still not proto
|
|
|
|
Post by domi on May 4, 2016 6:04:39 GMT -5
I successfully swapped a truck mount coupler on a gp38 but when doing the other side I snapped the peice on the truck that holds the couplers height. Only thing is it's still not proto So I understand you kept truck's arm and put a MTL coupler on, instead of original AZL one? Dom |
|
|
|
Post by domi on Jul 22, 2016 10:20:25 GMT -5
Guys I'm still in a stalled position with this issue. Whichever I do or think, #905 coupler boxes are way too long for a correct position setting on my GP38s (and it's even worse for the GP30 I'm planning to modify the same way). So I'm going to try a pair of MTL #901/902 short shank couplers. But I understand MTL/Kadee couplers have to be hinged in order to horizontally swing for coupling/uncoupling. Yet #901/902 don't seem to be able to. That means I won't be able to perform any switching if I glue them in place.
Do you guys have any trick in mind in order to overcome this issue?
Dom
|
|


 This has proven to me a reliable coupler interface.

 ). They break, they unlock or get stuck when not expected...a nightmare when you want to mix AZL locos and MTL rolling stocks.
 Charlie
